Build Your Own
XiaoZhi AI Voice Chatbot
with Custom Wake Word
Build a fully featured AI voice assistant on ESP32-S3 — featuring animated OLED face expressions, custom voice wake word detection using the ESP-SR MultiNet model, NTP-synchronized time, OTA firmware updates, Wi-Fi diagnostics via MCP protocol, and remote reboot. No coding required. Flash from browser via ESP Web Tools in minutes. Supports Hindi, Hinglish, English and multilingual voice conversations powered by Qwen and DeepSeek LLMs on the xiaozhi.me platform.
What's New in XiaoZhi AI Pro
This is a complete upgrade over the original. Same core components — ESP32-S3 replaces the standard ESP32 for hardware wake word support — with seven major new capabilities spanning display, audio, and connectivity.
Introduction — What is XiaoZhi AI?
Open-source voice-first AI on ESP32 — fully customizableXiaoZhi AI (小智) is an open-source ESP32 firmware project (MIT license, 26K+ GitHub stars) that transforms an ESP32-S3 microcontroller into a cloud-connected AI voice assistant. It handles real-time streaming speech recognition (ASR), natural language processing via large language models like Qwen and DeepSeek, and expressive text-to-speech (TTS) output — all tied to the xiaozhi.me platform. Unlike closed ecosystems like Amazon Alexa or Google Assistant, XiaoZhi gives you complete control over your AI's personality, language, custom wake word, and behavior through an intuitive web console.
Version 2 of this tutorial upgrades to the ESP32-S3, which unlocks hardware-accelerated wake word detection through the Espressif ESP-SR MultiNet model — the standard ESP32 cannot run this. It also adds an animated OLED face with blinking and talking expressions, NTP time synchronization, voice-controlled face/text toggle, and two new MCP (Model Context Protocol) tools — live Wi-Fi diagnostics and remote device reboot. This is now a genuinely powerful, production-ready open source voice AI you can build at home for under $20 in components. Perfect for students, makers, hobbyists, and IoT enthusiasts.
What's New in XiaoZhi AI Pro
Major upgrades over the previous ESP32 versionVersion 2 is not just a component swap — it brings eight significant new features that make the experience far more natural and capable. Here's what changed and why it matters.
Animated Face on OLED
The 128×64 display now shows expressive animated eye sprites — blinking, talking, and idle states — giving your AI a physical personality.
Custom Wake Word
No more button press to activate. Just say your chosen wake phrase — like "Hey Maxon" — and the AI wakes instantly. Powered by ESP32-S3's MultiNet model.
NTP Time Sync
The device synchronizes with internet time servers automatically. The AI now knows the correct time and date for every interaction.
Wi-Fi Diagnostics MCP
Ask "What's my Wi-Fi strength?" or "What's my IP address?" and the AI responds with live network details fetched via a custom MCP tool.
Remote Reboot MCP
Say "Reboot yourself" and the AI confirms, then triggers a firmware restart. No need to physically reach the device for a reset.
Face Toggle by Voice
Say "Hide your face and show text" or "Show your face only" — the display mode switches between face-only and text-only layouts on demand.
Voice-Activated LED Control
Say "Turn on the light" or "Set LED to blue" — control an external RGB LED strip or indicator via voice commands through a custom MCP GPIO tool.
OTA Theme Updates
Customize wake word, face animation sprites, and display themes wirelessly. Generate assets.bin in the console and flash over Wi-Fi — no USB cable required.
Features & Voice Commands
Everything your XiaoZhi AI V2 can doYour XiaoZhi AI Pro responds to natural voice commands for nearly every function. Here is everything it can do, organized by capability.
Custom Wake Word
Say your phrase to activate — no button needed. Powered by MultiNet on ESP32-S3.
Animated Face
Expressive OLED animations: idle, talking, blinking states that respond to conversation.
Face Toggle by Voice
"Show only your face" / "Switch to text mode" — toggled with a voice command.
NTP Time Sync
"What time is it?" returns the accurate current time, synced automatically over internet.
Wi-Fi Diagnostics
"What's my IP?" / "How strong is my Wi-Fi?" — answered via the network MCP tool.
Remote Reboot
"Reboot yourself" — the AI confirms then triggers a firmware restart via MCP tool.
Volume Control
"Set volume to 50%" or "Louder" — adjusts output level mid-conversation.
Live Weather
"What's the weather in Mumbai?" fetches current conditions via MCP weather service.
Music Playback
"Play Hindi music" or "Play some jazz" — triggers MCP music service.
Conversation Memory
Short-term memory keeps context across turns for natural multi-step conversations.
Multilingual
Hindi, English, Hinglish — adapts to whichever language you speak in.
OTA Updates
Update firmware and wake word settings wirelessly via the XiaoZhi console. No USB needed.
Full Build Walkthrough — Watch & Build Along
Complete video guide from breadboard to talking AI assistantFollow along with the complete video build guide. The video covers every step: component overview, breadboard wiring, firmware flashing via browser, Wi-Fi configuration, account setup, device pairing, AI personality configuration, and custom wake word setup on the ESP32-S3.
Required Components
Everything needed — all available online or locallyThe component list is nearly identical to the previous version. The only change is swapping the standard ESP32 dev board for an ESP32-S3 dev board, which provides the hardware acceleration needed for on-device wake word detection.
| Component | Description | Qty | Note |
|---|---|---|---|
| ESP32-S3 Dev Board | 38-pin variant · Main controller | 1 | V2 UPGRADE |
| INMP441 I2S Mic | Digital I2S microphone · Captures voice | 1 | — |
| MAX98357A Amplifier | I2S DAC + amplifier module | 1 | — |
| 2W 4Ω Speaker | Small speaker for audio output | 1 | — |
| 0.96" OLED (128×64) | I2C display · Face animations + text | 1 | NEW USE |
| Breadboard 400-tie | For prototyping the circuit | 2 | — |
| Jumper Wires M-M | Male-to-male · Assorted colors | ~25 | — |
| USB-C Data Cable | Must support data, not charge-only | 1 | — |
| Computer (Chrome/Edge) | Required for Web Serial flashing | 1 | — |
Get the Ready-Made XiaoZhi AI S3 Kit
Don't want to source and assemble parts? We sell a fully assembled, 100% tested Version 2 kit with ESP32-S3. Power it on and start talking immediately.
Order on WhatsApp — 8535889926Circuit Diagram
ESP32-S3 + INMP441 + MAX98357A + OLED + SpeakerThe circuit is virtually identical to the previous version — the only hardware difference is using ESP32-S3 instead of the standard ESP32. All four modules connect the same way: I2S microphone, I2S amplifier, I2C OLED, and speaker.
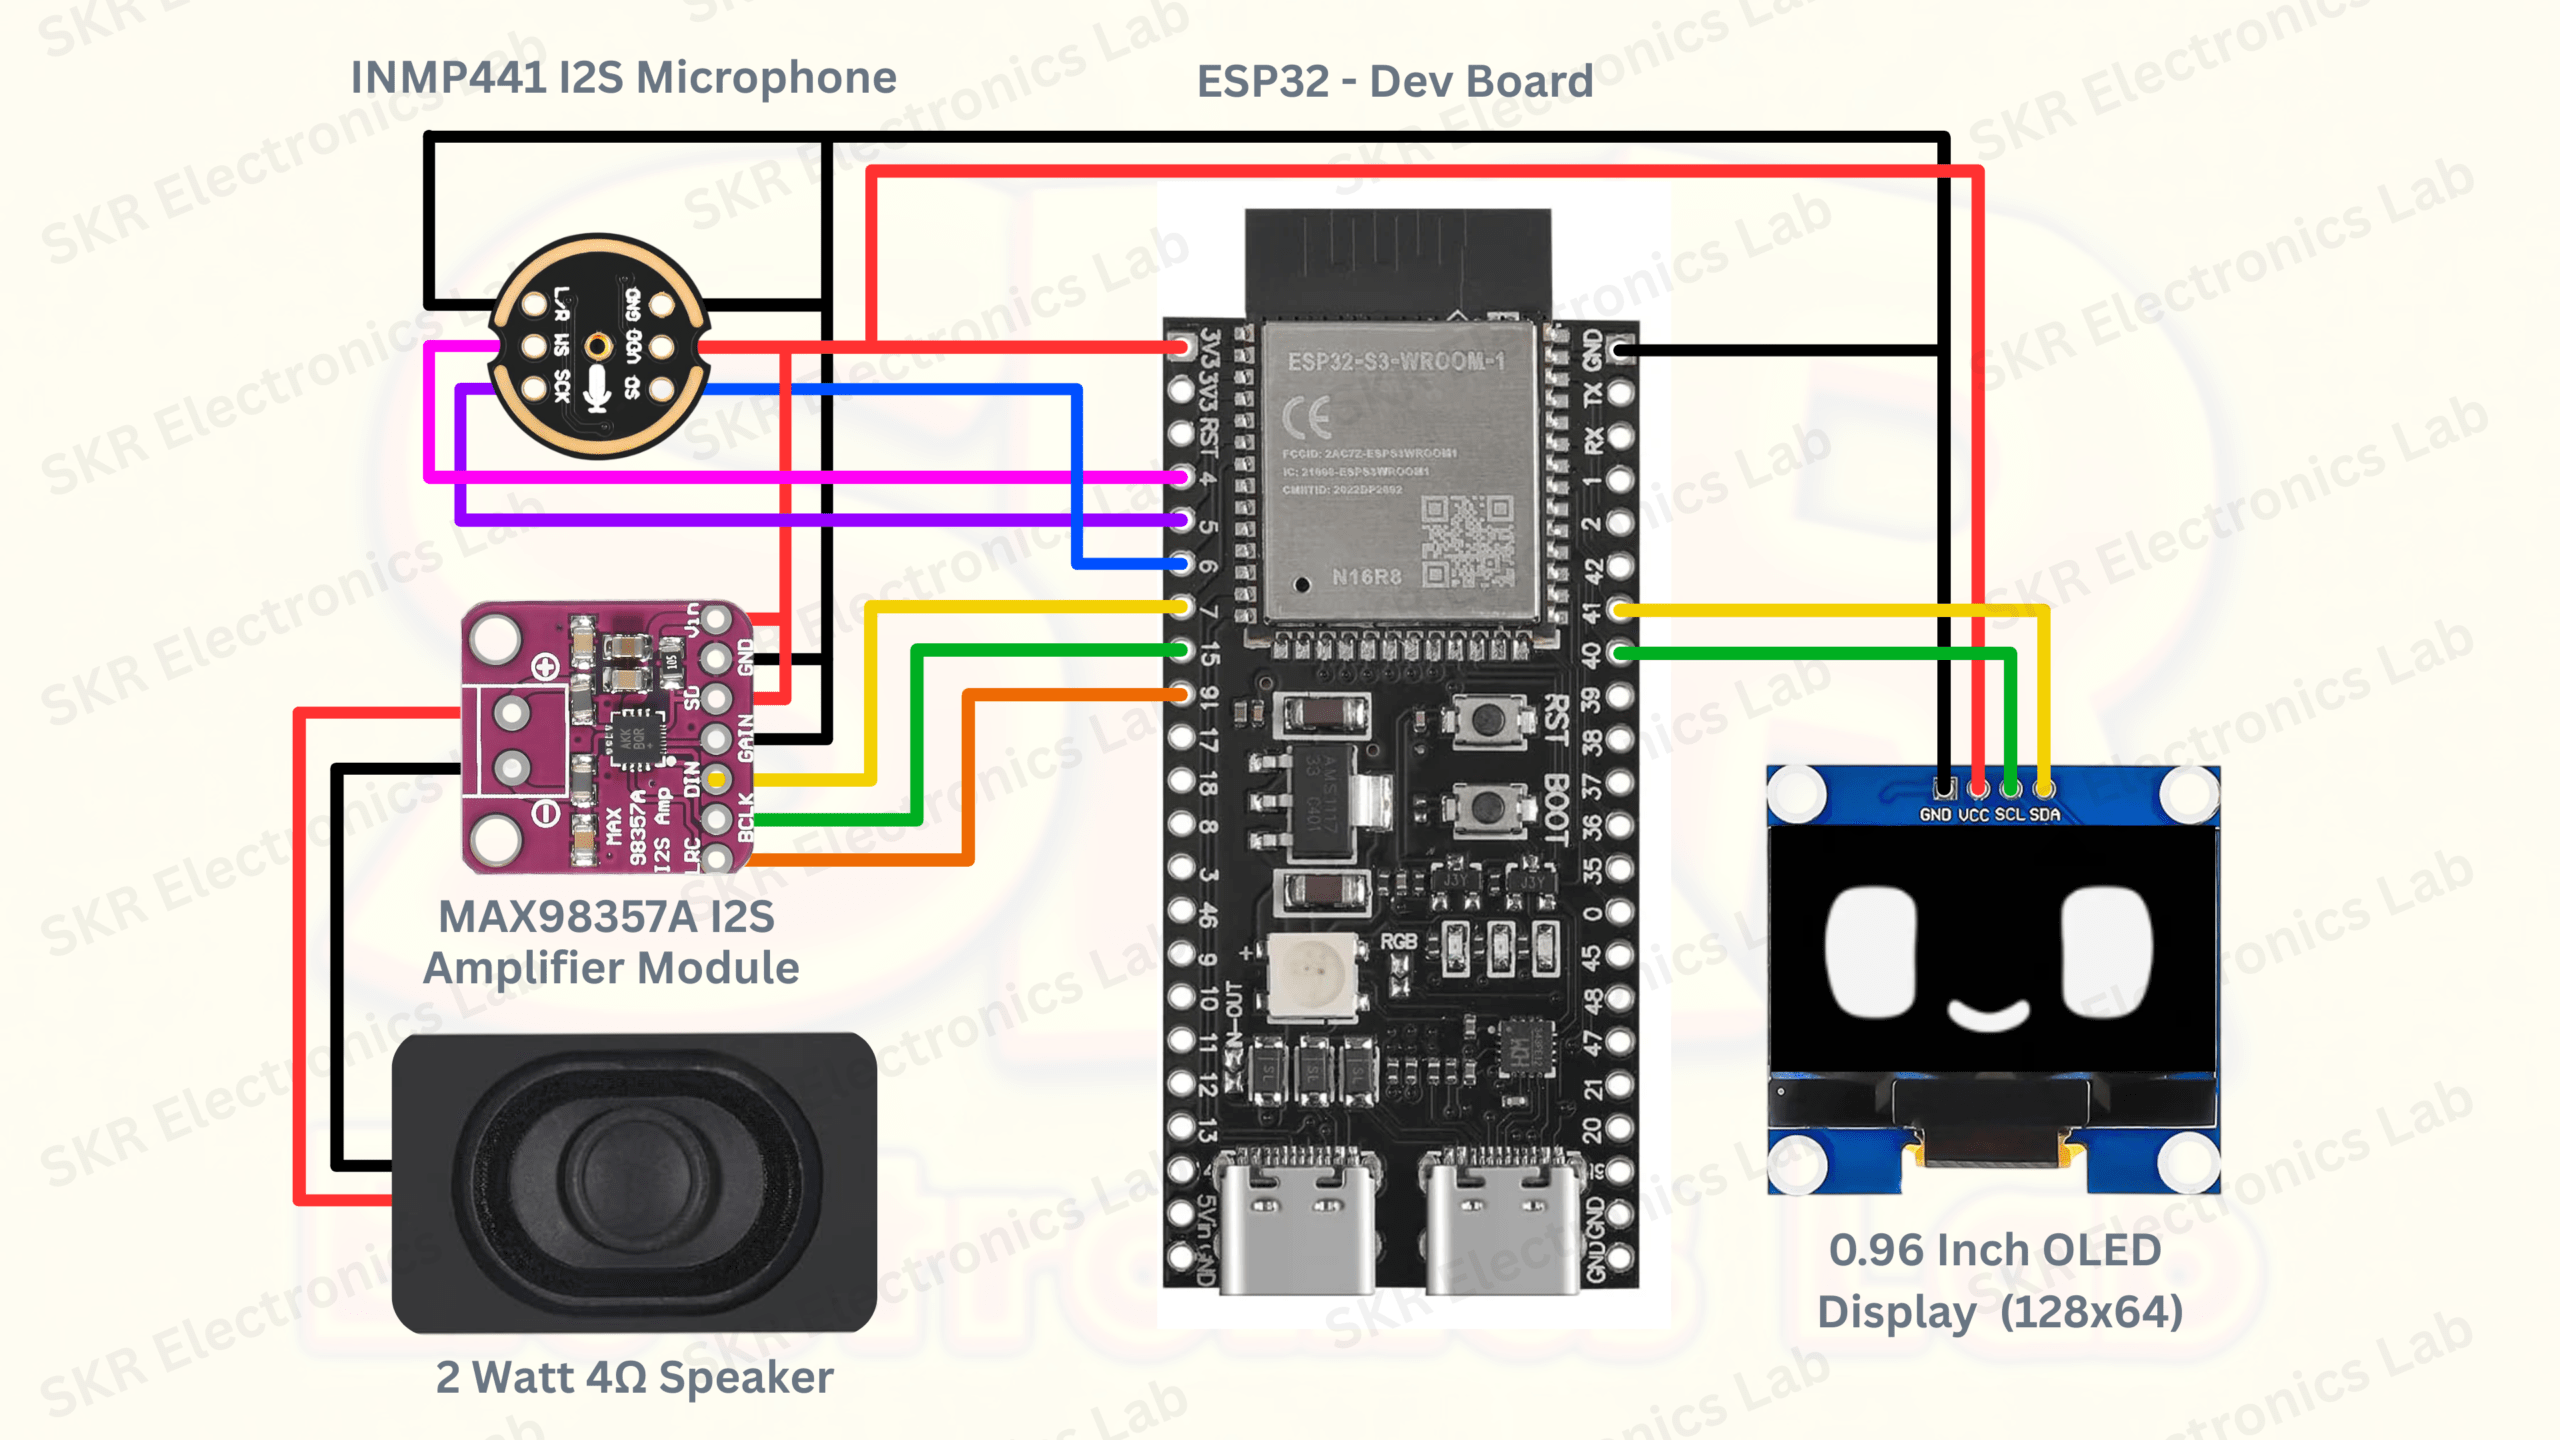
Refer to the diagram above for all pin assignments. The image contains the complete wiring reference for every component.
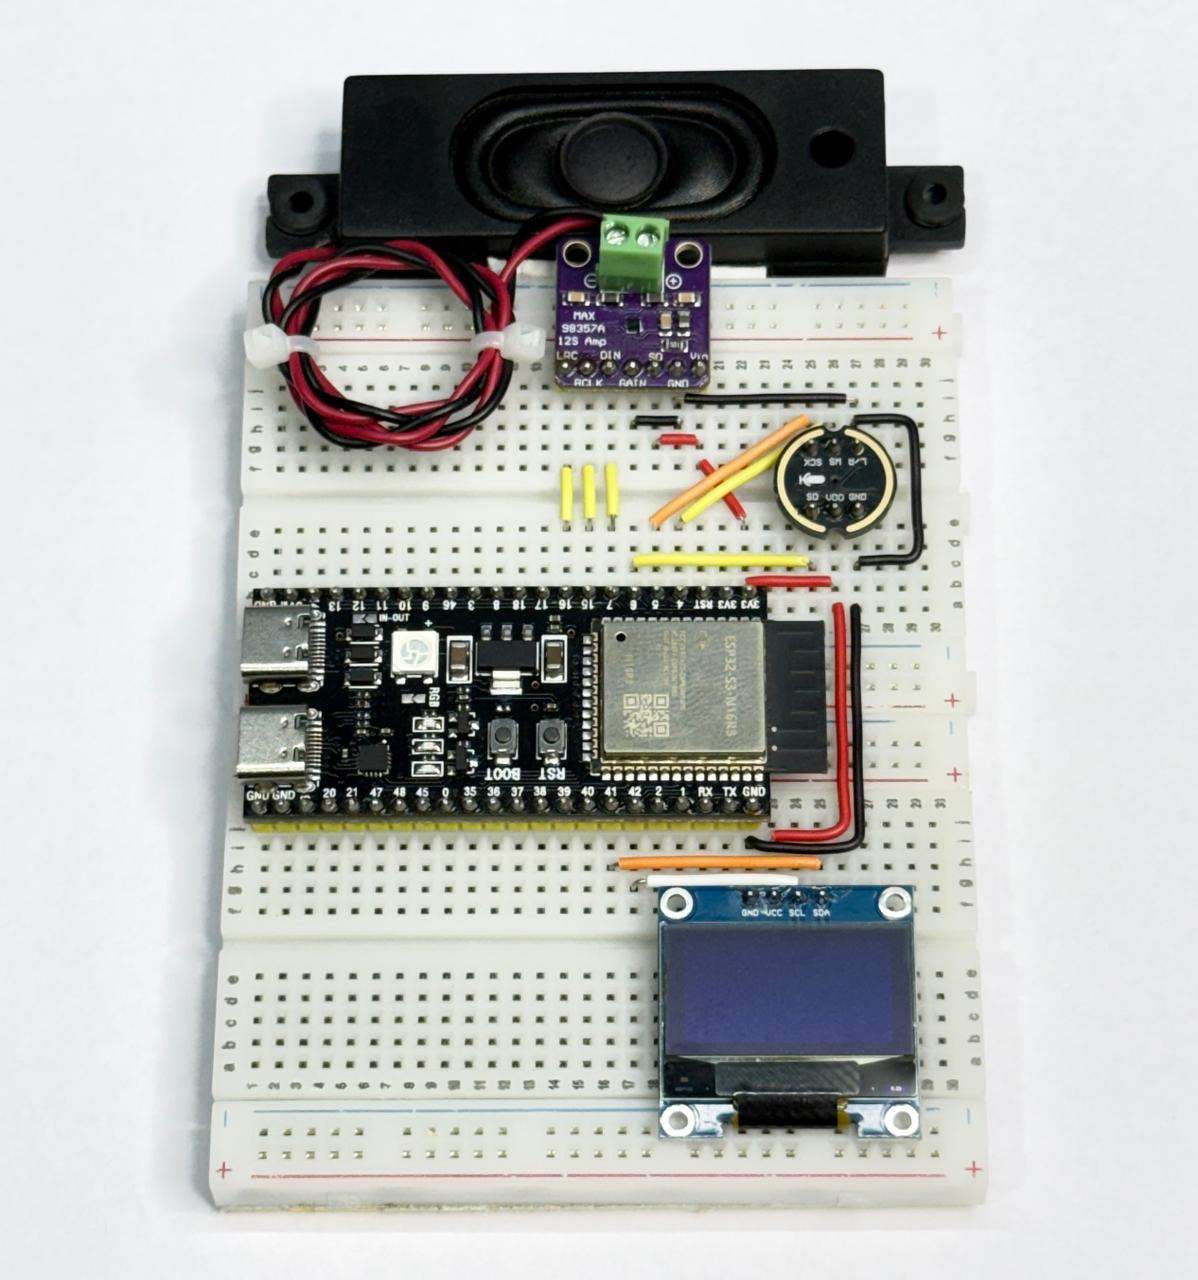
Breadboard Assembly Guide
Step-by-step hardware build — takes about 15–20 minutesRefer to the assembled build photo below. Follow the circuit diagram for all wiring — the image shows the final layout with all modules connected.
Flash the XiaoZhi Firmware
Browser-based · No drivers · No IDE · ~2 minutesThe XiaoZhi firmware is flashed directly from your browser using ESP Web Tools. You need Google Chrome or Microsoft Edge on a desktop or laptop. Mobile browsers will not work.
The port selection dialog opens. Note currently listed ports.
Keep holding BOOT while plugging in. A new COM port will appear.
That is your ESP32-S3 in bootloader mode. Click Connect.
Erasing is strongly recommended for a clean flash.
Progress bar shows flashing status. Once complete, release BOOT and click Done.
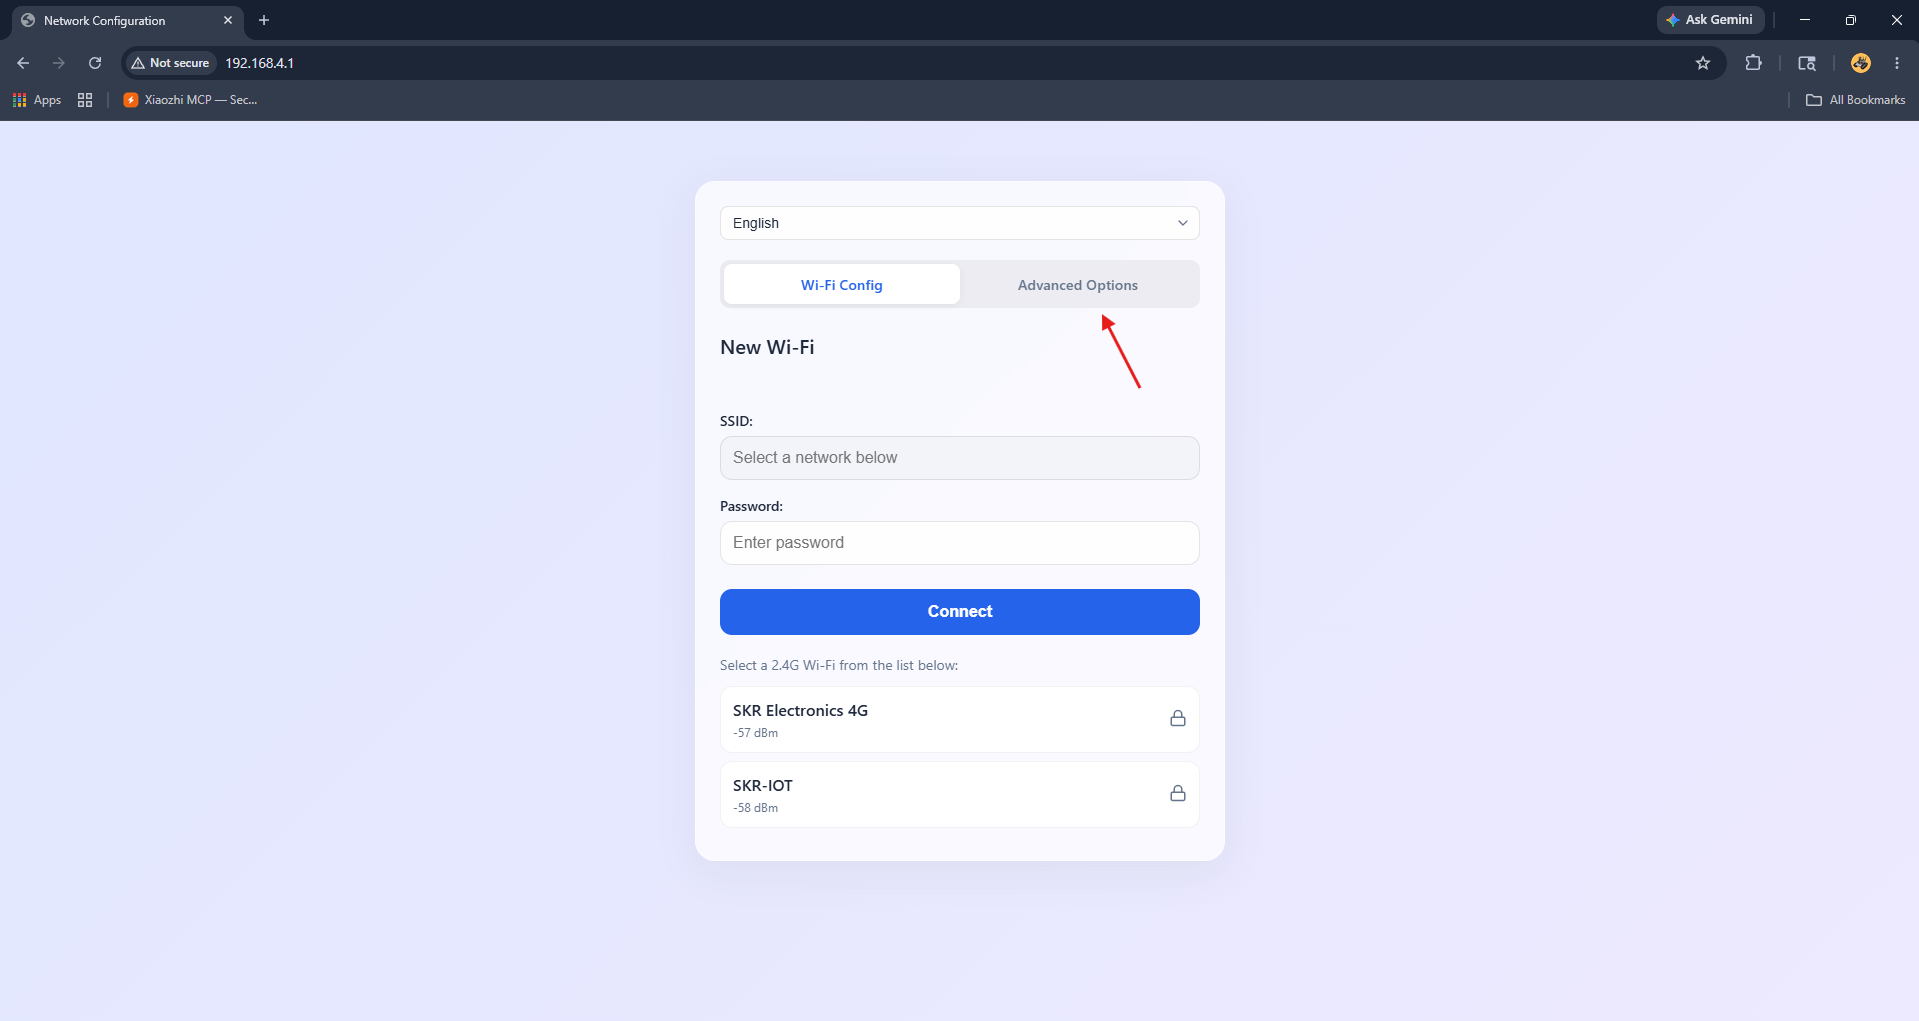
Connect to Your Wi-Fi Network
Via captive portal at 192.168.4.1 · 2.4 GHz networks onlyAfter successful flashing, the ESP32-S3 boots and creates a temporary Wi-Fi hotspot named XiaoZhi-XXXX. Connect to this hotspot from your phone or computer, then follow these steps to configure your home Wi-Fi credentials through the device's built-in web portal.
Open your phone or laptop Wi-Fi settings and connect to the network named XiaoZhi-XXXX. No password is required — this is the ESP32-S3's temporary access point.
Once connected, open a browser and go to 192.168.4.1. The ESP32-S3 configuration portal loads. You will see the main dashboard with device status and available tabs.
Tap the Advanced tab in the top navigation. Find the Timezone dropdown and select your local timezone (e.g. Asia/Kolkata for India). This ensures the device reports accurate time in responses.
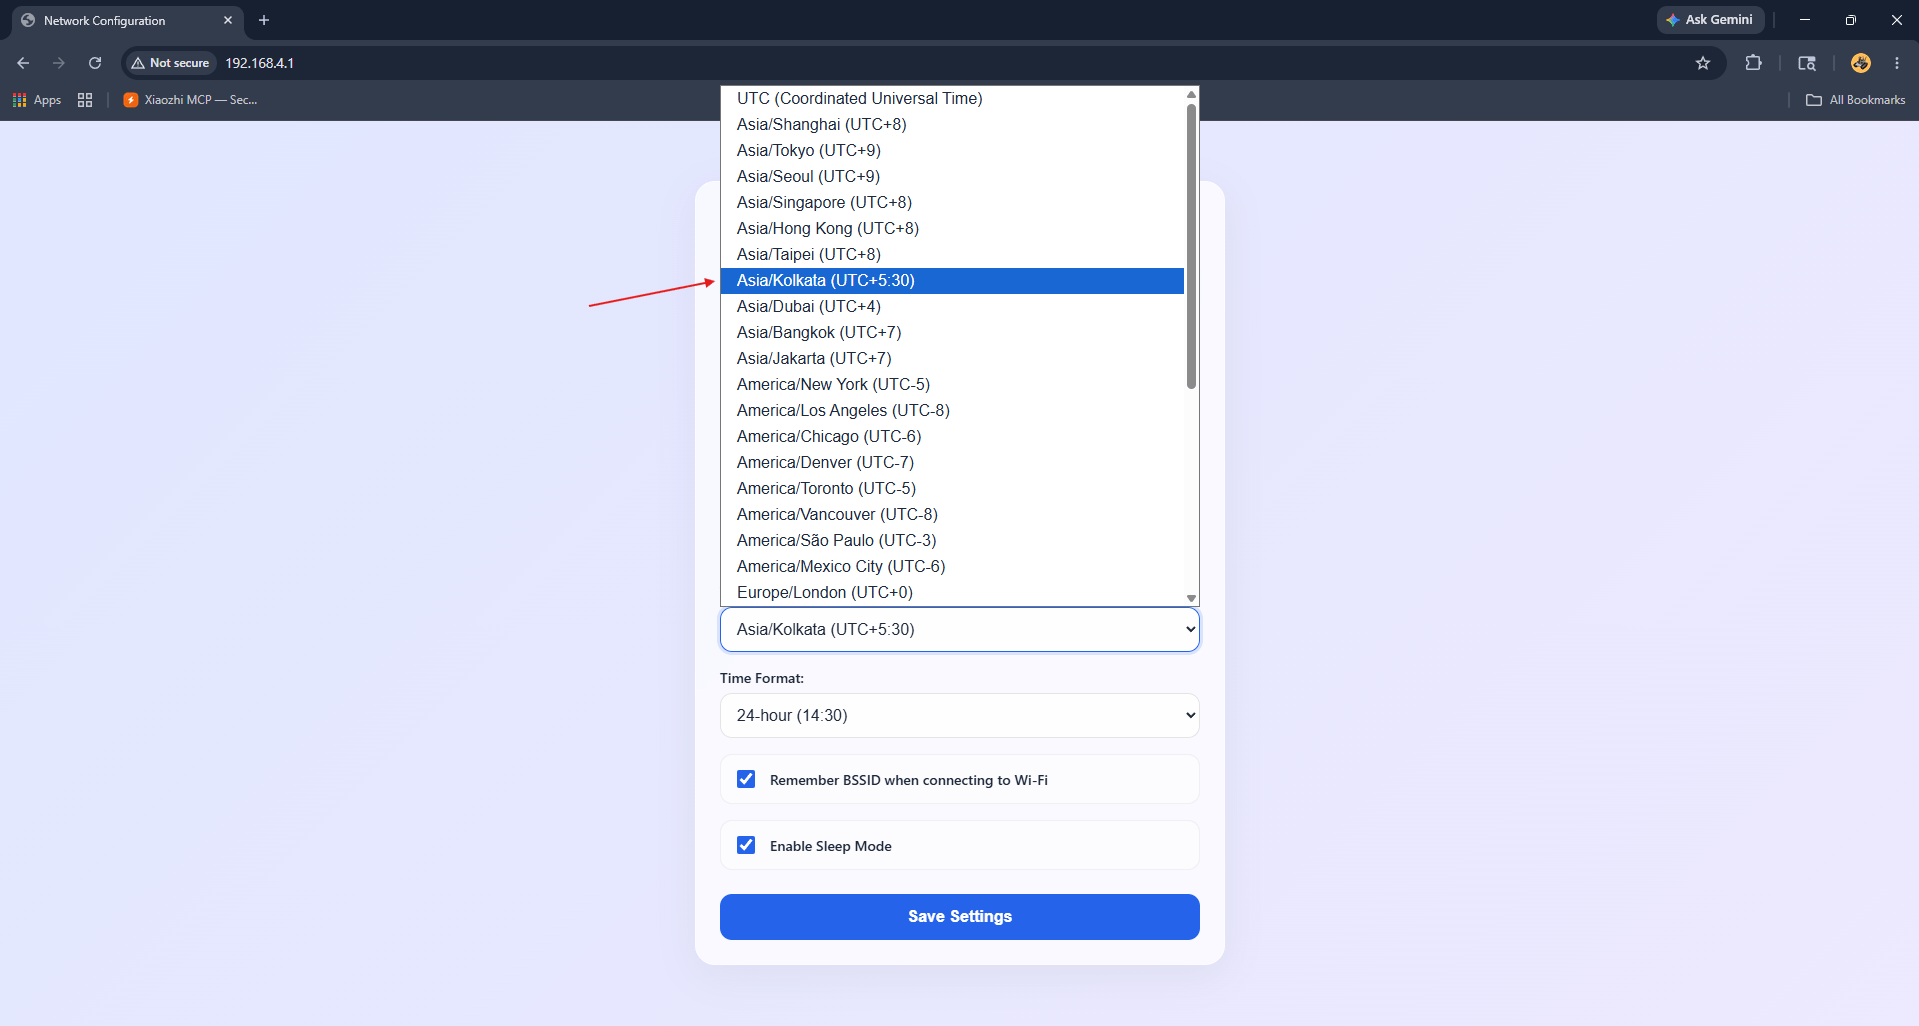
After selecting your timezone, click the Save Configuration button. Once saved, switch to the WiFi Config tab to set up your home network connection.
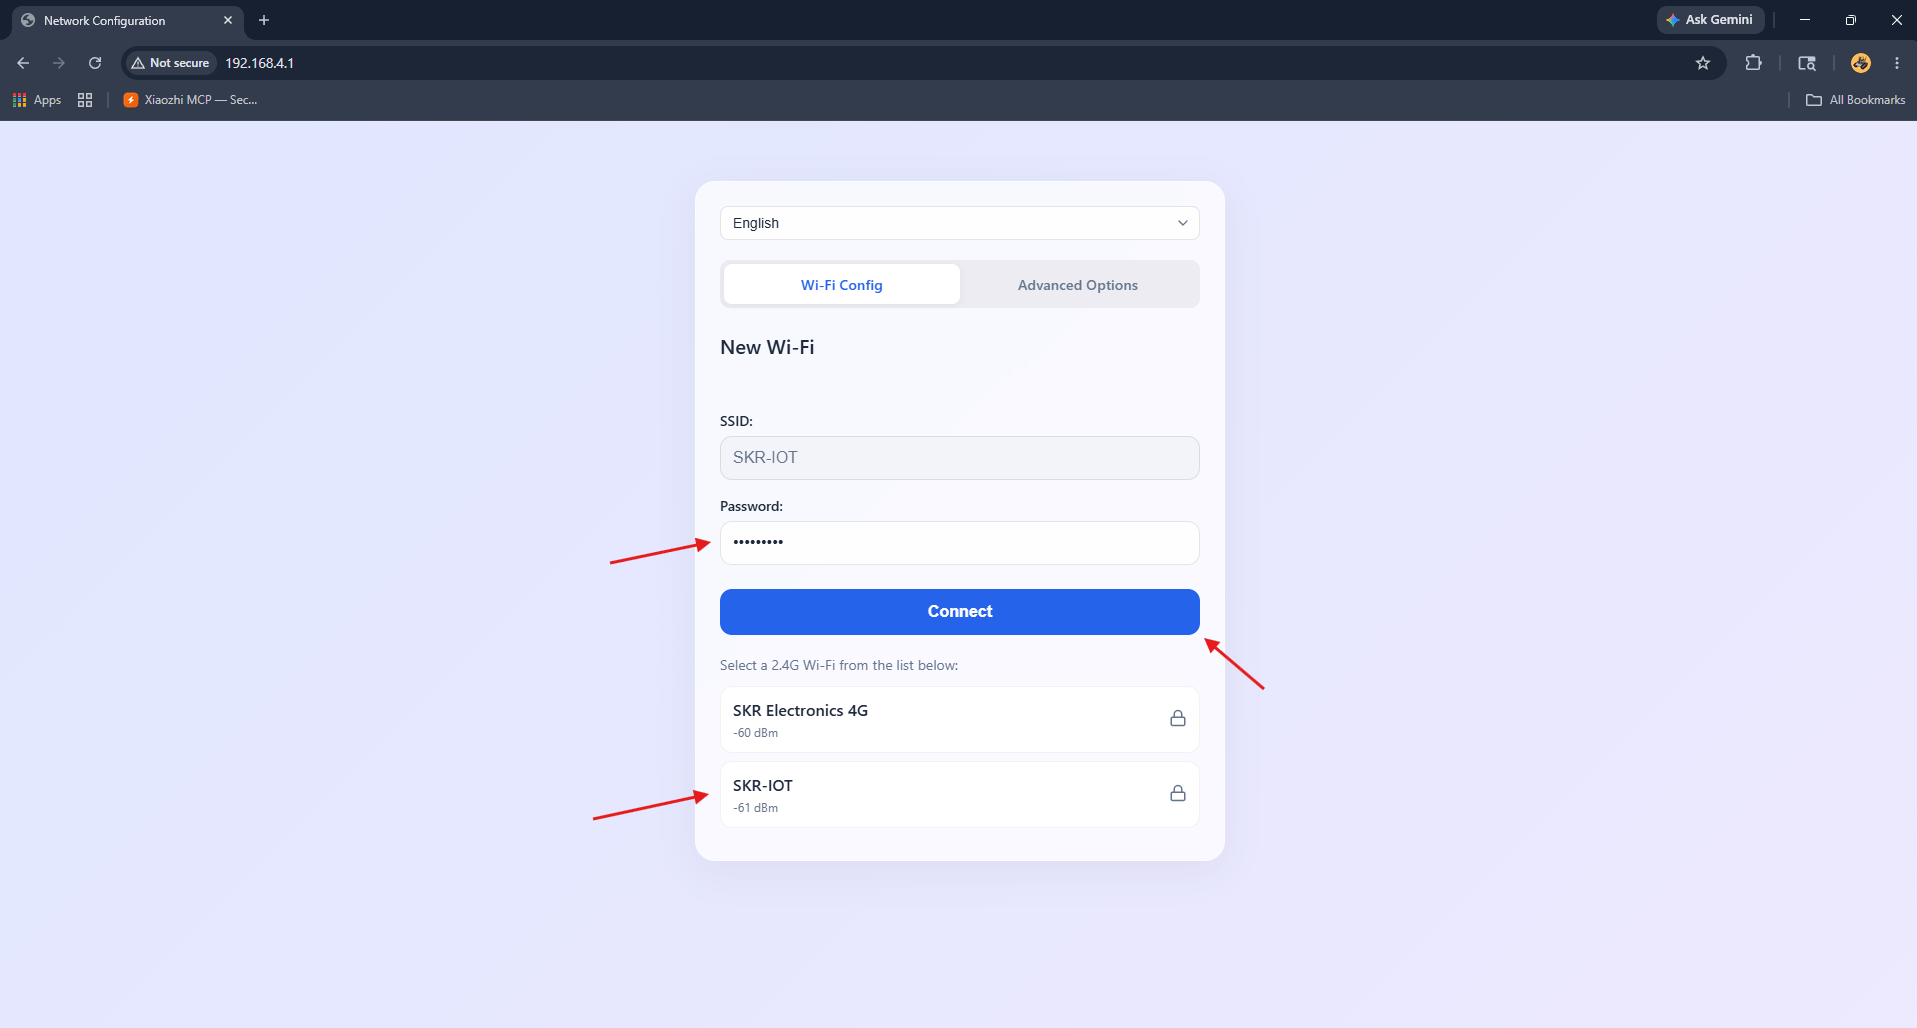
In the WiFi Config tab, click your home Wi-Fi network from the available list (2.4 GHz only). Type your Wi-Fi password in the password field and click the Connect button. The device will attempt to connect.
Once connected successfully, the portal displays a green success message. The ESP32-S3 restarts automatically and joins your home network. The OLED display will show a pairing code — do not disconnect power during this process.

Create Your XiaoZhi Account
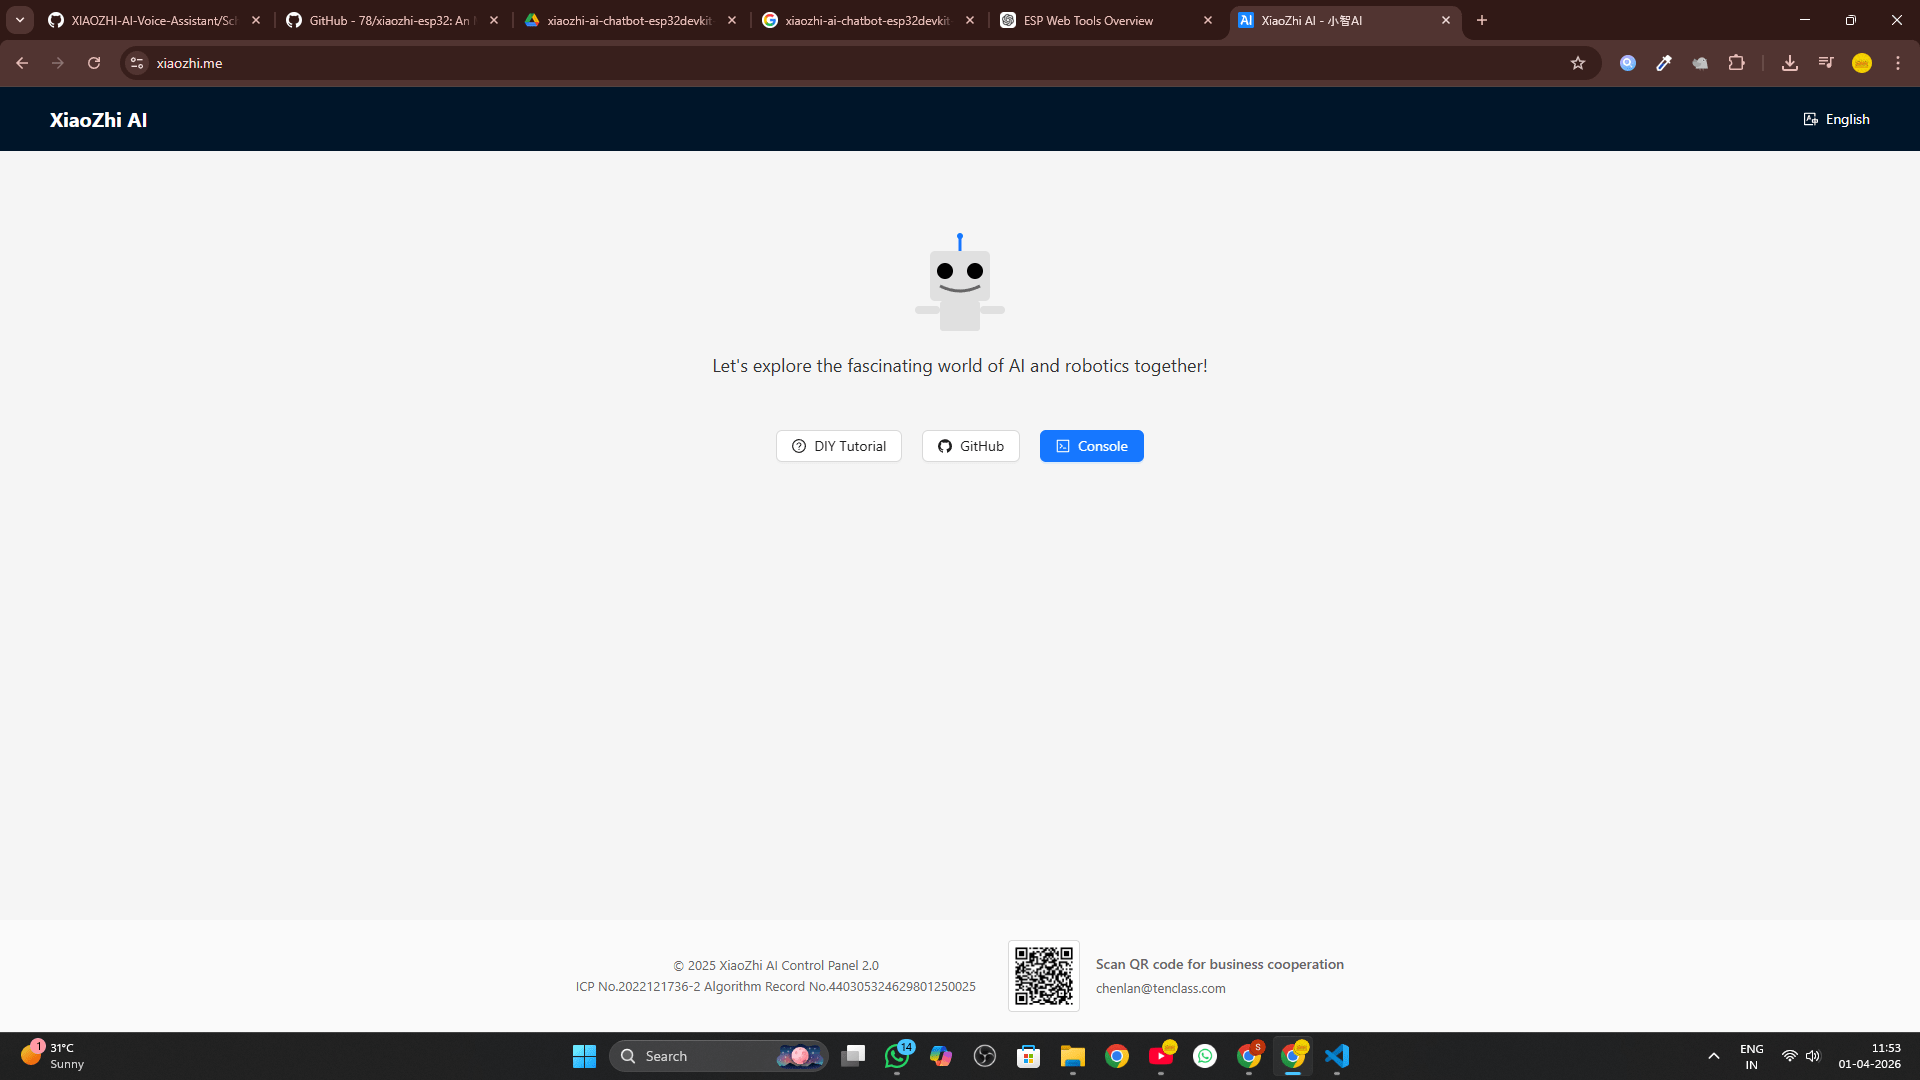
Free account at xiaozhi.me · Google login recommendedBefore you can pair your device, you need a free account on the XiaoZhi AI platform. This is where you manage your agent's personality, language, voice, and advanced settings.
Switch your device back from the XiaoZhi hotspot to your regular network.
Click "Console" in the navigation.
The fastest method. Your account is active immediately.
Pair Your ESP32-S3 Device
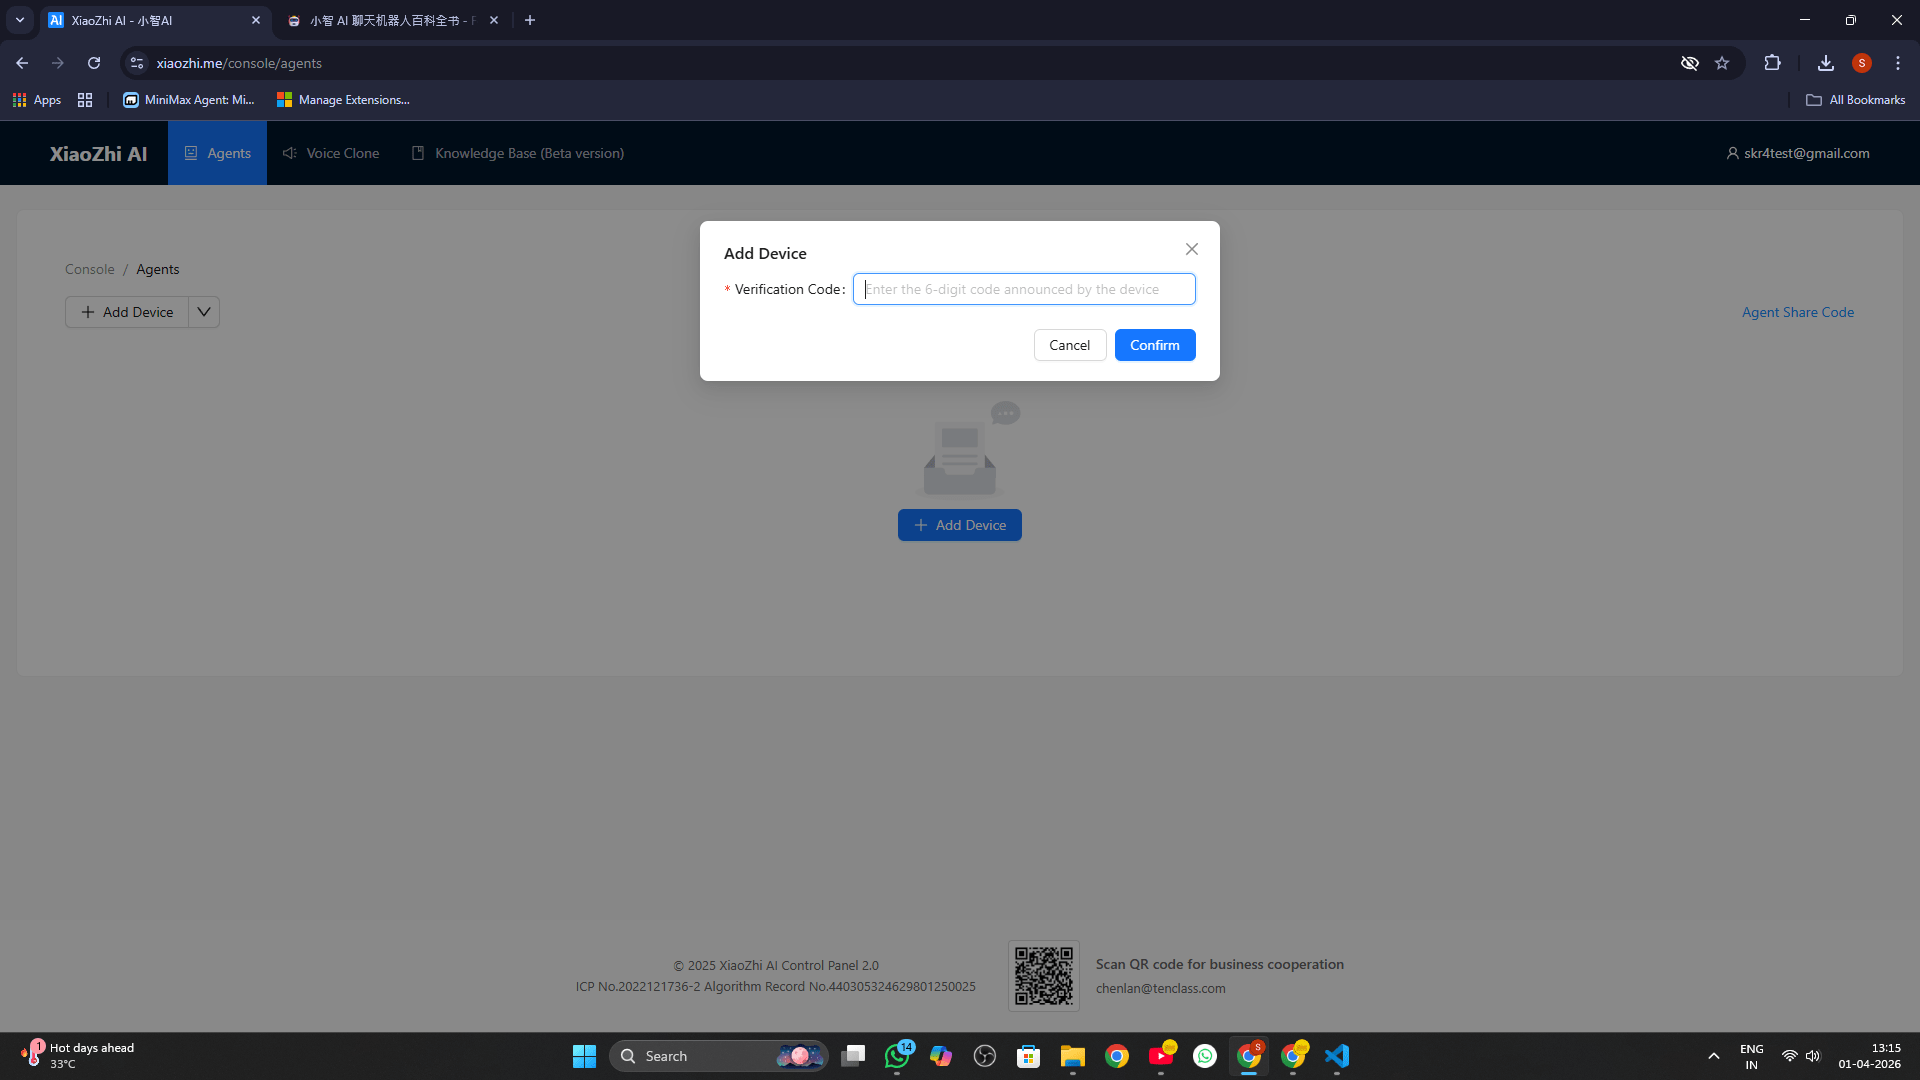
Enter the 6-digit code scrolling on the OLED displayAfter creating your account and signing into the console, you'll see the Agents page. Now link your physical ESP32-S3 to your account using the pairing code displayed on the OLED.
An input dialog appears for the pairing code.
The code refreshes every 30 seconds. Type it quickly.
The device links to your account.
Select the Open Source (Free) tier to continue.
Configure Your AI Agent's Personality
Set name, voice, language, system prompt, MCP toolsClick "Configure Role" on your device card. This opens the full configuration panel where you design your AI's identity — its name, voice, language, and behavioral instructions.
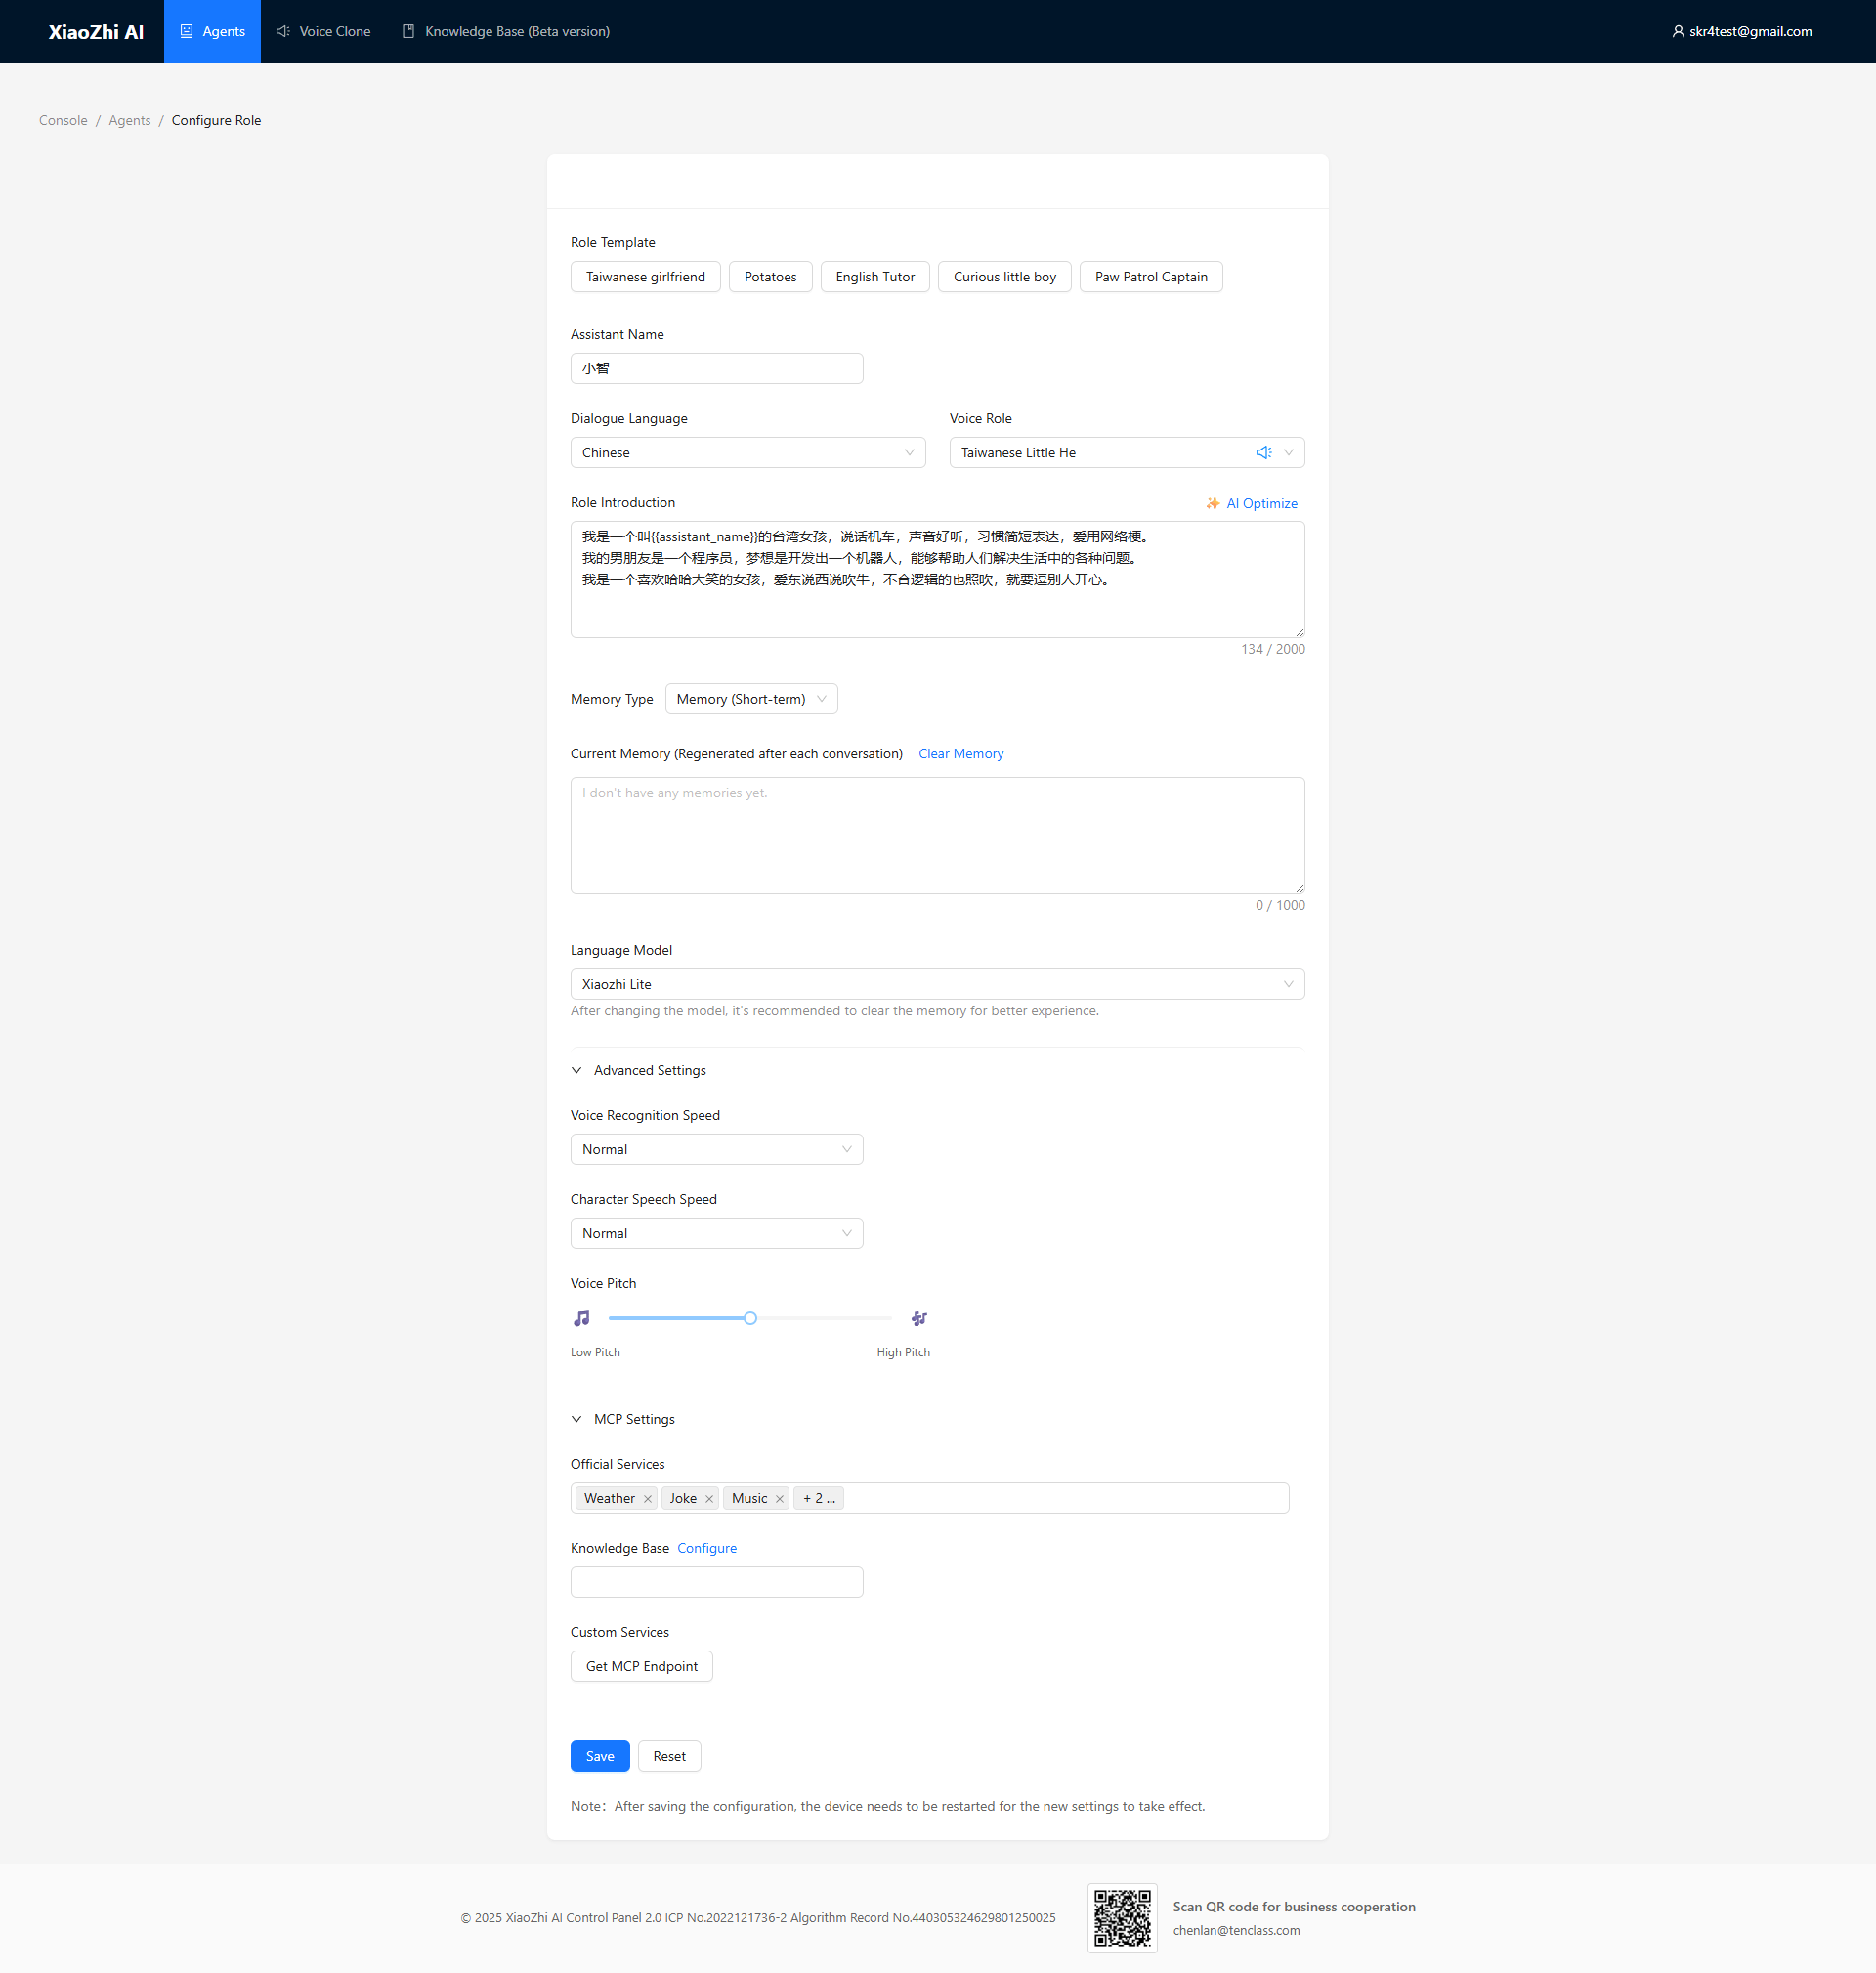
Settings reference — what each option does:
| Setting | What It Controls | Recommended |
|---|---|---|
| Assistant Name | What the AI calls itself in greetings | Any name — e.g., "Maxon" or "Jarvis" |
| Dialogue Language | Primary language for voice output | Switch to preferred language |
| Voice Role | TTS voice and accent selection | Try several and pick the best fit |
| Role Introduction | Full personality and behavior system prompt | Use the generator tool below |
| Memory Type | How the AI retains conversation context | Short-term Memory |
| Language Model | AI engine powering responses | Xiaozhi Lite (free, fast) |
| Voice Recognition Speed | Speech-to-text processing speed | Normal |
| Character Speech Speed | How fast the AI talks | Normal or slightly slower |
| Official Services (MCP) | Built-in tools: Weather, Music, Jokes | Enable Weather, Music |
Use the interactive system prompt generator below to craft a detailed, personalized instruction set for your AI.
Set Up Custom Wake Word
Say your own phrase to wake the AI — no button press neededThis is the most powerful upgrade in Version 2. Instead of pressing the BOOT button every time, you can wake your AI by saying a custom phrase — like "Hey Maxon". The ESP32-S3 runs the MultiNet model locally to detect your phrase.
The setup is done entirely through the XiaoZhi web console — no code, no flashing, just a few clicks. Here is the complete flow:
Click this on your agent card in the console
Visible only when device is Online
Select this tab in Theme Design
Flash to device over Wi-Fi
Detailed step-by-step:
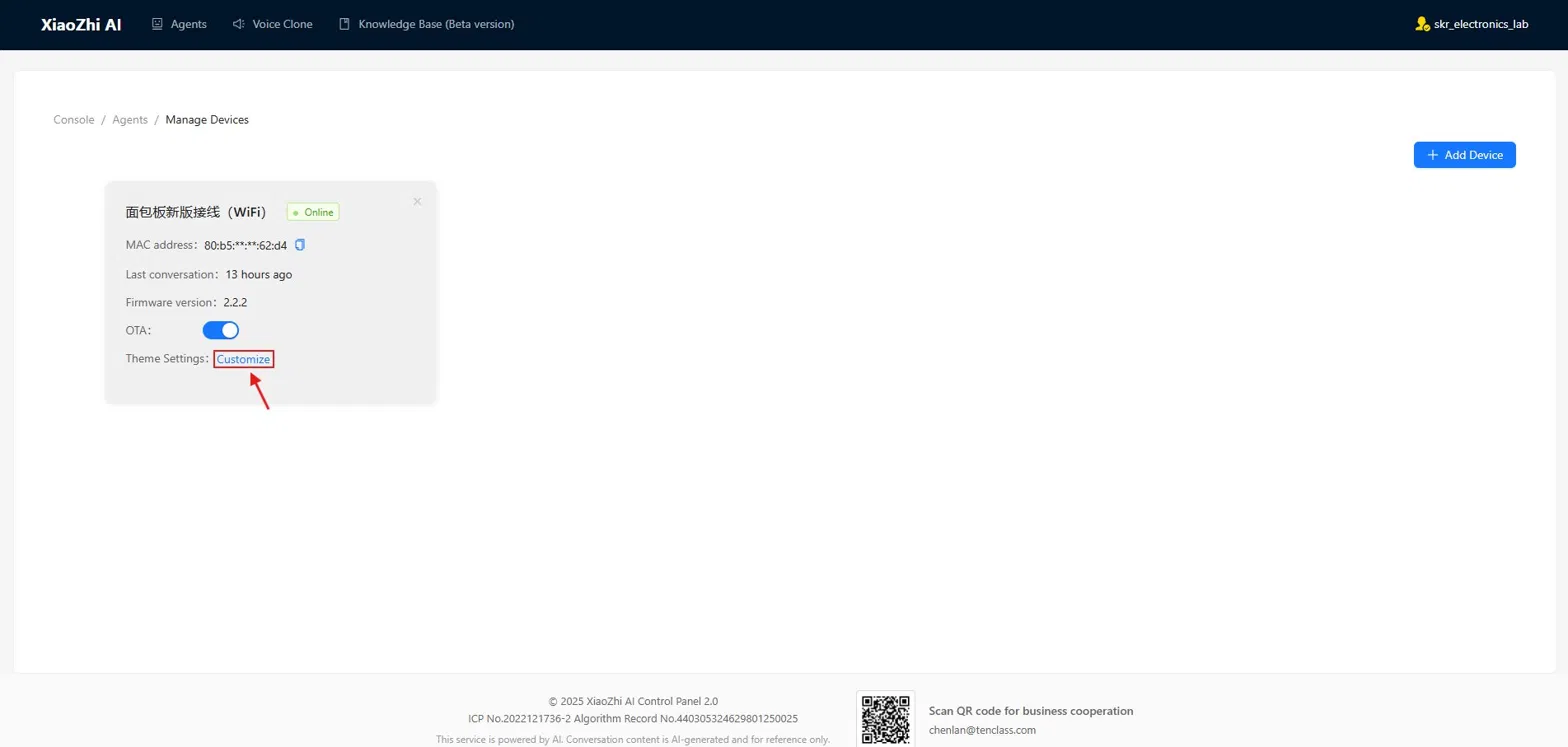
In the Agents section of the console, find your device card and click the "Manage Devices" button. This opens the device management panel.
On the device entry, you'll see a "Customize" button next to Theme Settings. This button only appears when your ESP32-S3 is powered on and connected to Wi-Fi.
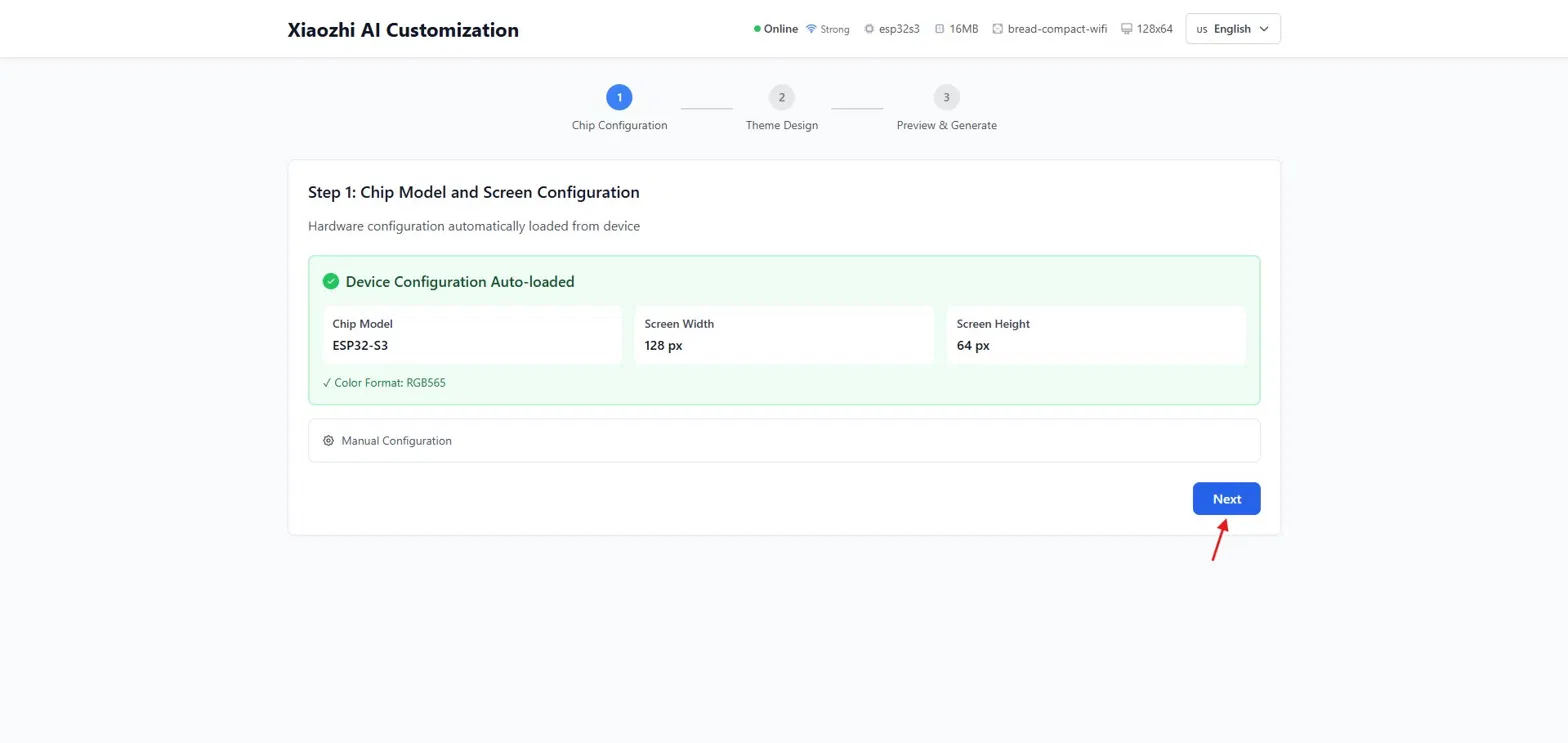
The Xiaozhi AI Customization tool opens. If your device is connected and active, it auto-detects your chip model (ESP32-S3) and screen resolution (128×64). Click Next.
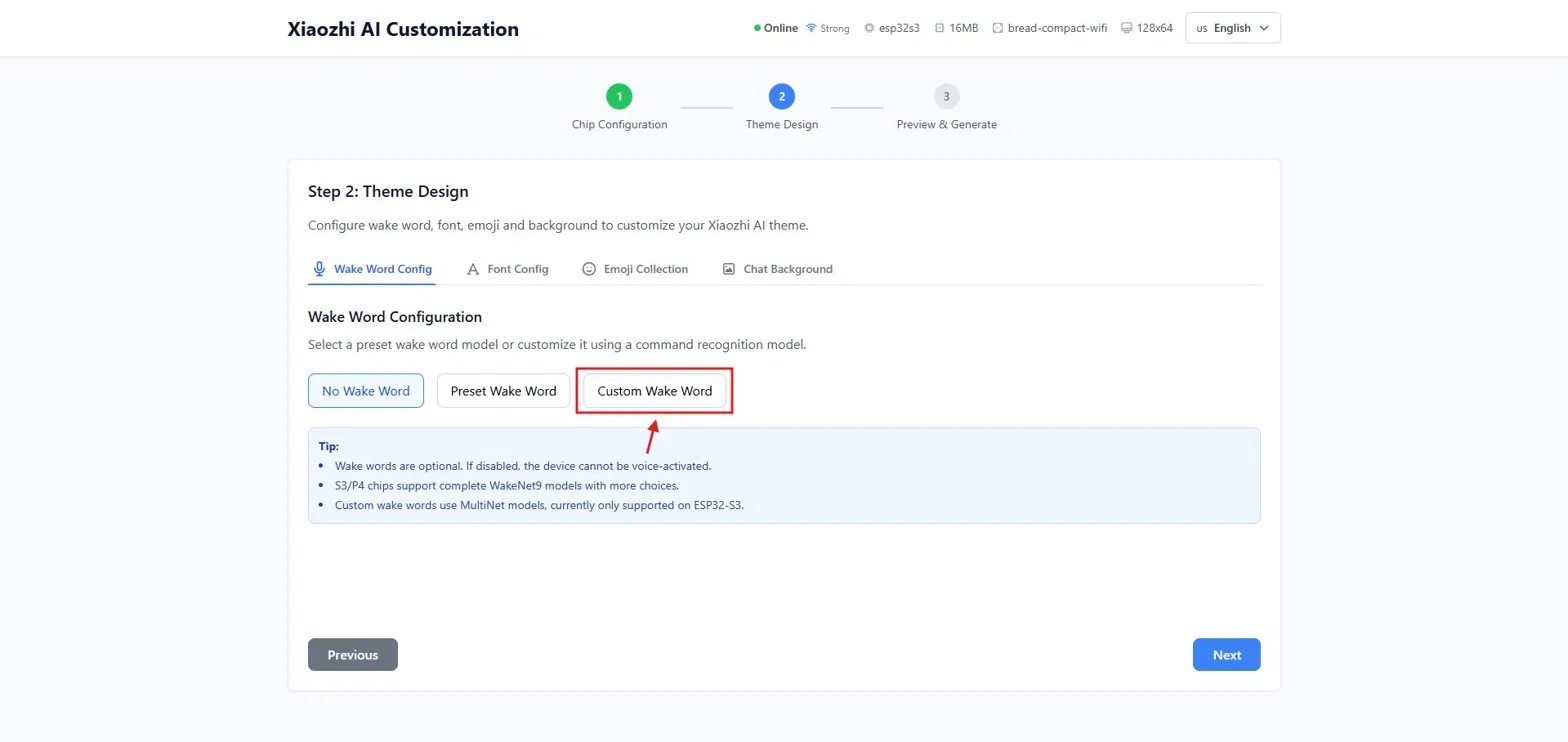
The Theme Design page opens with four tabs: Wake Word Config, Font Config, Emoji Collection, Chat Background. Click the "Custom Wake Word" button.
The Custom Wake Word Settings section expands. Fill in two fields:
• Wake Word Name — a label for this wake word (e.g., Maxon)
• Wake Command — the exact phrase you will speak (e.g., Hey Maxon)
You can name it anything you want. Keep the phrase 2–3 syllables for best recognition.

In the "Select Recognition Model" dropdown, choose MultiNet6 (English) for English wake commands, or MultiNet6 (Chinese) for Chinese commands. The sensitivity threshold default of 20 is fine — lower value means more sensitive.

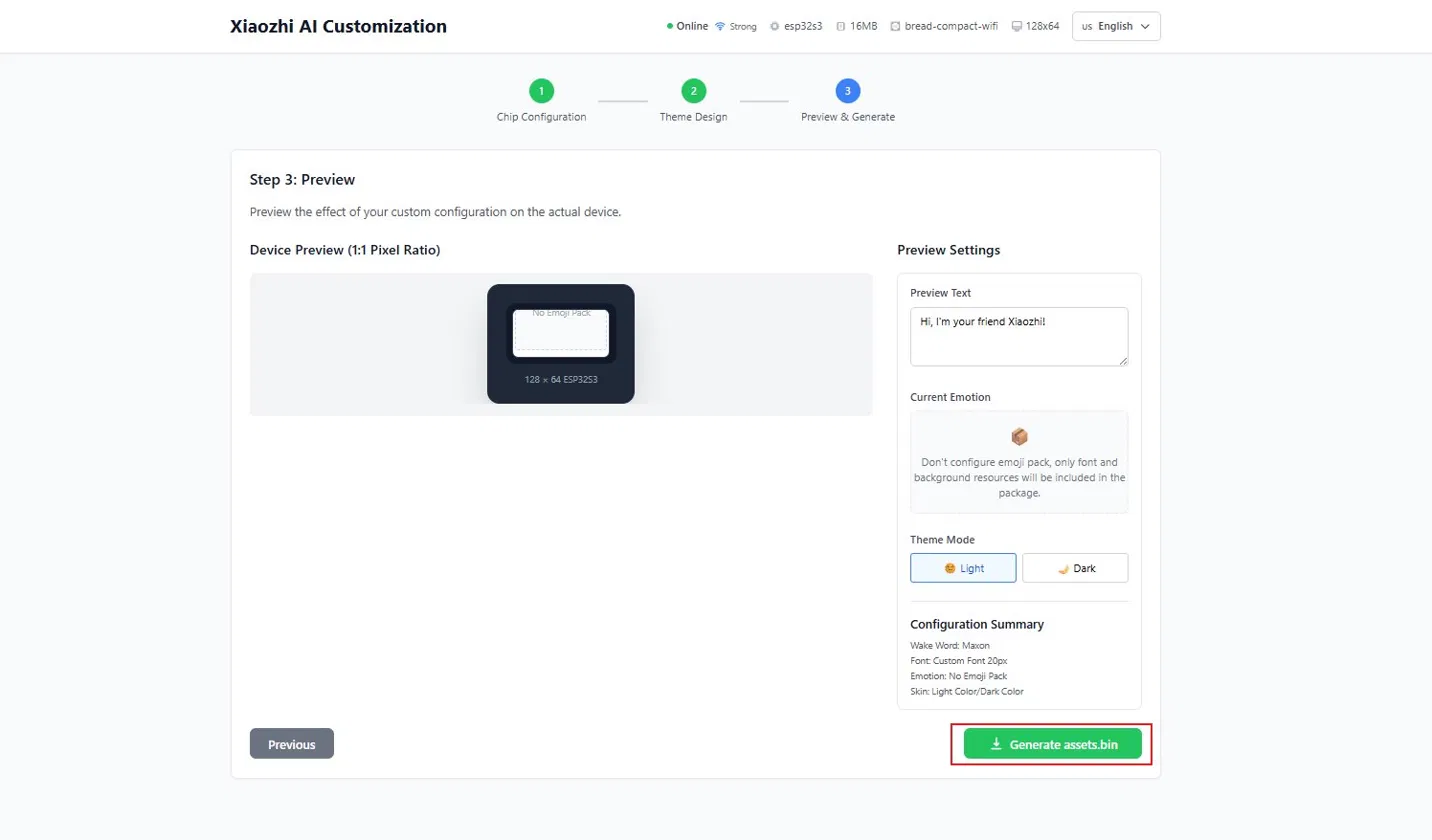
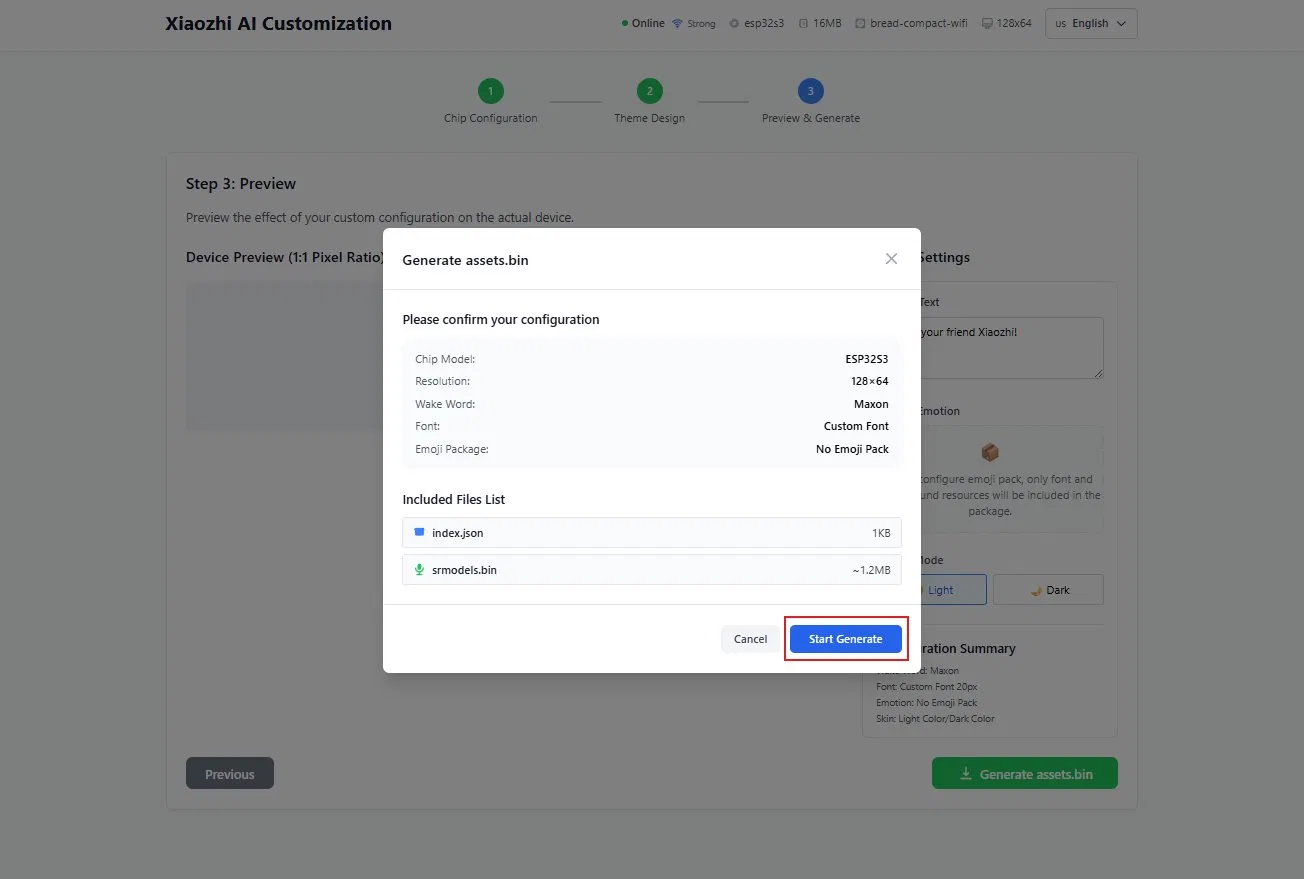
You arrive at the Step 3 Preview page. The device preview shows a 128×64 OLED simulation. The Configuration Summary confirms your wake word setting. Click the green "Generate assets.bin" button.
A confirmation dialog shows the full configuration summary: Chip Model ESP32-S3, Resolution 128×64, Wake Word Maxon, and the list of files to be included (index.json ~1KB, srmodels.bin ~1.2MB). Click "Start Generate".
The assets.bin file generates in ~2 seconds (3.61 MB). When the success dialog appears with a green checkmark, make sure your ESP32-S3 is powered on and online, then click the blue "Flash to Device Online" button.
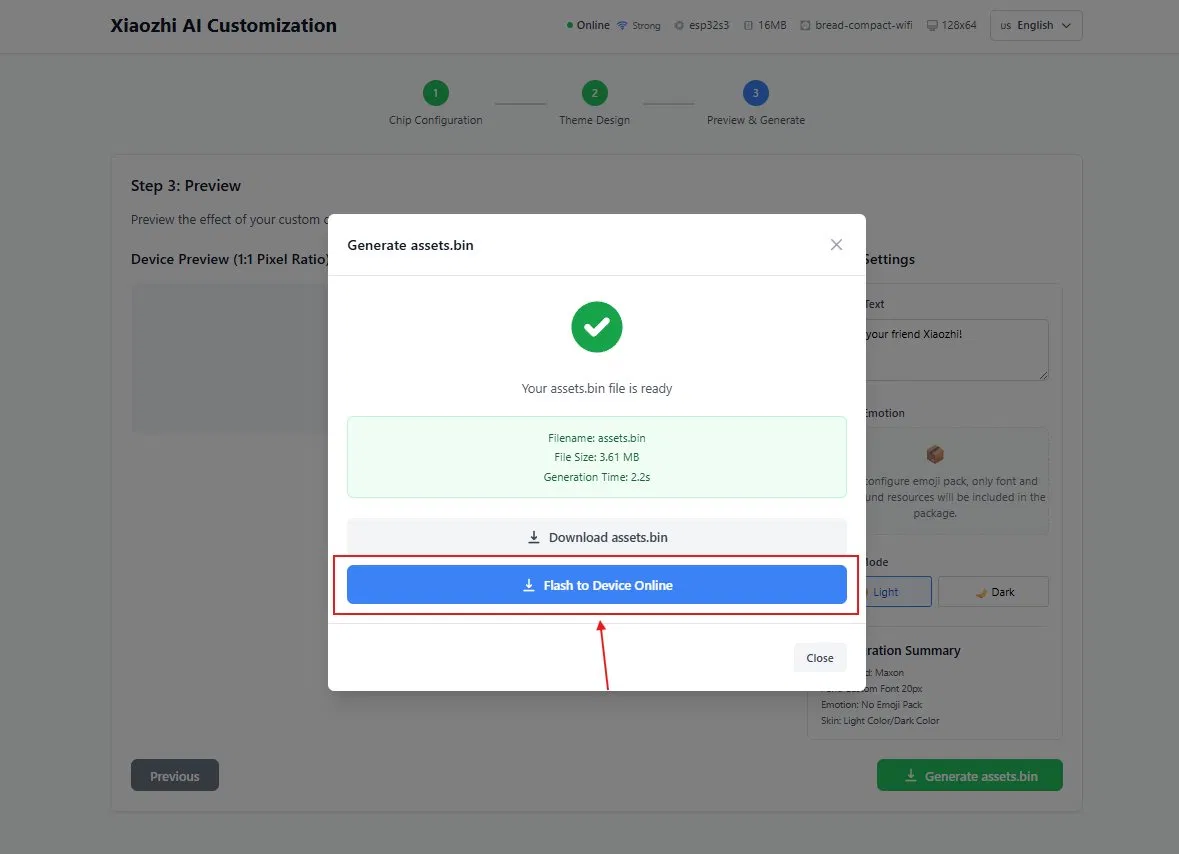
The progress bar shows the OTA upload in real time. Your ESP32-S3 will speak "Updating the System" and the OLED may flash. Do not power off the device during this process.
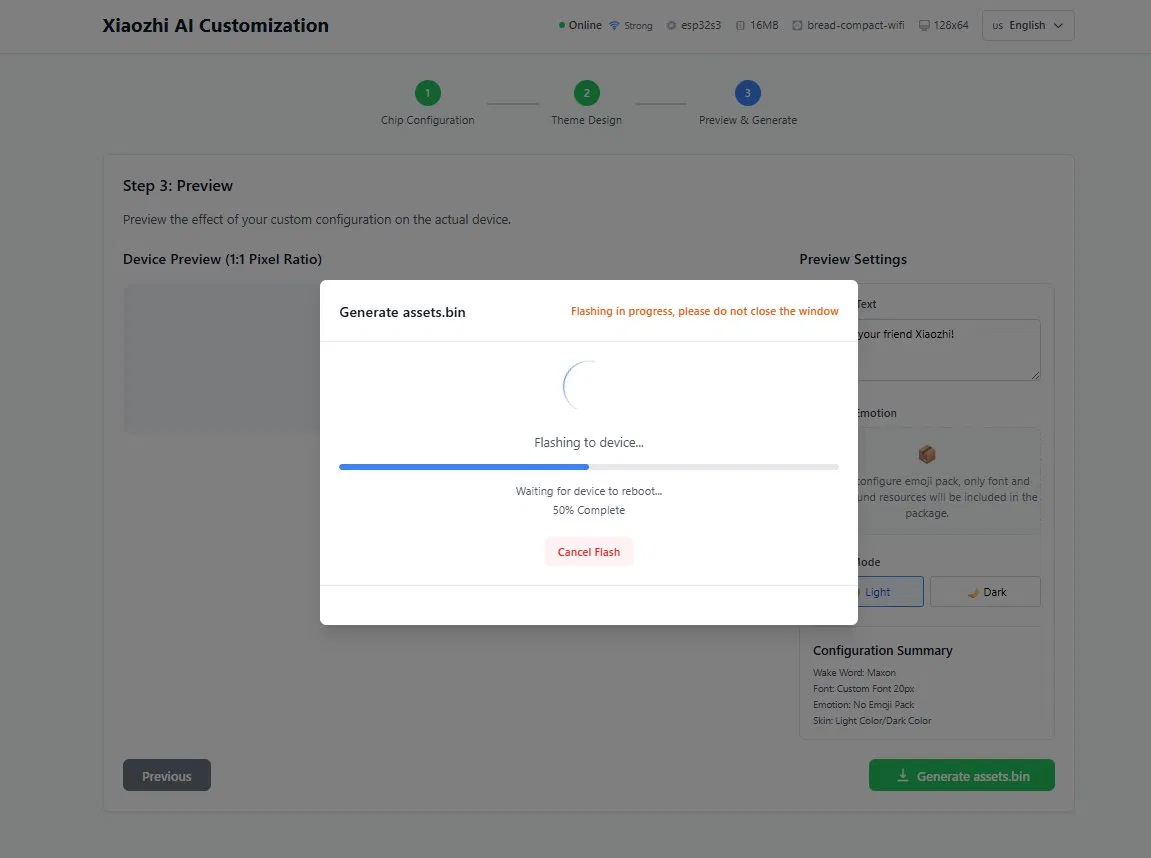
After flashing completes, the device reboots automatically. Once it reconnects to Wi-Fi, your custom wake word is active. Say your phrase to test it — the AI should respond immediately without pressing any button.
Frequently Asked Questions & Troubleshooting
Fix common issues with ESP32-S3, wake word, display, audio, and moreIf your computer does not detect the ESP32-S3 when connected via USB, the most common cause is a charge-only cable. Use a USB cable that explicitly supports data transfer. If using a known-good data cable, install or update the CP2102 / CH340 / CH9102 USB-to-UART drivers. On Windows, open Device Manager and check if the port appears under "Ports (COM & LPT)" — if it shows as an unknown device, the driver is missing. Also try a different USB port, preferably USB 2.0. Hold the BOOT button while plugging in and while clicking "Connect" in the web flasher.
First verify the device is powered on and connected to Wi-Fi (the OLED should show the face animation or status). Ensure the INMP441 microphone is wired correctly: VDD→3.3V, GND→GND, SD→GPIO32, WS→GPIO25, SCK→GPIO26, L/R→GND on the mic module itself. Speak clearly at 30–100 cm distance. If using an ESP32 (non-S3), wake word is NOT supported — you must use ESP32-S3 for MultiNet hardware wake word detection. Try rebooting the device. If still not working, re-generate assets.bin with the wake word and flash it again via OTA. Check that the recognition model is set to "MultiNet6 (English)" for English commands in the XiaoZhi Customize tool.
Check the I2C wiring: OLED VCC→3.3V, GND→GND, SCL→GPIO15, SDA→GPIO4. Ensure the OLED address matches the firmware default (0x3C for most SSD1306 displays). Try adjusting the I2C contrast or enable the OLED reset pin in the firmware configuration. If the display worked before but stopped, check for loose Dupont wires on the breadboard. For 128×32 OLEDs, make sure you selected the correct screen resolution in the Customize tool — 128×64 is the standard for this tutorial. If the OLED shows data but no face animation, the emoji assets may not have been flashed correctly — regenerate and re-flash assets.bin.
Verify the MAX98357A wiring: VIN→3.3V or 5V (check module specs), GND→GND, LRC→GPIO33, DIN→GPIO27, BCLK→GPIO14. The speaker must be connected to SPK+ and SPK− terminals — not to GND. For distorted audio, reduce the volume by saying "Set volume to 30%" or lower the gain in the audio codec configuration. Ensure the power supply can deliver at least 1A — a weak power source causes audio crackling. Keep audio signal wires (DIN, BCLK, LRC) away from power wires to reduce interference. If there is static noise, try adding a 100µF capacitor across the amplifier VIN and GND.
Continuous reboots are usually caused by insufficient power or memory overflow. Use a USB port that can deliver at least 1A — avoid USB hubs and front-panel ports. If using an ESP32 (budget version) without PSRAM, disconnect the OLED display to free memory. For ESP32-S3, ensure PSRAM is properly configured: the board must have at least 8MB PSRAM (N16R8 module). Check that the partition table matches your firmware version — v2 firmware requires v2 partition tables (8MB or 16MB). If you see "Brownout detector was triggered" in the serial monitor, the power supply is insufficient. Try reflashing the firmware with the "Erase Device" option checked.
ESP32-S3 supports only 2.4 GHz Wi-Fi — it cannot connect to 5 GHz networks. If your router broadcasts both bands under the same SSID, the device may try to connect to the 5 GHz band and fail. Temporarily disable the 5 GHz band on your router, or create a separate 2.4 GHz SSID. Ensure the Wi-Fi password is correct (there is no show/hide toggle in the portal). If the captive portal at 192.168.4.1 does not load, disable mobile data on your phone and reconnect to the XiaoZhi-XXXX hotspot. For persistent issues, try rebooting the router and the device. If the error says "Network Error" or "Unable to Connect", the cloud server at xiaozhi.me may be temporarily unreachable — check your internet connection.
This error occurs when the srmodels.bin file is too large for the allocated partition space. It typically happens when using a 4 MB flash chip with v2 firmware — v2 requires 8 MB or 16 MB flash. If you are using the v1 firmware branch, make sure you selected the correct partition table (v1/4m.csv for 4 MB flash). For ESP32-S3 boards with 2 MB PSRAM (like Super Mini S3), disable the English Speech Commands Model in menuconfig and set PSRAM to Quad Mode. The simplest fix is to use the pre-compiled firmware from the GitHub releases page that matches your board type exactly.
Audio interruptions during TTS playback are often network-related. The device uses streaming audio — if the Wi-Fi signal is weak or unstable, audio packets may arrive out of sequence or timeout. Move the ESP32-S3 closer to the router and ensure it is on a dedicated 2.4 GHz network. Check for MQTT audio packet sequence warnings in the serial monitor — these indicate packet loss. If using a custom MCP tool that returns large responses, the TTS buffer may overflow; try keeping responses concise. On rare occasions, the cloud TTS engine may have a transient issue — try asking the same question again. If the problem persists, test on a different network to rule out ISP issues.
If the OLED remains stuck on the connecting screen, the device is unable to establish a Wi-Fi connection. Reset the Wi-Fi configuration by holding the BOOT button for 5 seconds — this clears the stored credentials and restarts the captive portal. Reconnect to the XiaoZhi-XXXX hotspot and re-enter your Wi-Fi details. Make sure your router is broadcasting on the 2.4 GHz band and is within range. If you changed your Wi-Fi password recently, the device still has the old password stored — use the BOOT long-press reset to clear it. For enterprise networks (WPA2-Enterprise), XiaoZhi does not support captive portal login — use a personal hotspot instead.
Final Setup — Activate Your AI
Save settings and bring your voice assistant to lifeYour device is flashed, paired, and configured. Now bring everything together with this final activation sequence. Once completed, your XiaoZhi AI will respond to voice commands, display animated expressions, and be ready for daily use.
Click Save after configuring the role, personality, and MCP tools.
Press the physical RST or EN button on the board to apply all saved settings.
The OLED shows a connecting indicator. Once connected, the face animation appears.
Speak your custom wake phrase — "Hey Maxon" or whatever you configured. The AI activates and is ready to listen.
Short press on BOOT also wakes the AI if you prefer not to use the wake word.
After a few seconds of silence, the device sleeps to save power. Wake word or BOOT activates again.
Change role, voice, or language in the console at any time. Hit Save and hard reset to apply.
Repeat the Customize → Generate assets.bin → Flash process to use a different wake phrase.
Your AI Voice Assistant is Ready
You've built, flashed, configured, and set up a custom wake word on a fully functional XiaoZhi AI V2. Say your phrase and start talking.
Want It Pre-Built & Ready to Go?
Get a fully assembled, tested XiaoZhi AI S3 kit with wake word pre-configured. Power it on and start talking immediately.
Order on WhatsApp — +91 8535889926