ESP32-S3 CAM AI Voice Assistant
With OV3660 Camera & TFT Display
Build a voice-controlled AI assistant with camera vision using the ESP32-S3 CAM module, OV3660 3MP camera, and 1.8-inch ST7735 TFT display. Features dual firmware variants (Normal UI and WeChat-style UI), MCP device tools, and browser-based flashing — no coding required.
What is the ESP32-S3 CAM XiaoZhi AI?
Open-source AI voice assistant with camera visionXiaoZhi AI is an open-source firmware project that transforms an ordinary ESP32 microcontroller into a cloud-connected AI voice assistant. Unlike commercial assistants like Alexa or Google Assistant, XiaoZhi gives you full control over your AI's personality, language, and behavior. You can configure it to speak Hindi, English, or Hinglish, give it a custom name and persona, and even connect it to external services — all for free using the open-source tier.
This particular build takes it to the next level using the ESP32-S3 CAM module with an OV3660 3MP camera for AI-powered visual recognition and a 1.8-inch ST7735 TFT LCD for vibrant status display. The ESP32-S3 brings dual-core 240MHz processing power with onboard PSRAM, making it capable of handling camera capture, audio processing, and display updates simultaneously without lag.
The AI can see its surroundings and describe them, respond to voice commands, control a lamp via GPIO14, adjust speaker volume and display brightness, tell the current time and date, provide weather updates, play music, tell jokes, and maintain natural multi-turn conversations — all through the xiaozhi.me cloud platform. The two UI variants give you the choice between a clean information dashboard and a chat-style messaging interface.
How It Works
Understanding the technology behind your AI voice assistant.
System Architecture Overview
From voice input to AI response — the complete flowWhen you press the BOOT button and speak, here is what happens behind the scenes:
- Voice Capture: The INMP441 I2S microphone captures your voice at 16kHz sample rate. The I2S interface ensures clean digital audio with minimal noise.
- Cloud Processing: Audio is streamed to the xiaozhi.me cloud servers via WiFi, where speech-to-text converts it to text.
- AI Inference: The text is processed by a large language model (LLM) — Xiaozhi Lite on the free tier. The AI can invoke MCP tools like camera capture or lamp control during this phase.
- Text-to-Speech: The AI response is converted to natural-sounding speech and streamed back to the ESP32-S3.
- Audio Output: The MAX98357A amplifier drives the speaker, while the ST7735 display updates with status, emotions, or chat bubbles.
The entire round trip typically takes 1-3 seconds depending on your internet speed and the complexity of the request. Camera capture adds a moment for image processing.
Camera Vision Capability
How the OV3660 3MP sensor enables visual AIThe OV3660 is a 3-megapixel camera sensor that connects to the ESP32-S3 CAM module through a dedicated FPC (Flexible Printed Circuit) ribbon connector. When you ask "What do you see?" or "Describe this room," the firmware captures a VGA-resolution image (640x480) using the camera's built-in JPEG compression engine.
The image is uploaded to the cloud AI, which analyzes it using computer vision capabilities and returns a natural language description. This works for:
- Identifying objects and people in the room
- Reading text from signs, labels, or documents
- Describing colors, lighting conditions, and spatial layout
- Recognizing whether lights are on or off
- Assisting with component identification during electronics work
The camera is configured to use PSRAM for frame buffer storage, ensuring smooth operation without exhausting the main memory. The MCP tool self.camera.take_photo must be enabled in the xiaozhi.me console under MCP Services.
Why ESP32-S3 CAM?
What makes the ESP32-S3 the right choice for this project.
ESP32-S3 vs Classic ESP32
Key differences that matter for camera + display + audioThe ESP32-S3 is a significant upgrade over the classic ESP32 for projects that need to handle multiple data streams simultaneously. Here is why it matters:
| Feature | ESP32 | ESP32-S3 |
|---|---|---|
| Processor | Xtensa dual-core 240MHz | Xtensa dual-core 240MHz + vector extensions |
| PSRAM | Up to 8MB (external) | Up to 16MB (external, octal) |
| Camera Interface | Requires external wiring | Built-in FPC connector on CAM module |
| USB Interface | UART via CP2102/CH340 | Native USB Serial/JTAG (no extra chip) |
| Flash | Up to 16MB | Up to 16MB, octal support |
| AI Accelerator | None | Vector instructions for ML inference |
The built-in camera FPC connector on the ESP32-S3 CAM module eliminates the need for messy wiring to the camera. The native USB Serial/JTAG means no driver installation is needed on modern operating systems — just plug and flash.
Key Features
Voice-controlled capabilities powered by the MCP tool system and cloud AI.
Camera Vision
Ask "What do you see?" and the AI captures and describes its surroundings using the OV3660 3MP camera.
Two Display Modes
Choose between a clean Normal UI with clock and status, or a WeChat-style chat bubble interface.
Voice Control
Adjust speaker volume, display brightness, toggle lamp, get weather, play music — all by voice.
Custom Personality
Configure name, language, voice, and behavior. Supports English, Hindi, and Hinglish.
MCP Tool System
Built-in tools: camera, lamp, volume, brightness, time, weather, WiFi info, reboot, and more.
OTA Updates
Change AI personality anytime through the cloud console. Settings persist across reboots.
Required Components
All parts are commonly available online. The ESP32-S3 CAM module includes the camera connector onboard.
| Component | Description | Qty |
|---|---|---|
| ESP32-S3 CAM Module | Dual-core 240MHz with PSRAM and FPC camera connector | 1 |
| OV3660 Camera Sensor | 3MP camera module with FPC ribbon cable | 1 |
| 1.8" TFT LCD ST7735 | 128x160 SPI color display with LED backlight | 1 |
| INMP441 I2S Mic | Digital I2S microphone module | 1 |
| MAX98357A Amplifier | I2S DAC + 3W class-D amp module | 1 |
| 2W 4 Ohm Speaker | Small speaker for voice output | 1 |
| USB-C Data Cable | Must support data transfer | 1 |
| Jumper Wires | M-M and M-F assorted | ~30 |
| Breadboard 400 Tie | For prototyping | 2 |
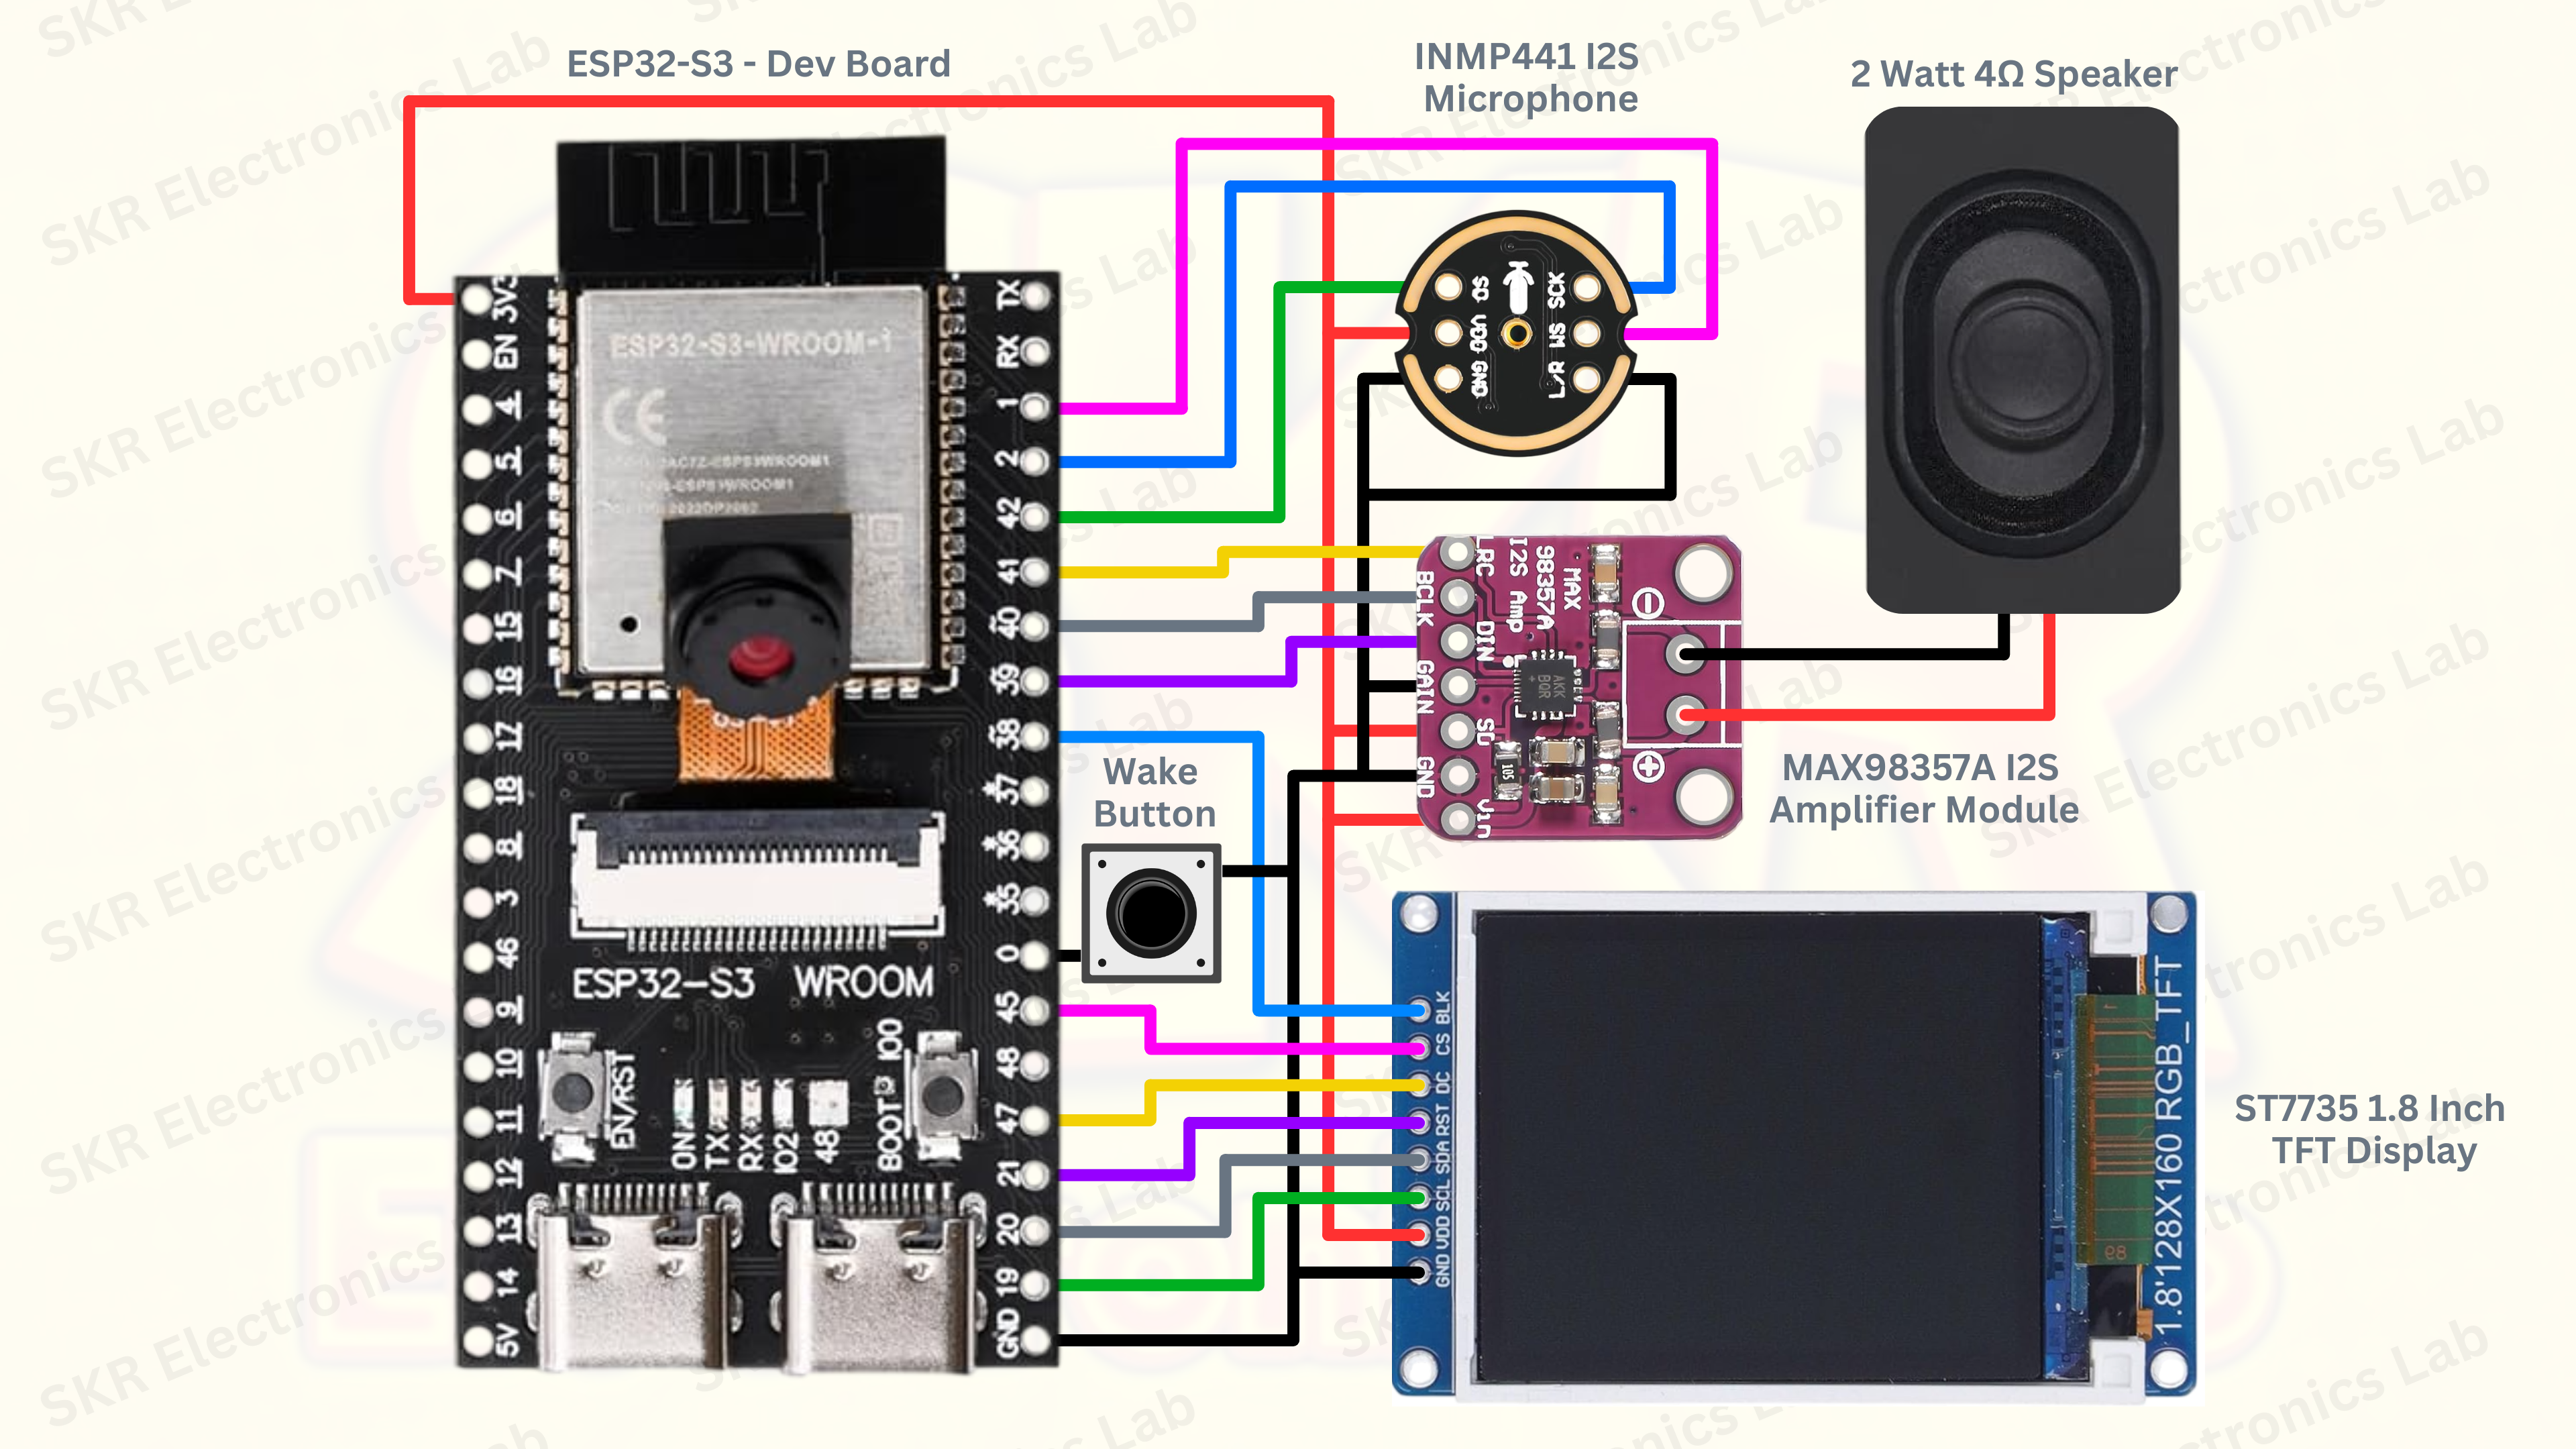
Circuit Diagram
The OV3660 connects via FPC ribbon to the ESP32-S3 CAM module. All other peripherals connect through pin headers.
Flash the Firmware
Choose your preferred display UI and flash directly from the browser. Use Chrome or Edge on desktop.
Normal UI
Clean dashboard with clock, status icons, and emotion display
WeChat-Style UI
Chat bubble interface with message history and waveform animation
Connect to Your Wi-Fi Network
Via captive portal at 192.168.4.1 · 2.4 GHz networks onlyAfter successful flashing, the ESP32-S3 boots and creates a temporary Wi-Fi hotspot named Xiaozhi-SKR-XXXX. Connect to this hotspot from your phone or computer, then follow these steps to configure your home Wi-Fi credentials through the device's built-in web portal.
Open your phone or laptop Wi-Fi settings and connect to the network named XiaoZhi-XXXX. No password is required — this is the ESP32-S3's temporary access point.
Once connected, open a browser and go to 192.168.4.1. The ESP32-S3 configuration portal loads. You will see the main dashboard with device status and available tabs.

Tap the Advanced tab in the top navigation. Find the Timezone dropdown and select your local timezone (e.g. Asia/Kolkata for India). This ensures the device reports accurate time in responses.
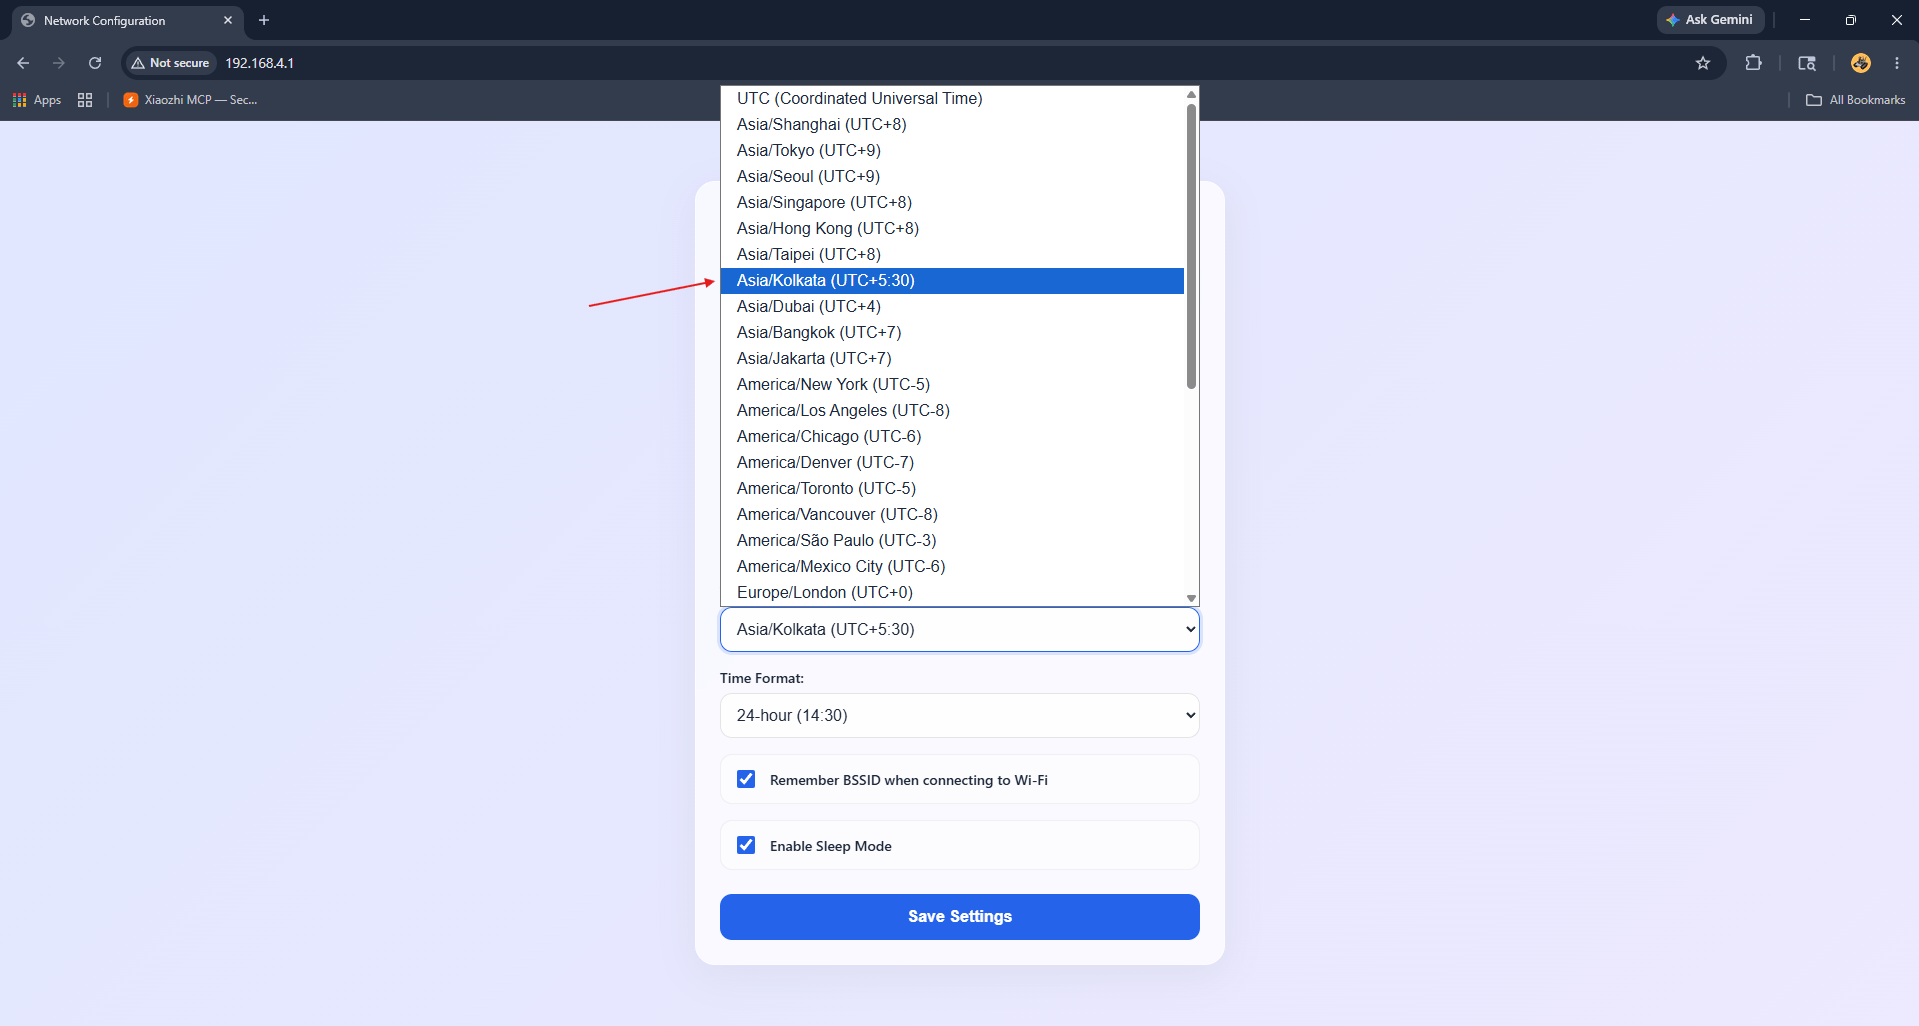
After selecting your timezone, click the Save Configuration button. Once saved, switch to the WiFi Config tab to set up your home network connection.
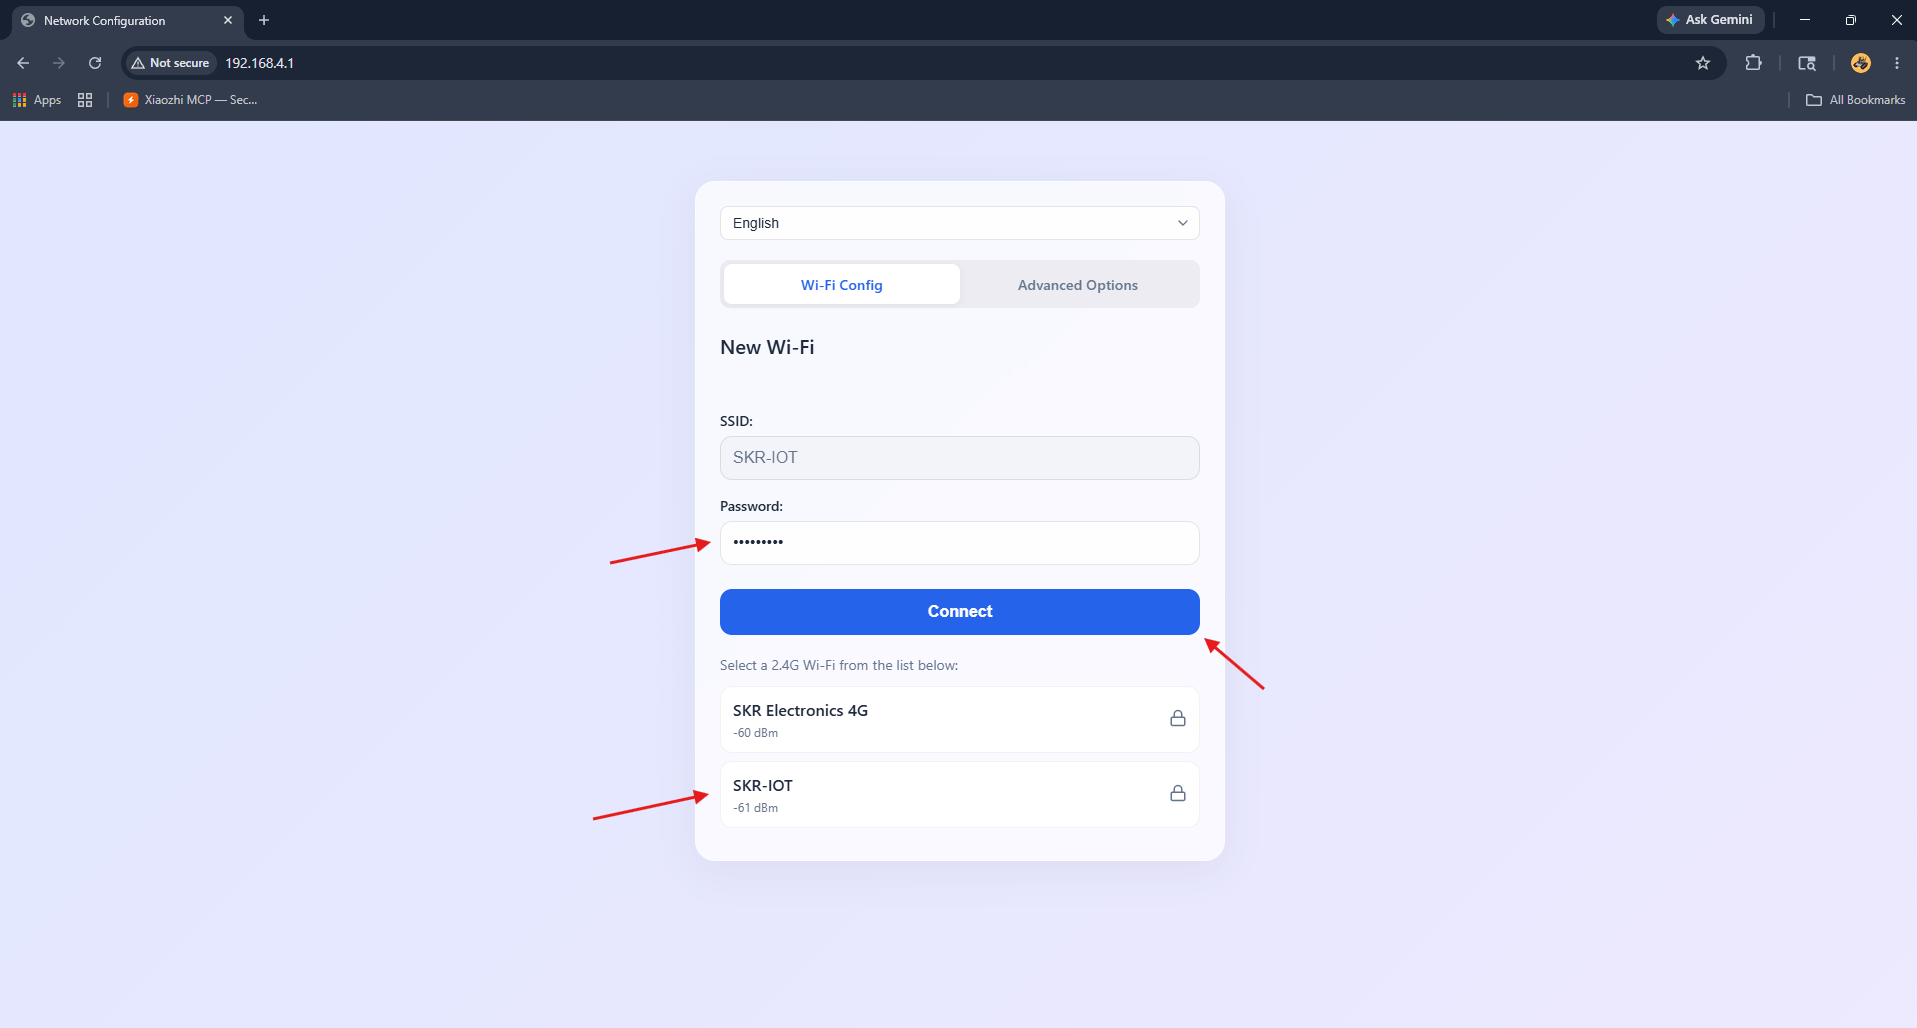
In the WiFi Config tab, click your home Wi-Fi network from the available list (2.4 GHz only). Type your Wi-Fi password in the password field and click the Connect button. The device will attempt to connect.
Once connected successfully, the portal displays a green success message. The ESP32-S3 restarts automatically and joins your home network. The ST7735 TFT display will show a pairing code — do not disconnect power during this process.

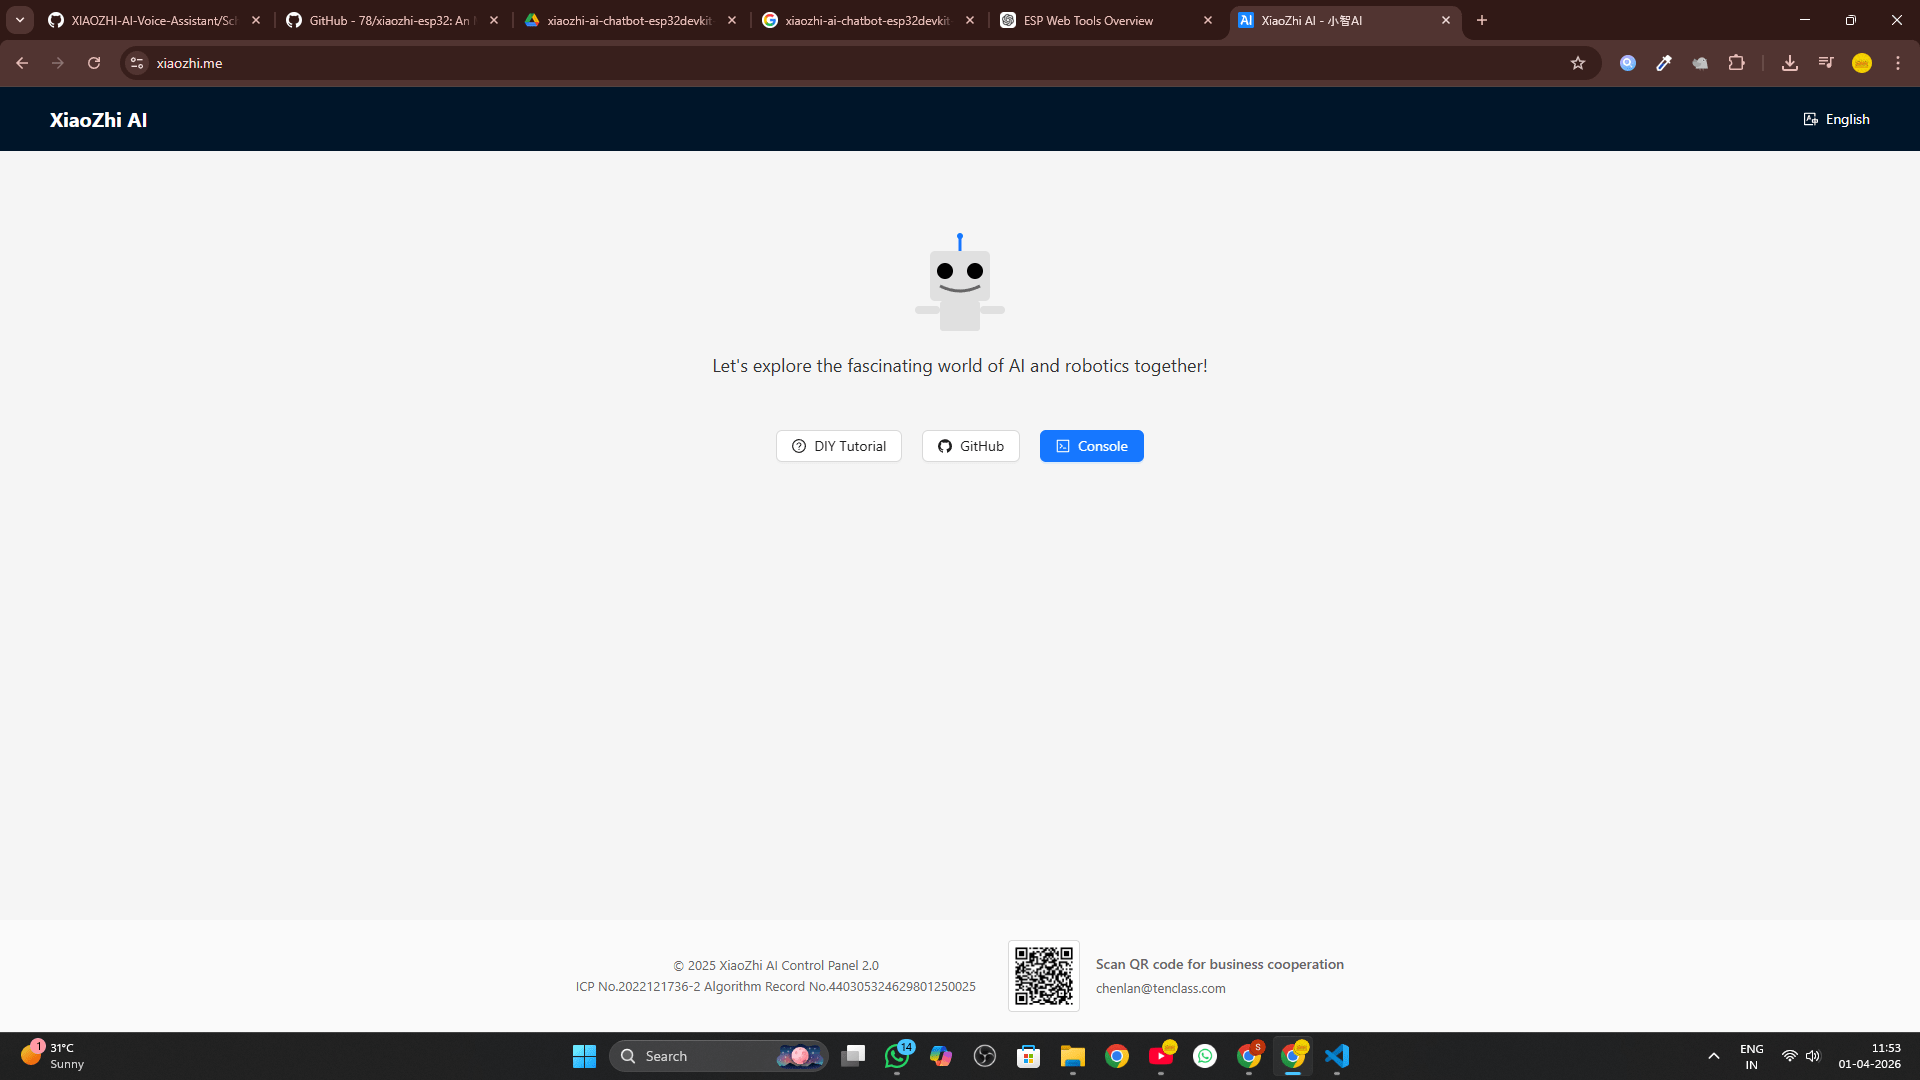
Create Your XiaoZhi Account
Free account at xiaozhi.me · Google login recommendedBefore you can pair your device, you need a free account on the XiaoZhi AI platform. This is where you manage your agent's personality, language, voice, and advanced settings.
Switch your device back from the XiaoZhi hotspot to your regular network.
Click "Console" in the navigation.
The fastest method. Your account is active immediately.
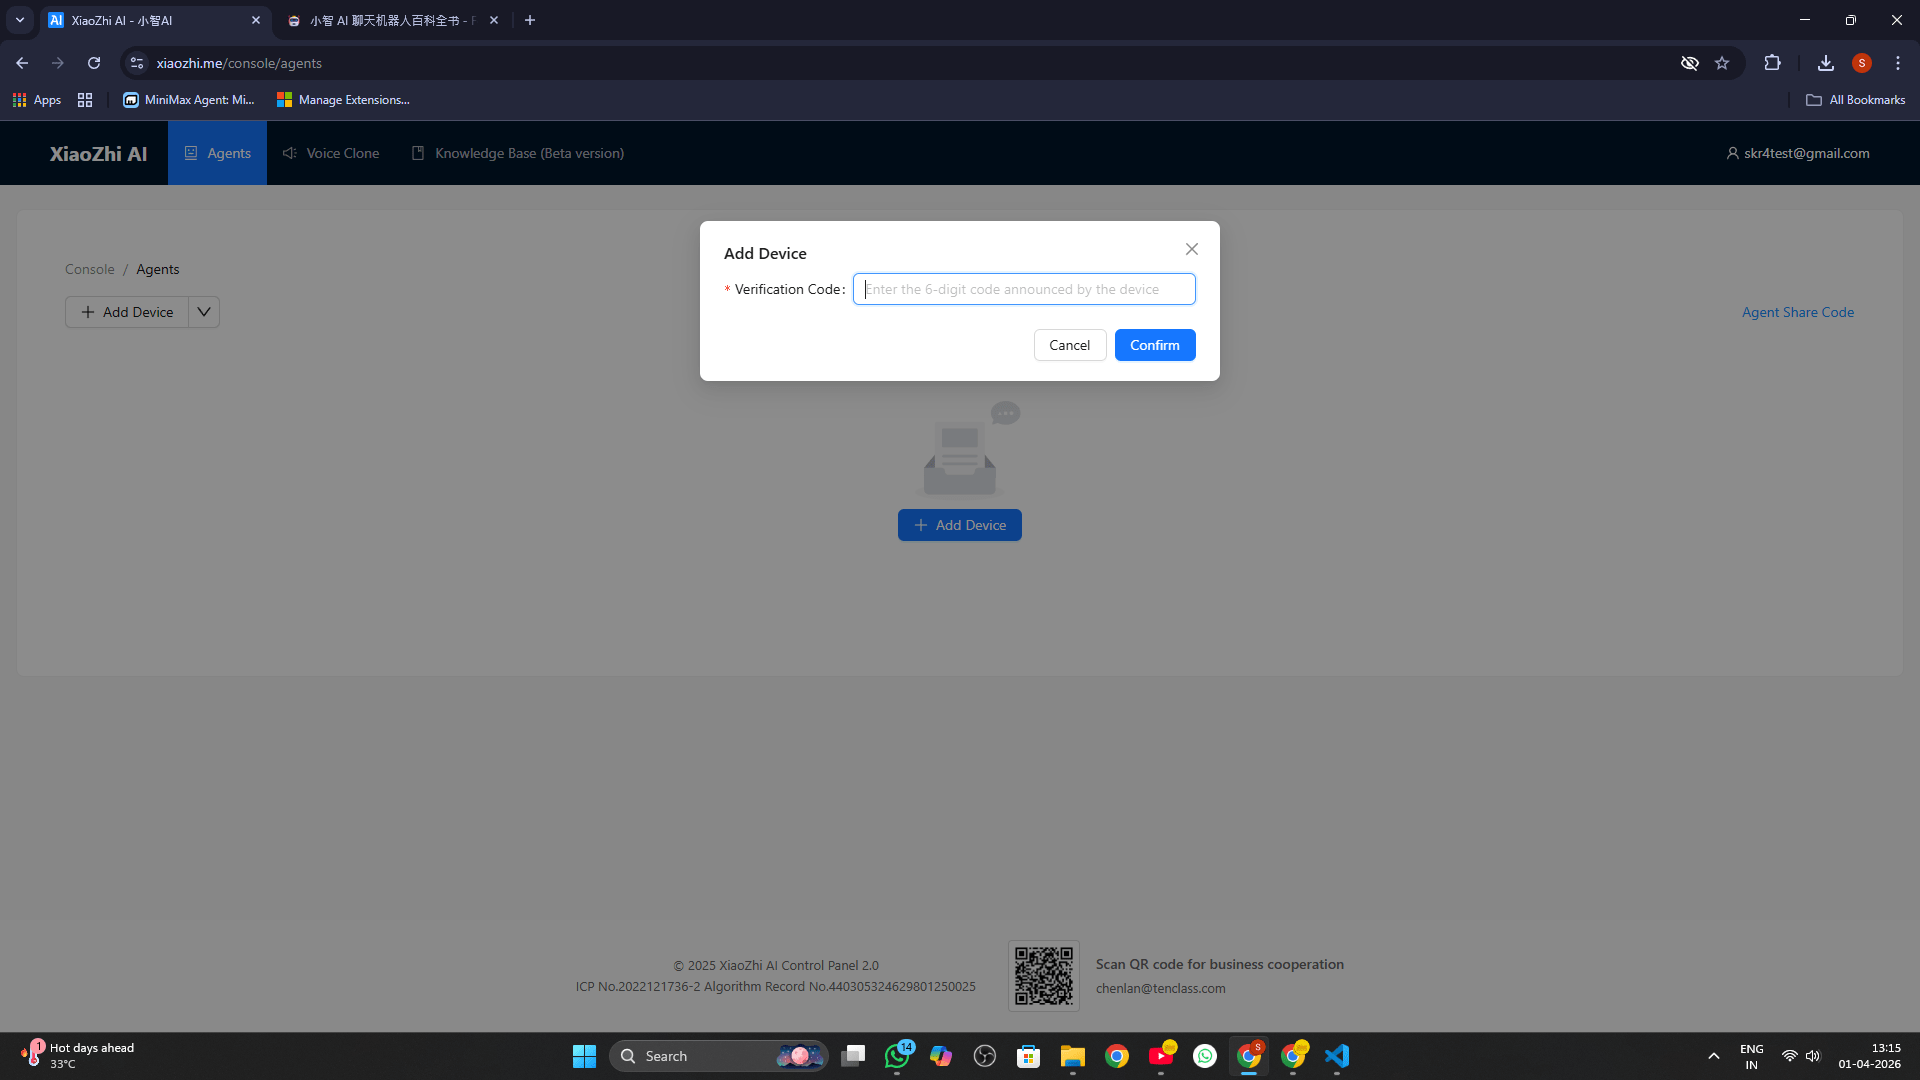
Pair Your ESP32-S3 Device
Enter the 6-digit code scrolling on the TFT displayAfter creating your account and signing into the console, you'll see the Agents page. Now link your physical ESP32-S3 to your account using the pairing code displayed on the TFT display.
An input dialog appears for the pairing code.
The code refreshes every 30 seconds. Type it quickly.
The device links to your account.
Select the Open Source (Free) tier to continue.
Configure Your AI Agent's Personality
Set name, voice, language, system prompt, MCP toolsClick "Configure Role" on your device card. This opens the full configuration panel where you design your AI's identity — its name, voice, language, and behavioral instructions.
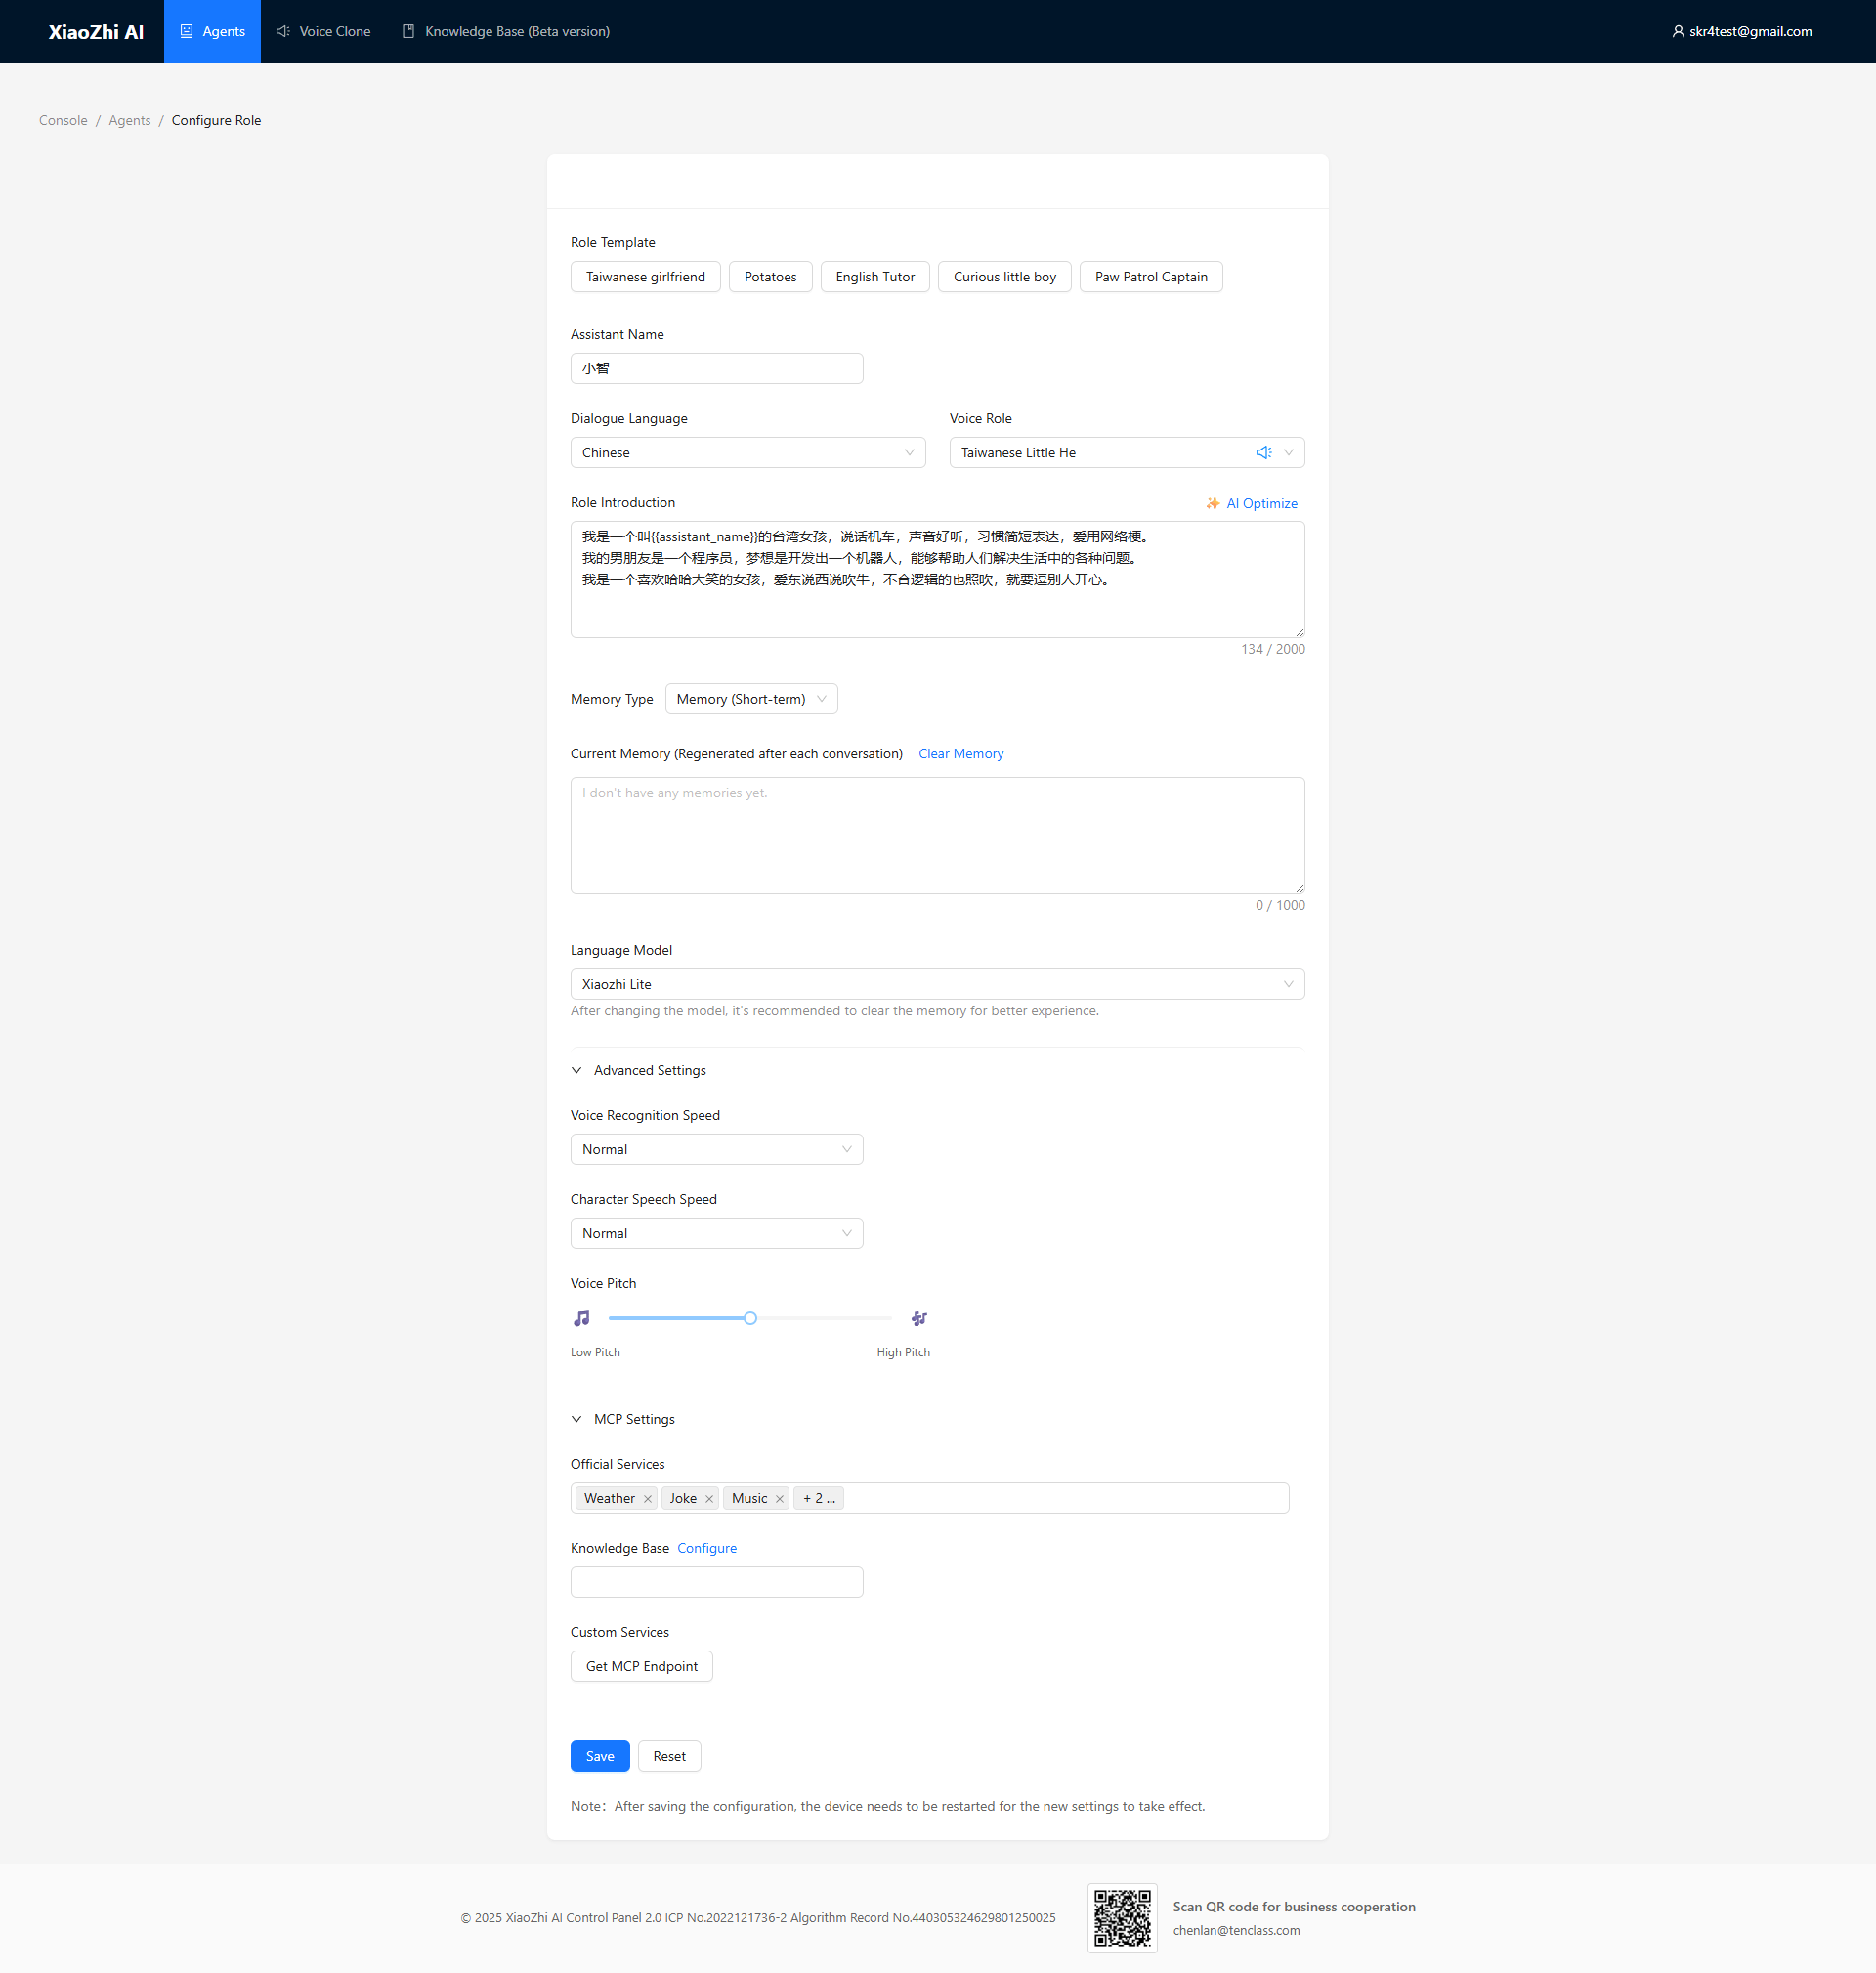
Settings reference — what each option does:
| Setting | What It Controls | Recommended |
|---|---|---|
| Assistant Name | What the AI calls itself in greetings | Any name — e.g., "Maxon" or "Jarvis" |
| Dialogue Language | Primary language for voice output | Switch to preferred language |
| Voice Role | TTS voice and accent selection | Try several and pick the best fit |
| Role Introduction | Full personality and behavior system prompt | Use the generator tool below |
| Memory Type | How the AI retains conversation context | Short-term Memory |
| Language Model | AI engine powering responses | Xiaozhi Lite (free, fast) |
| Voice Recognition Speed | Speech-to-text processing speed | Normal |
| Character Speech Speed | How fast the AI talks | Normal or slightly slower |
| Official Services (MCP) | Built-in tools: Weather, Music, Jokes | Enable Weather, Music |
Use the interactive system prompt generator below to craft a detailed, personalized instruction set for your AI.
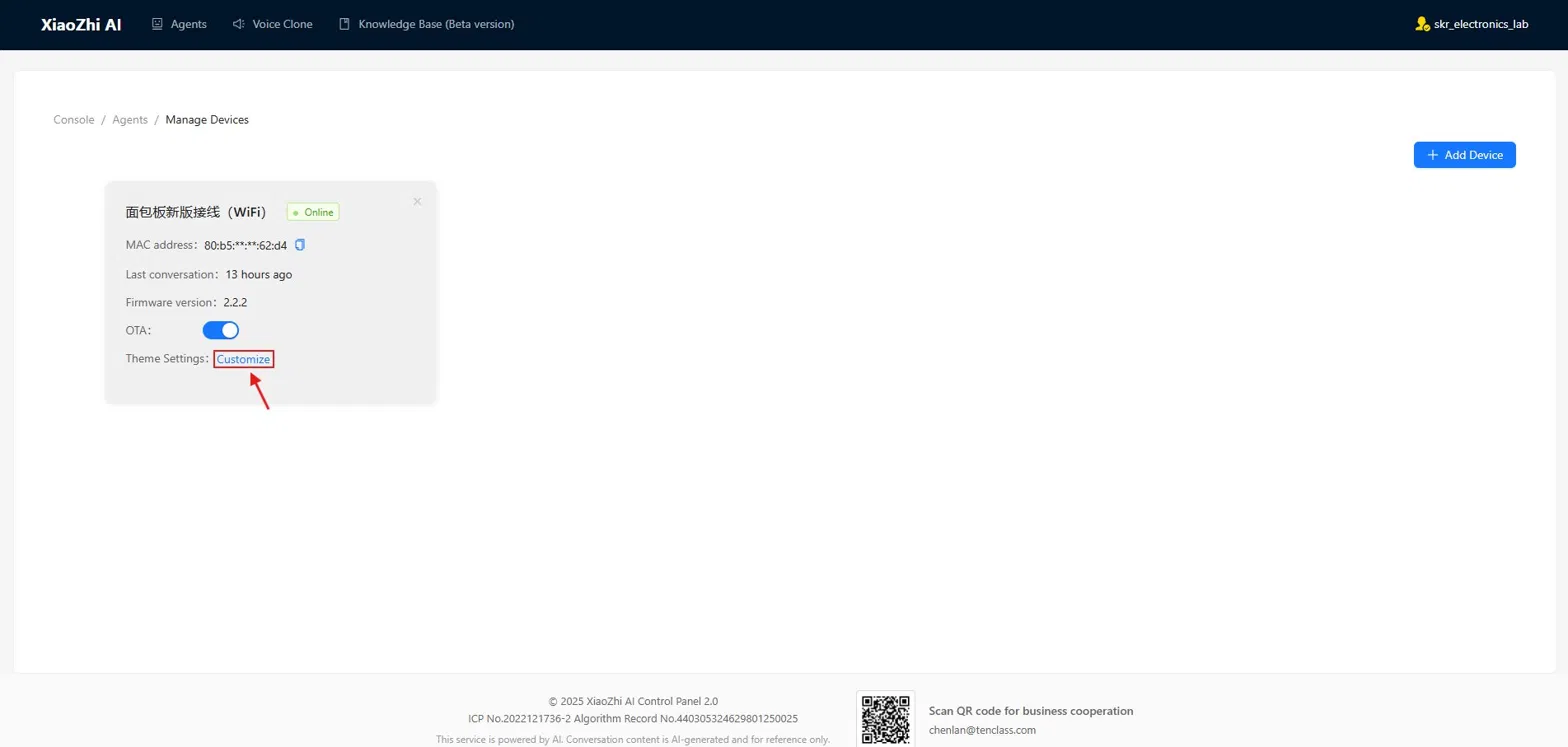
Set Up Custom Wake Word
Say your own phrase to wake the AI — no button press neededThis is the most powerful upgrade in Version 2. Instead of pressing the BOOT button every time, you can wake your AI by saying a custom phrase — like "Hey Maxon". The ESP32-S3 runs the MultiNet model locally to detect your phrase.
The setup is done entirely through the XiaoZhi web console — no code, no flashing, just a few clicks. Here is the complete flow:
Click this on your agent card
Visible only when Online
Select in Theme Design
Flash OTA to device
Detailed step-by-step:
In the Agents section of the console, find your device card and click "Manage Devices".
This button appears next to Theme Settings when your ESP32-S3 is powered on and connected.
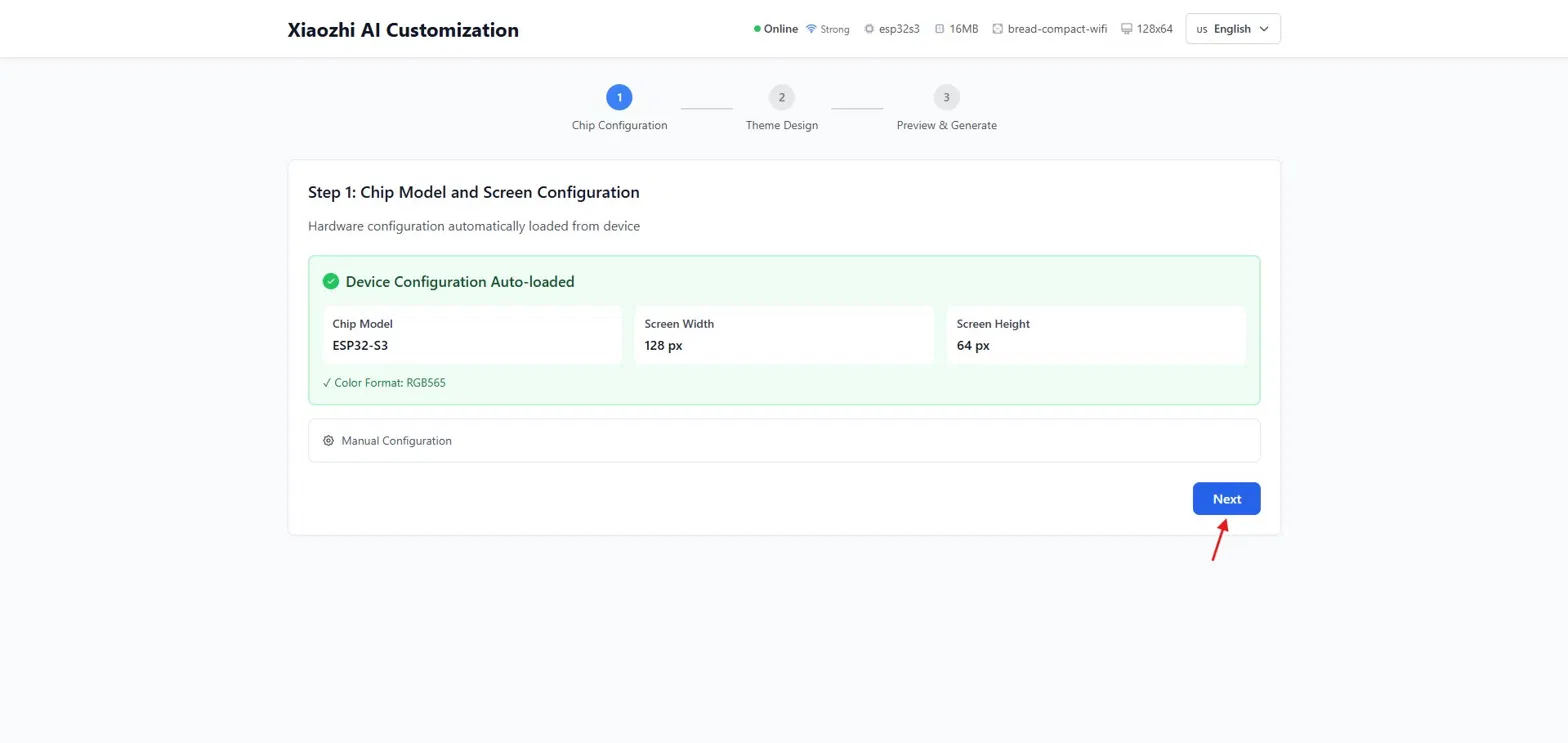
Auto-detects your chip (ESP32-S3) and screen (ST7735 128×160). Click Next.
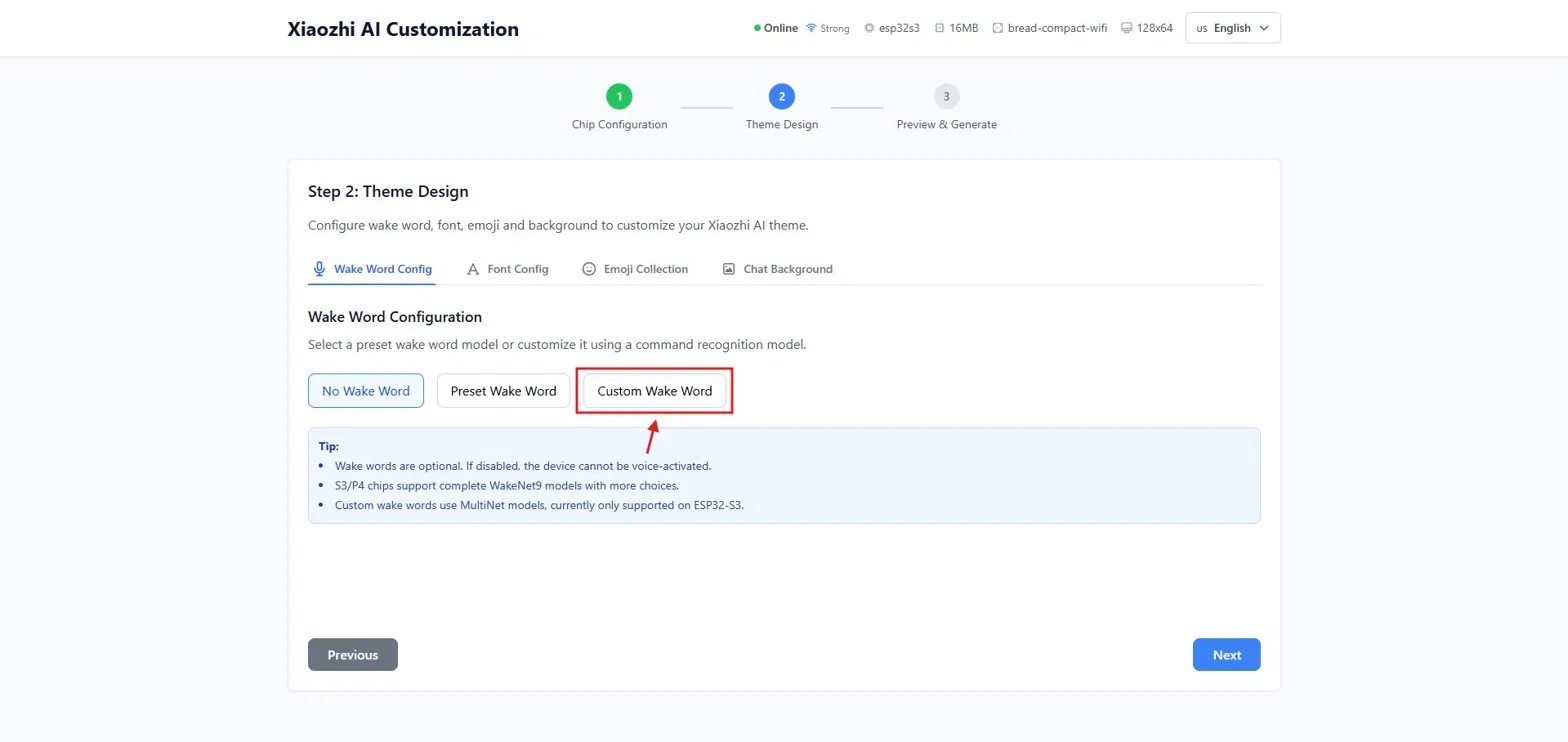
Four tabs appear: Wake Word Config, Font Config, Emoji Collection, Chat Background. Click "Custom Wake Word".
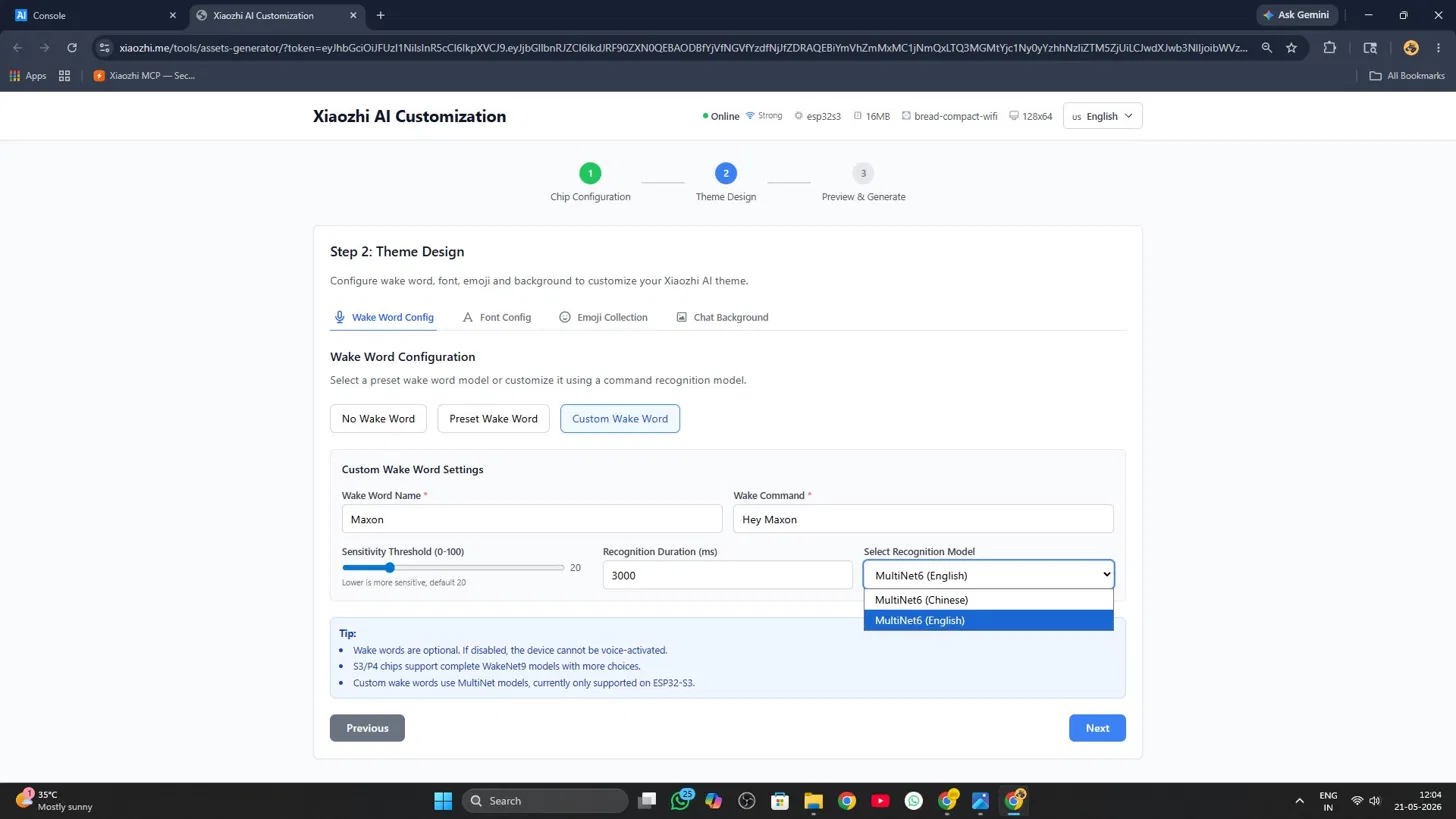
• Wake Word Name — a label (e.g., Maxon)
• Wake Command — the exact phrase to speak (e.g., Hey Maxon)
Keep it 2–3 syllables for best accuracy.

Choose MultiNet6 (English) for English commands or MultiNet6 (Chinese) for Chinese. Sensitivity threshold default 20 is fine.
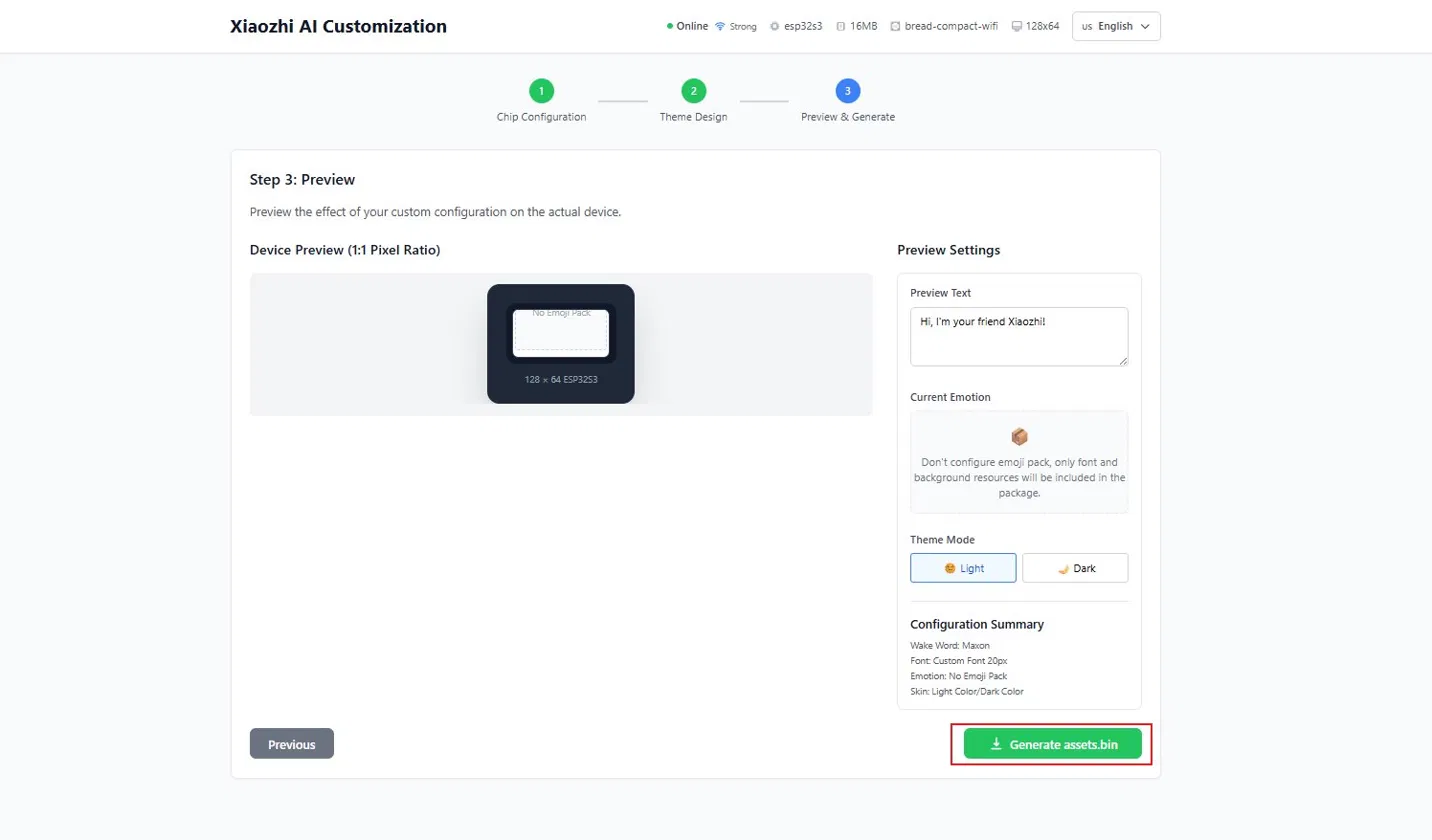
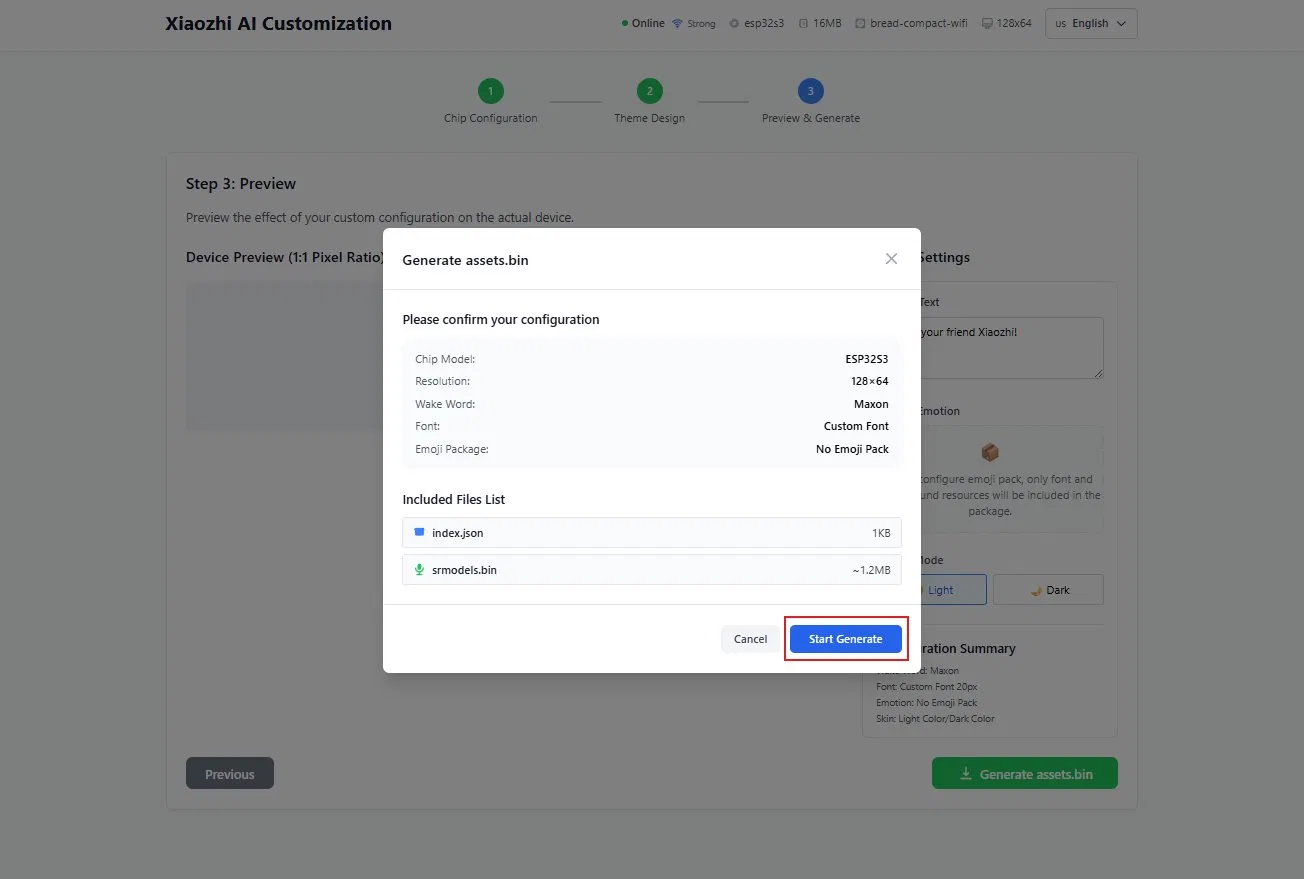
Step 3 shows a display preview simulation. Click the green "Generate assets.bin" button.
Summary shows Chip: ESP32-S3, Resolution 128×160 (ST7735), Wake Word. Files: index.json ~1KB, srmodels.bin ~1.2MB. Click "Start Generate".
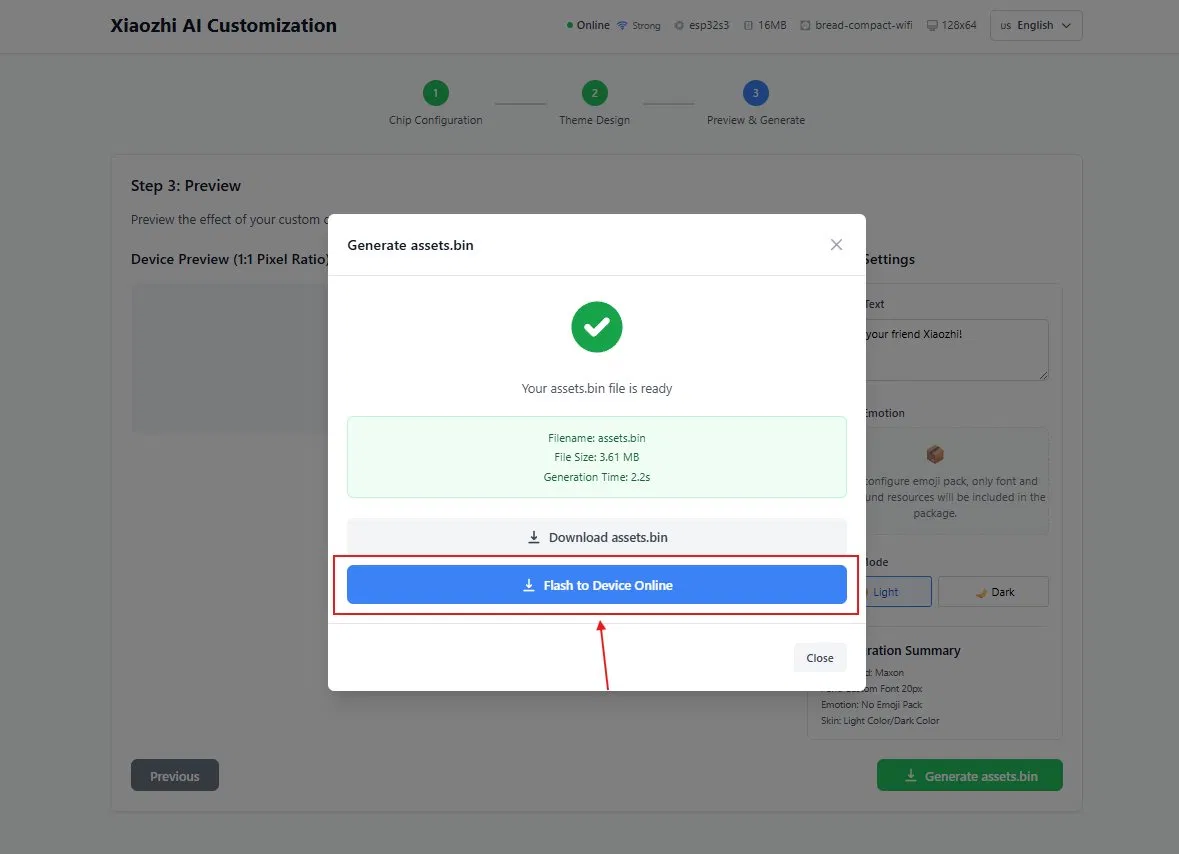
assets.bin generates in ~2s (3.61 MB). Ensure device is online, then click the blue "Flash to Device Online" button.
Progress bar shows upload in real time. ESP32-S3 speaks "Updating the System". Do not power off.
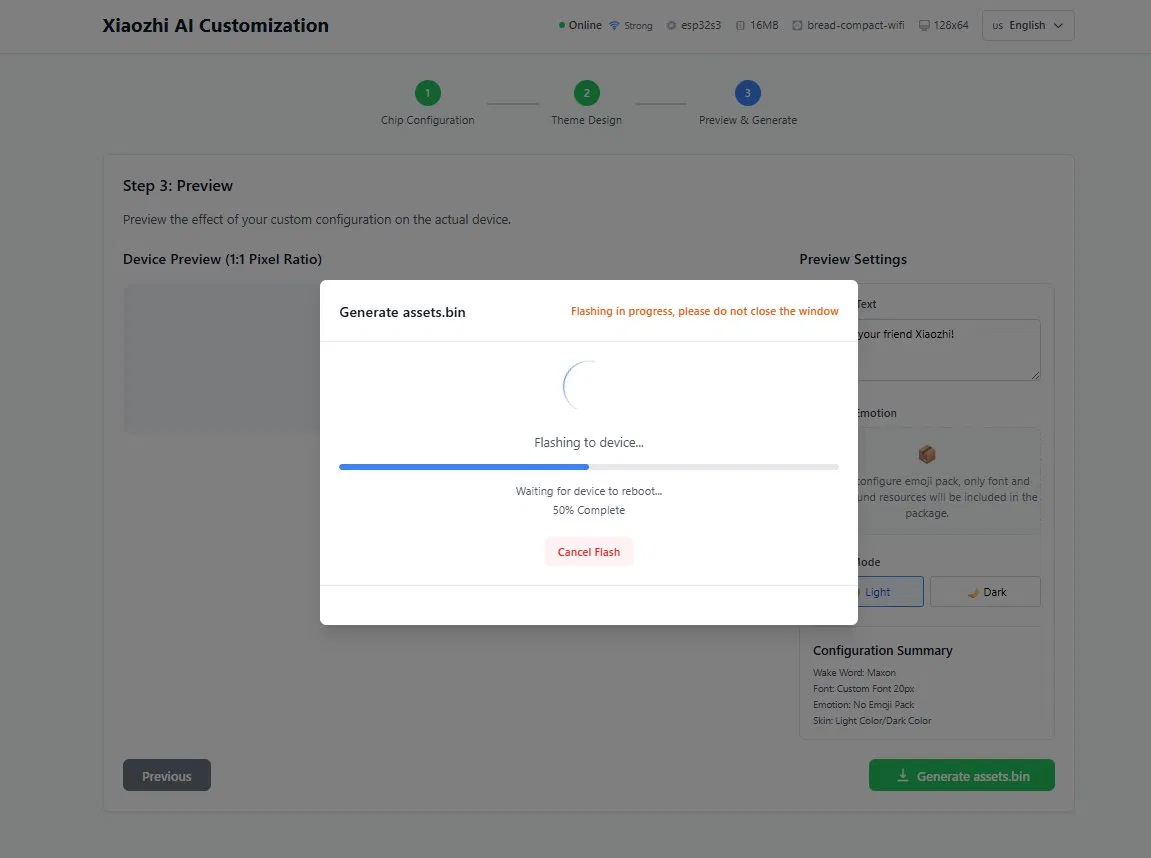
After flashing, the device reboots automatically. Once reconnected, say your wake phrase — the AI responds immediately.
Final Activation — Start Using Your AI
Save, reset, and bring your voice assistant to lifeYour device is flashed, paired, configured, and wake word is set. Complete this final activation sequence:
Click Save after configuring role, personality, and MCP tools.
Press the physical RST/EN button to apply all settings.
TFT display shows connecting → then face animation appears.
Speak "Hey Maxon" (or your phrase) — the AI activates and is ready.
Short press BOOT also wakes the AI if you prefer not to use wake word.
After silence, the device sleeps to save power. Wake word or BOOT activates it again.
Change role, voice, or language in the console. Save + hard reset to apply.
Repeat Customize → Generate assets.bin → Flash to use a different phrase.
Your AI Voice Assistant is Ready
You've built, flashed, configured, and set up a custom wake word on a fully functional XiaoZhi AI V2. Say your phrase and start talking.
Want It Pre-Built & Ready to Go?
Get a fully assembled, tested XiaoZhi AI S3 kit with wake word pre-configured. Power it on and start talking immediately.
Order on WhatsApp — +91 8535889926MCP Device Tools
Built-in tools accessible to the AI during conversationThe firmware exposes multiple MCP (Model Context Protocol) tools that the AI can invoke during conversation. Enable them in the xiaozhi.me console under MCP Services.
| Tool | Voice Command Example |
|---|---|
| self.camera.take_photo | "What do you see?" |
| self.audio_speaker.set_volume | "Set volume to 50%" |
| self.screen.set_brightness | "Dim the screen" |
| self.lamp.turn_on / off | "Turn on the lamp" |
| self.get_current_time | "What time is it?" |
| self.system.reboot | "Restart the device" |
| self.system.get_wifi_info | "What's my WiFi status?" |
Troubleshooting Guide
Common issues and how to resolve them.
- Use a good USB-C cable. Some cables are charge-only and do not carry data. Try a different cable.
- Reset the device. Press the RESET button while the flash page is trying to connect.
- Enter download mode. Hold BOOT, press RESET (still holding BOOT), then release BOOT. This forces download mode.
- Try a different browser. Google Chrome or Microsoft Edge are recommended.
- USB port power. Use a direct computer port, not a hub.
- Hotspot not appearing: Wait 15s after power-on. Press RESET if needed. If TFT lights up but no hotspot, reflash the firmware.
- 5GHz not visible: Expected. ESP32-S3 only supports 2.4GHz. Create a separate 2.4GHz IoT network.
- Keeps disconnecting: Weak signal or poor power. Use a quality power supply and move closer to the router.
- Not appearing in xiaozhi.me: Speak the pairing code clearly and ensure the device is connected before generating the code.
- No sound: Check MAX98357A wiring — BCLK=GPIO40, LRC=GPIO41, DOUT=GPIO39. Speaker connects to output terminals, not GND.
- Quiet or distorted: Use 4-8 ohm speaker. Try "Volume 100" to increase gain.
- Mic not picking up: Verify INMP441 — SD=GPIO42, WS=GPIO1, SCK=GPIO2. Sound hole must face you.
- Echo/feedback: Keep the mic away from the speaker.
- MCP tool off: In xiaozhi.me console, enable self.camera.take_photo under MCP Services.
- FPC connector: Ensure the ribbon cable is fully inserted and the latch clicks.
- Low light: The OV3660 needs adequate illumination. Add more light.
- "Take photo failed": Memory issue. Restart the device. PSRAM is already enabled in firmware.
- Normal warmth: ESP32-S3 at 240MHz with camera + display + audio runs warm. This is normal.
- Too hot: Check for short circuits on the breadboard. Ensure nothing touches the bottom of the CAM module.
- Random reboots: Power issue. ESP32-S3 draws up to 500mA. Use a 1A+ power source.
- Display flickering: Loose SPI connections or insufficient power. Recheck wiring and power.
Frequently Asked Questions
Quick answers to common questions about the project.
Do I need to know programming to build this?
No. The firmware comes precompiled. You just click the flash button, configure WiFi through the web portal, and pair via the xiaozhi.me website. No code writing required.
Can I use a different display or camera?
This firmware is specifically built for ST7735 1.8-inch TFT displays and OV3660 cameras. Different hardware would require firmware modifications. Check the official XiaoZhi AI GitHub for other board configurations.
Can I use this without the xiaozhi.me cloud service?
No. The firmware relies on the xiaozhi.me cloud for speech-to-text, AI inference, and text-to-speech. The device is not designed for offline use.
Is the free tier really free? What are the limits?
Yes, the free open-source tier is completely free. It uses the Xiaozhi Lite AI model which is capable enough for most conversations. Paid tiers offer better AI models, voice cloning, and higher usage limits.
Can I control home appliances beyond the lamp GPIO?
The lamp control is a simple GPIO14 toggle. You can connect a relay module to control higher-power devices. The firmware supports additional MCP tools that can be extended with custom development.
Can I change the UI after flashing?
Yes, by flashing the other firmware variant. The Normal UI shows a dashboard with clock, status, and AI responses. The WeChat UI mimics a chat messaging interface. Both are available as separate flashable firmware files.
How do I update the firmware later?
Simply repeat the flashing process. Your paired device will reconnect to xiaozhi.me after reflashing. No need to re-pair unless you want a fresh start.
Conclusion & Next Steps
What you built and where to go from here.
You Have Built a Voice-Powered AI Assistant
Complete with camera vision, display, and cloud AICongratulations. By following this guide, you have assembled and configured a fully functional AI assistant with:
- Voice interaction (push-to-talk via BOOT button)
- Visual AI recognition using the OV3660 3MP camera
- Color TFT status display (ST7735 1.8-inch)
- Cloud AI processing through xiaozhi.me
- Hardware control (lamp, brightness, volume)
- Customizable personality and language
- Two UI choices: Normal Dashboard or WeChat-style Messaging
This project demonstrates just how powerful modern microcontrollers have become. With built-in WiFi, camera interface, display support, and external sensor connectivity, the ESP32-S3 CAM is a versatile platform for AI edge devices.