Introduction
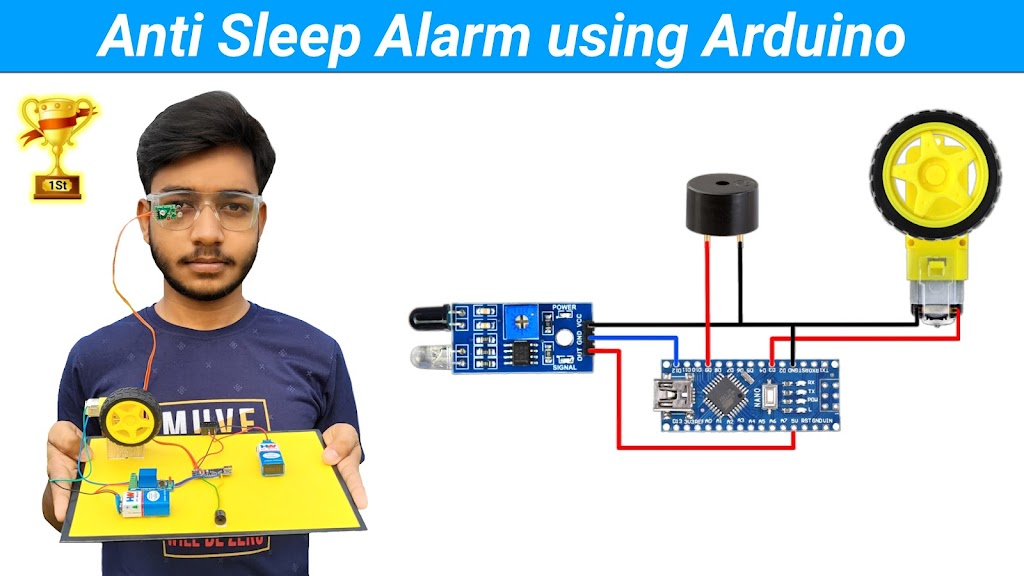
Transport officials say that 40% of road accidents are due to drivers falling asleep due to fatigue. They fall asleep while driving due to which many accidents happen. So today I will show you how to make an anti sleep alarm for driver’s to deal with it. This project works like this – When the driver keeps his eyes closed for more than 3 seconds, a buzzer and vibration will turn on and alert the driver to wake up. If the driver closes his eyes for less than 3 seconds or blinks his eyes, the buzzer and vibration motor will not turn on. This is how this project works. This is a very effective life saving project. You can make this project and show it in your school or college science project program or science fair or as an Inspire award project. In this tutorial I will show you how to make this life saving project in a very easy way.
Components Required
Connection Diagram

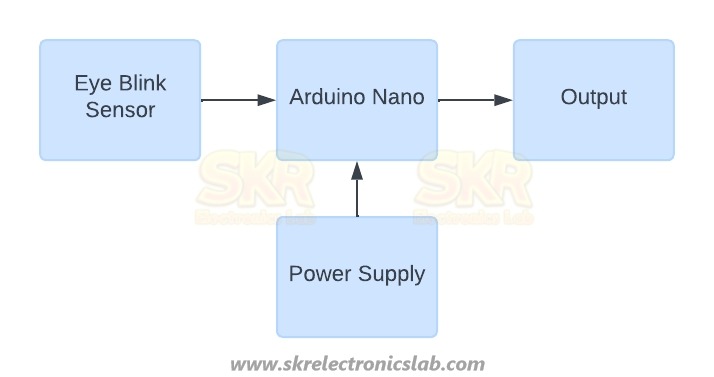
Block Diagram
How it works
1. Eye Blink Sensor
2. Arduino Nano
The main component of this project is the Arduino Nano board. The output of the IR sensor is given as input to Arduino. And we have programmed the Arduino in such a way that whenever the high signal from the eye blink sensor is received for more than 3 seconds, the Arduino will turn on the buzzer and vibration motor attached to the output pin of the Arduino. And if the high signal comes from the eye blink sensor for less than 3 seconds (means – when the driver is just blinking his eyes) then the Arduino will not turn on the Buzzer and Vibration Motor attached to its output pin. You can increase or decrease this timing by editing the code.
3. Output (Buzzer & Vibration Motor)
To alert the driver we have used a buzzer and a vibration motor which is connected to the output pin of Arduino.
4. Power Supply
We know that any electronic device needs a power supply to run. So we have used a 9V battery to provide power supply to this project.
5. Switch
We have used a switch to turn on and off the project.
Overall Operation
- First of all, the project is turned on by turning on the switch.
- Then the eye blink sensor will monitor whether the driver's eyes are open or closed and send the signal to the Arduino accordingly.
- Then the Arduino will calculate the signal received from the eyeblink sensor and see how long the driver's eyes are open and closed.If the eyes are closed for more than three seconds, Arduino will turn on the buzzer and vibration motor connected to its output pin. And if the eyes are closed for less than three seconds (like a normal person blinks) then the Arduino will not turn on the buzzer and vibration motor.
- The Buzzer and Vibration Motor will alert the driver and the driver will be saved from a big accident.
This is how projects works
Arduino Code
Due to some reasons, I am not able to provide the Arduino code for free. I have fixed a minimum price for the code. So if you are willing to get the code then please message me on Instagram. Instagram link – @skr_electronics_lab