Build Your Own XiaoZhi AI Voice Chatbot
Using ESP32 — Cute & Complete Guide 2026
✨ Learn how to build a fully functional AI voice chatbot using an ESP32 microcontroller and the open-source XiaoZhi AI firmware. Flash it via browser, configure your AI personality, and start talking in minutes — no coding required. Perfect for students, hobbyists, and makers. ✨
🐻❄️ Table of Contents
- Introduction — What is XiaoZhi AI?
- Required Components
- 🛒 Buy Ready-Made Project Kit
- Circuit Diagram
- How to Build on Breadboard
- Step 1 — Flash the Firmware
- Step 2 — Wi-Fi Configuration
- Step 3 — Create XiaoZhi Account
- Step 4 — Pair Your Device
- Step 5 — Configure AI Personality
- Features & Voice Commands
- You're Done!
✨ Introduction — What is XiaoZhi AI?
Open-source, voice-first AI on ESP32XiaoZhi AI (小智) is a revolutionary open-source firmware project that transforms a simple ESP32 microcontroller into a powerful, cloud-connected AI voice assistant. It supports real-time voice recognition, natural language understanding, and expressive text-to-speech — all tied to the xiaozhi.me platform. Whether you're a student building a college project, a hobbyist exploring IoT, or an educator demonstrating AI concepts, this project offers an accessible, hands-on introduction to embedded AI.
Unlike Amazon Alexa or Google Assistant, XiaoZhi gives you full control over your AI's personality, language, and behavior. You can configure it to speak Hindi, Hinglish, or English; give it a custom name and persona; and even connect it to external services like weather, music, and more — all for free using the open-source tier.
In this tutorial, we'll build the complete project from scratch — assembling the hardware circuit, flashing the firmware using a simple browser-based tool, and configuring a custom Hindi voice chatbot through the XiaoZhi cloud console. By the end, you'll have a fully functional voice AI assistant that you can further customize and expand.
🧸 Required Components
Everything you need to build this projectHere is the complete list of components needed to build the XiaoZhi AI Voice Chatbot circuit. All parts are easily available online or at your local electronics store. This project is ideal for school/college submissions and hobbyist experiments.
| Component | Description | Qty |
|---|---|---|
| ESP32 Dev Board | 38-pin variant recommended · Main controller | 1 |
| INMP441 I2S Mic | Digital I2S microphone · Captures voice clearly | 1 |
| MAX98357A Amplifier | I2S DAC + amp module · Drives speaker | 1 |
| 2W 4Ω Speaker | Small speaker for AI audio output | 1 |
| 0.96" OLED (128x64) | I2C interface · Shows pairing code | 1 |
| 5mm LED + 220Ω Resistor | Control using voice commands | 1 |
| Breadboard 400 Tie | For prototyping the circuit | 2 |
| Jumper Wires (M-M) | Male-to-Male · Various colors | ~20 |
| USB Micro-B Data Cable | Must support data (not charge-only) | 1 |
| Computer (Chrome/Edge) | Required for Web Serial flashing | 1 |
Get the Ready-Made XiaoZhi AI Kit!
Don't want to build from scratch? We offer a 100% tested and fully assembled XiaoZhi AI Voice Chatbot kit — just power it on and start talking. Perfect for quick demonstrations or as a gift. Whatsapp us for pricing and availability.
🔌 Circuit Diagram
Complete wiring for XiaoZhi AI Voice ChatbotThe circuit connects four key modules to the ESP32: an I2S microphone for voice input, an I2S amplifier + speaker for audio output, an OLED display for the pairing code, and a status LED. Study the diagram carefully before assembling.
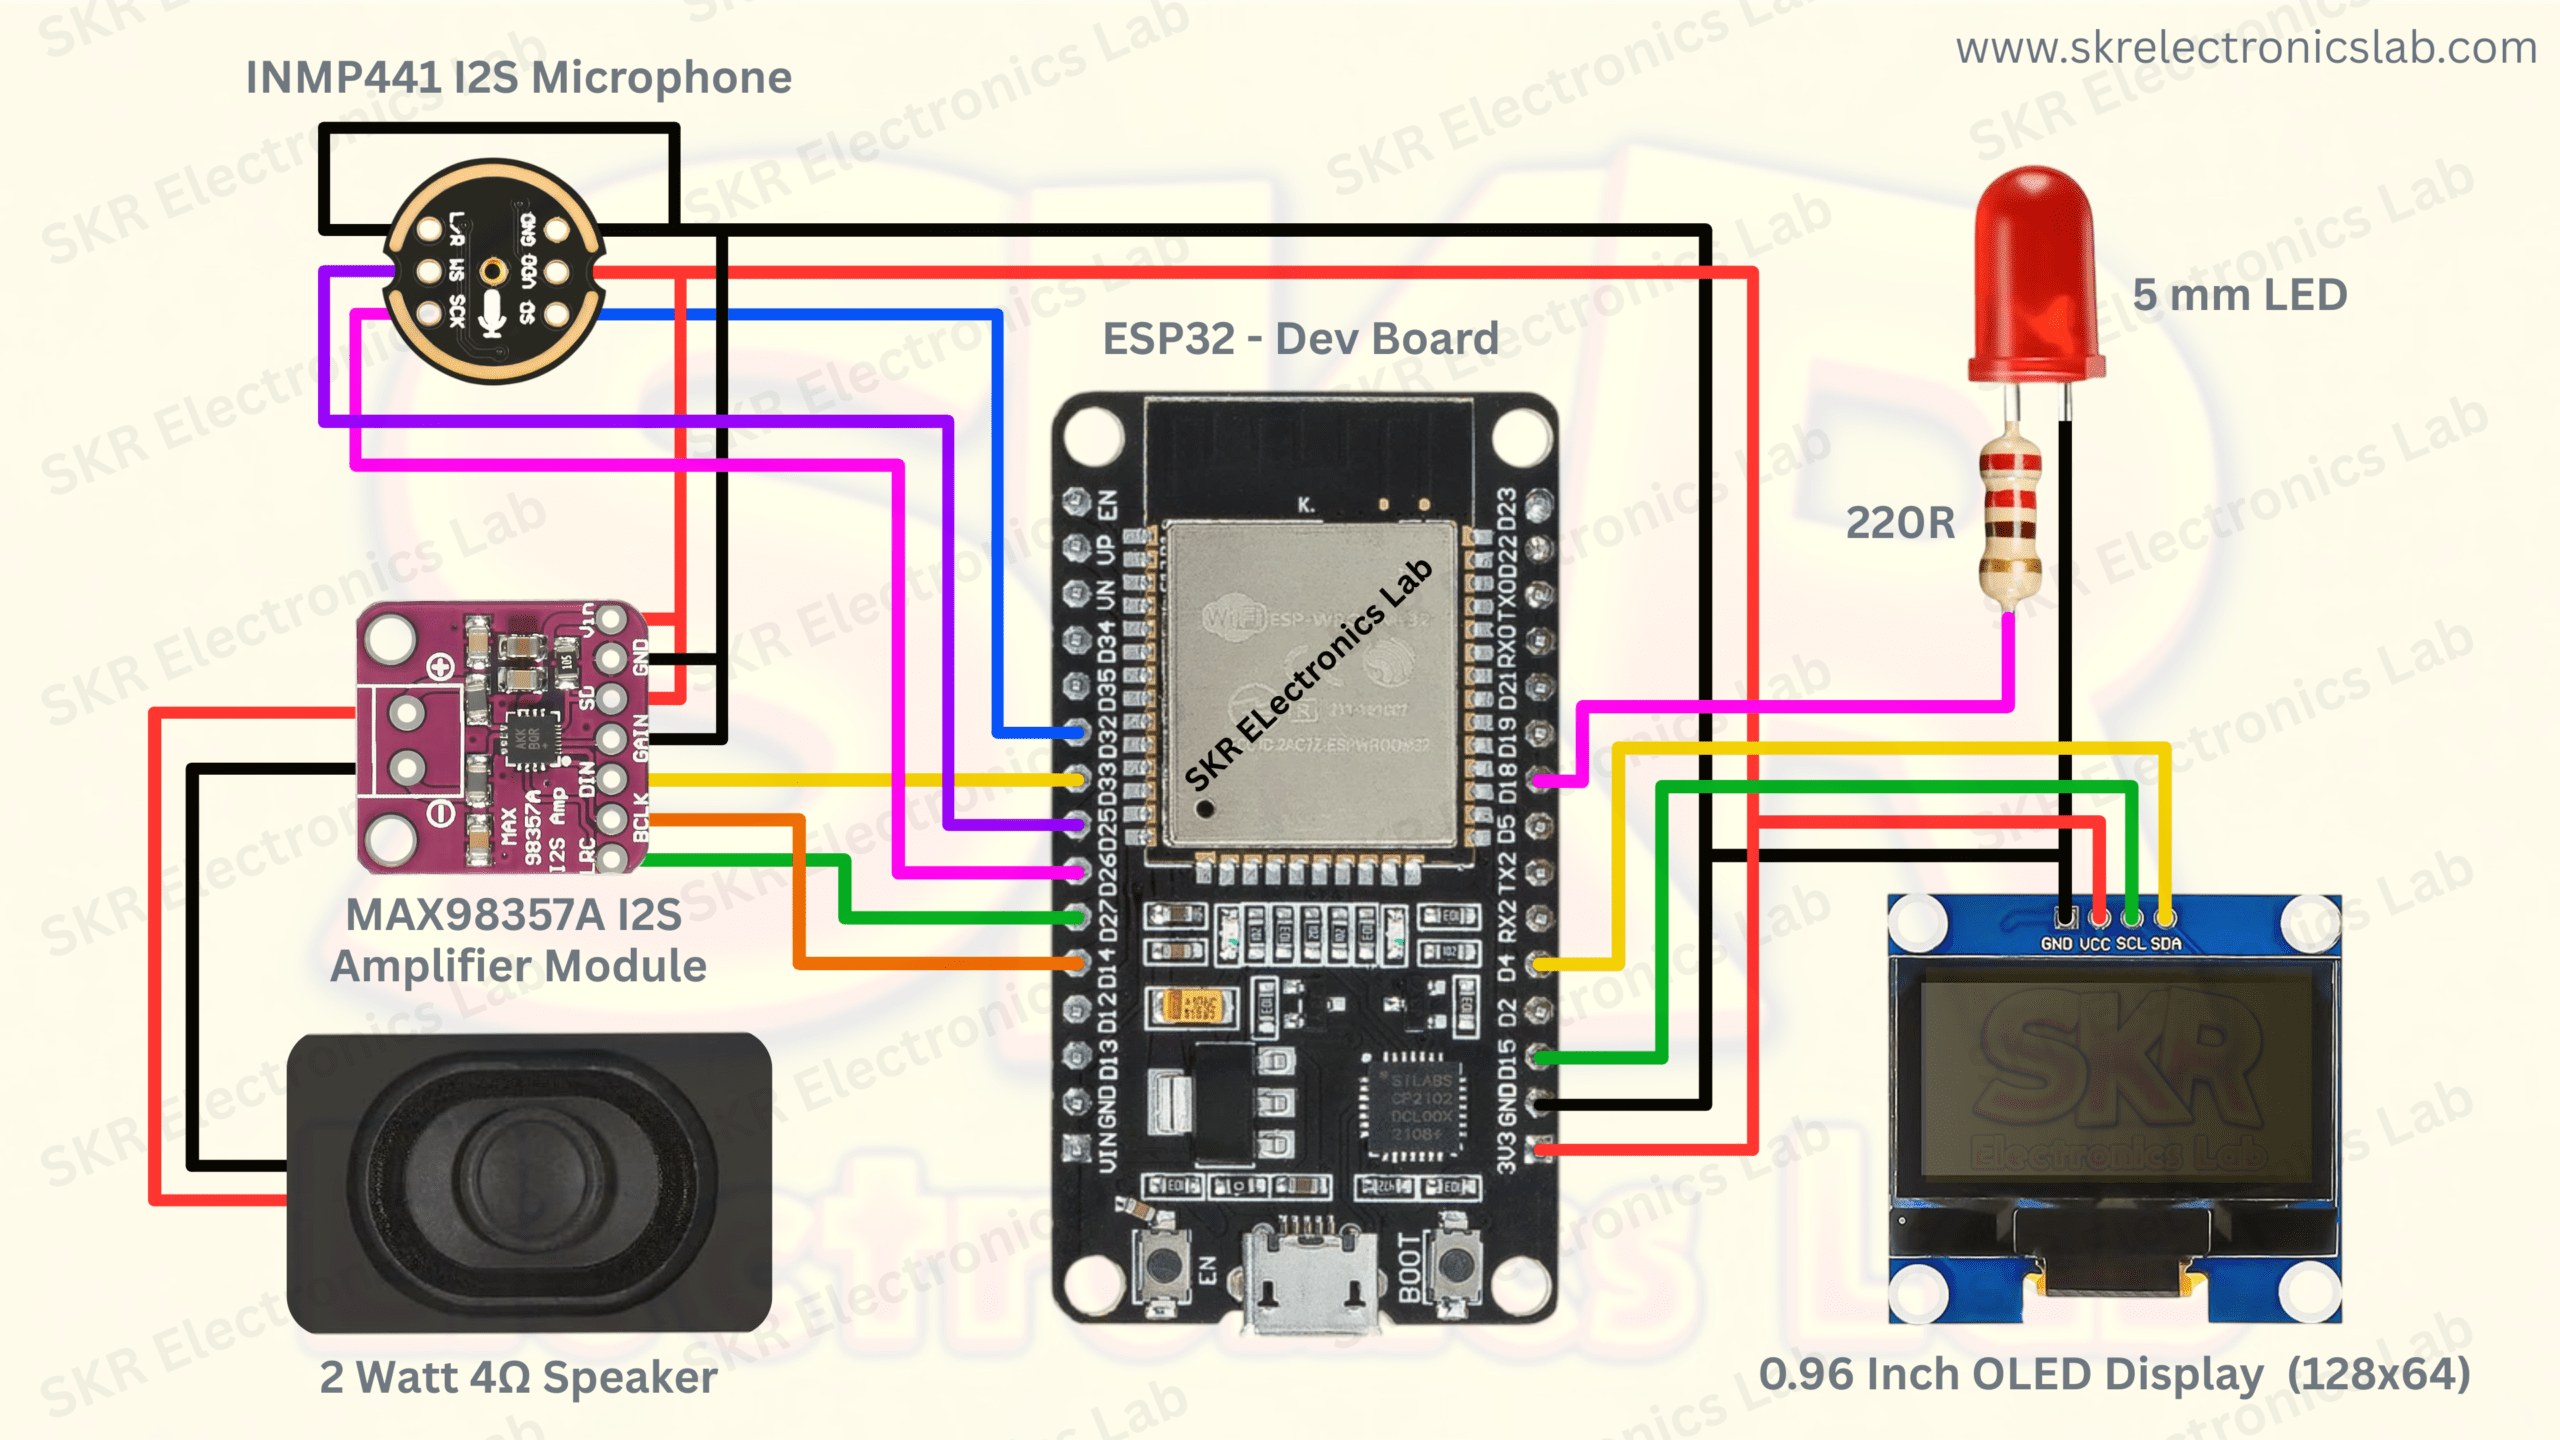
🐣Pin Connections:
- INMP441 Mic: VDD→3.3V, GND→GND, SD→GPIO32, WS→GPIO25, SCK→GPIO26, L/R→GND (on mic module itself)
- MAX98357A Amp: VIN→3.3V, GND→GND, LRC→GPIO33, DIN→GPIO27, BCLK→GPIO14, GAIN/SD→not connected
- OLED: VCC→3.3V, GND→GND, SCL→GPIO15, SDA→GPIO4
- LED: Anode→220Ω→GPIO18, Cathode→GND
- Speaker: SPK+ and SPK- to MAX98357A speaker output pads
🧵 How to Assemble on Breadboard
Step-by-step hardware assembly guideFollow these steps to assemble the circuit on a breadboard. Take your time — a clean build makes troubleshooting much easier. This is a great hands-on activity for students learning electronics and IoT.
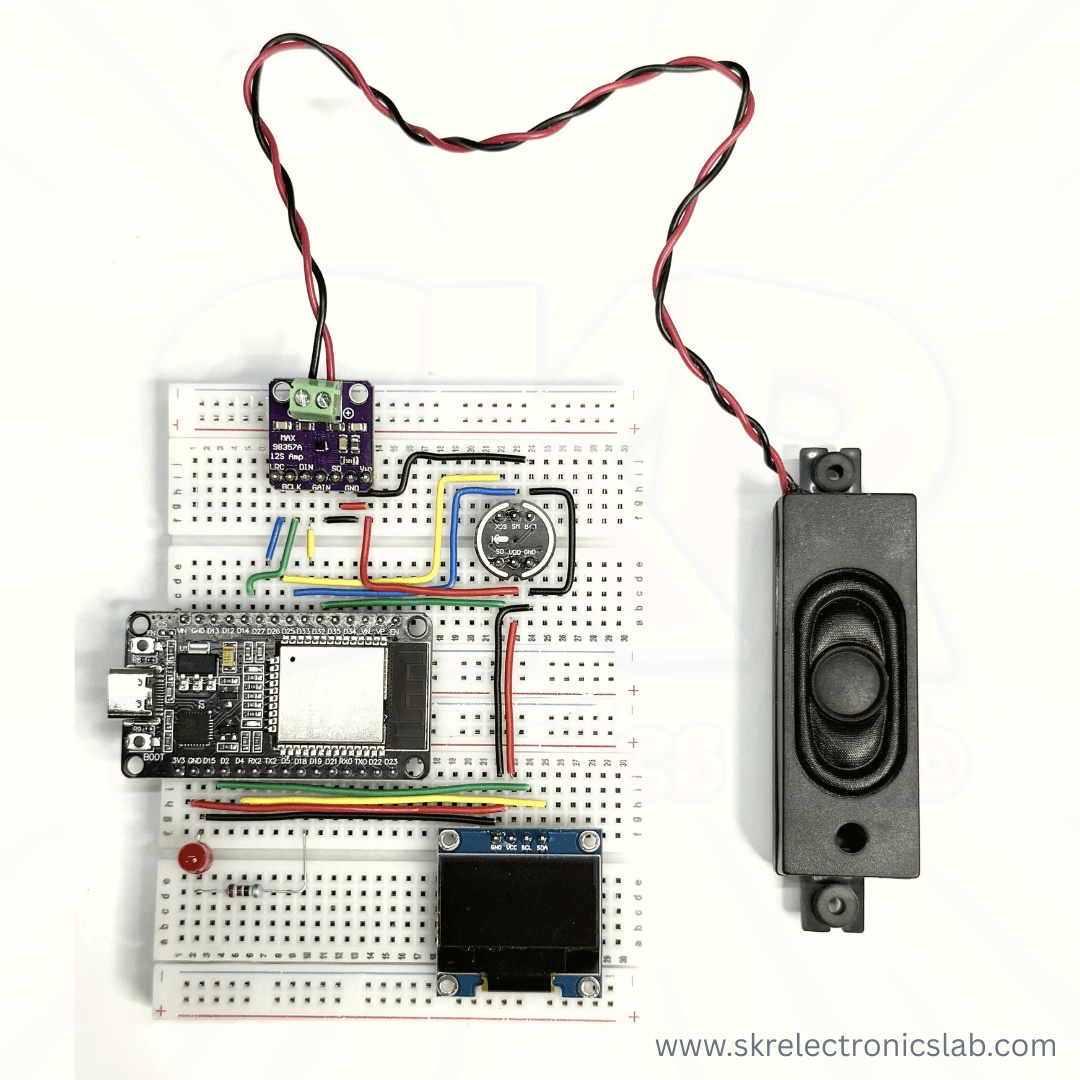
Seat the ESP32 dev board centrally across the breadboard's center gap.
Use red wire from ESP32's 3.3V pin to positive rail, black from GND to negative rail.
VDD→3.3V, GND→GND, SD→GPIO32, WS→GPIO25, SCK→GPIO26, L/R→GND on mic module.
VIN→3.3V, GND→GND, LRC→GPIO33, DIN→GPIO27, BCLK→GPIO14.
Speaker positive to SPK+, negative to SPK- on MAX98357A output pads.
VCC→3.3V, GND→GND, SCL→GPIO15, SDA→GPIO4.
GPIO18 → resistor → LED anode (+). Cathode to GND.
Visually verify every wire against the circuit diagram before plugging in USB.
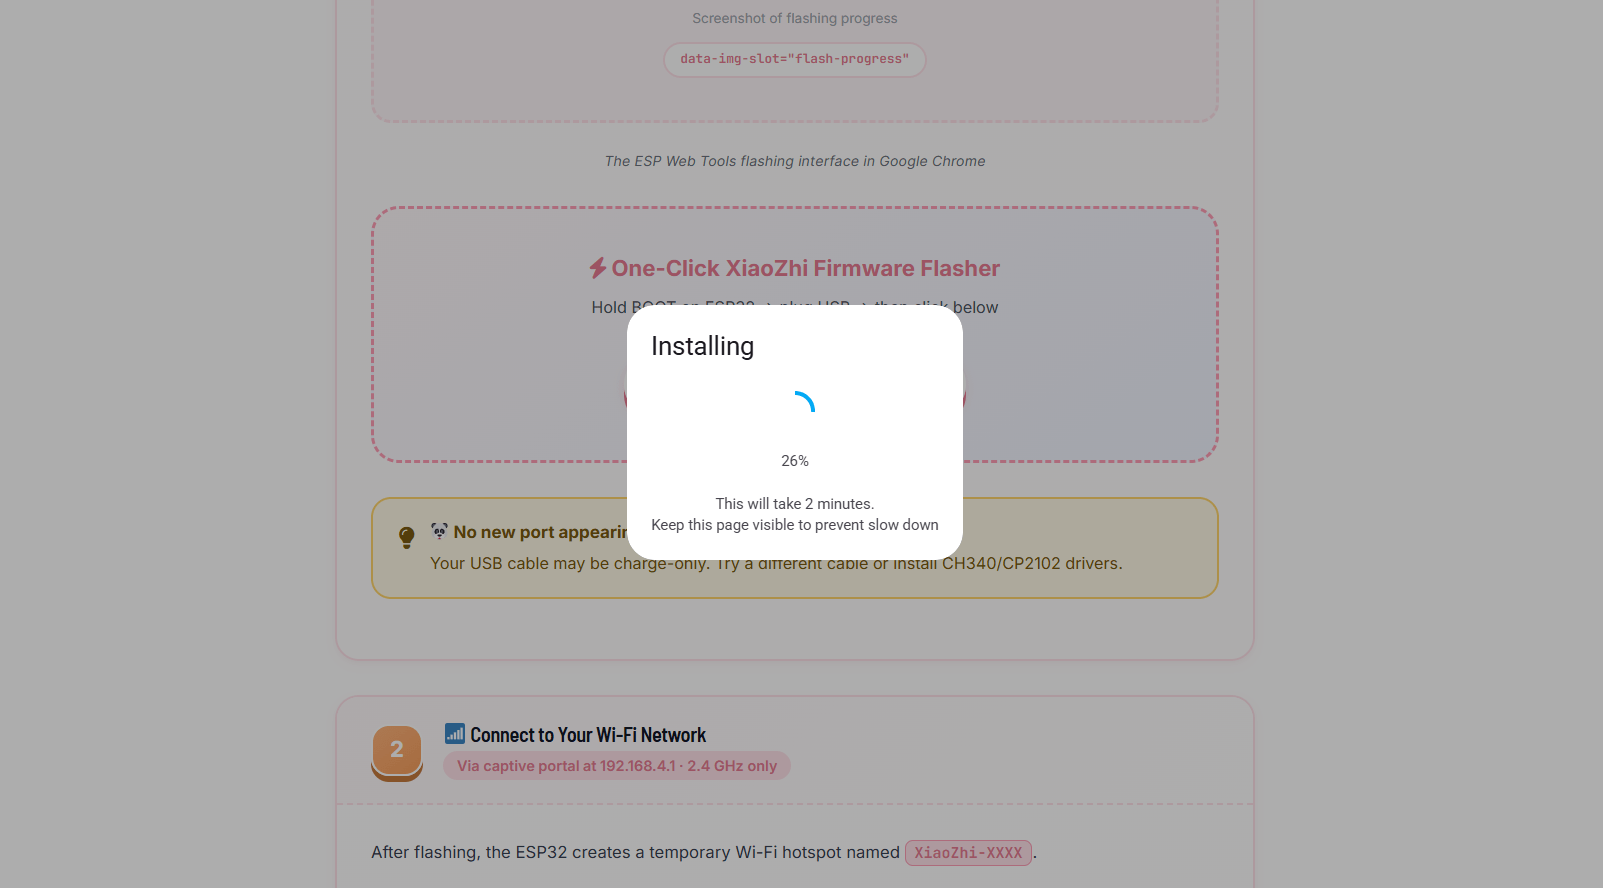
⚡ Flash the XiaoZhi Firmware via Web Flasher
Browser-based · No drivers · ~2 minutesThe XiaoZhi firmware is flashed directly from your browser using ESP Web Tools — no Arduino IDE, no drivers needed. Use Google Chrome or Microsoft Edge on a desktop.
Note the ports currently listed.
Keep holding BOOT.
That's your ESP32. Select it and click Connect.
Enabling Erase Device is recommended.
Progress bar shows flashing. Once complete, release BOOT.
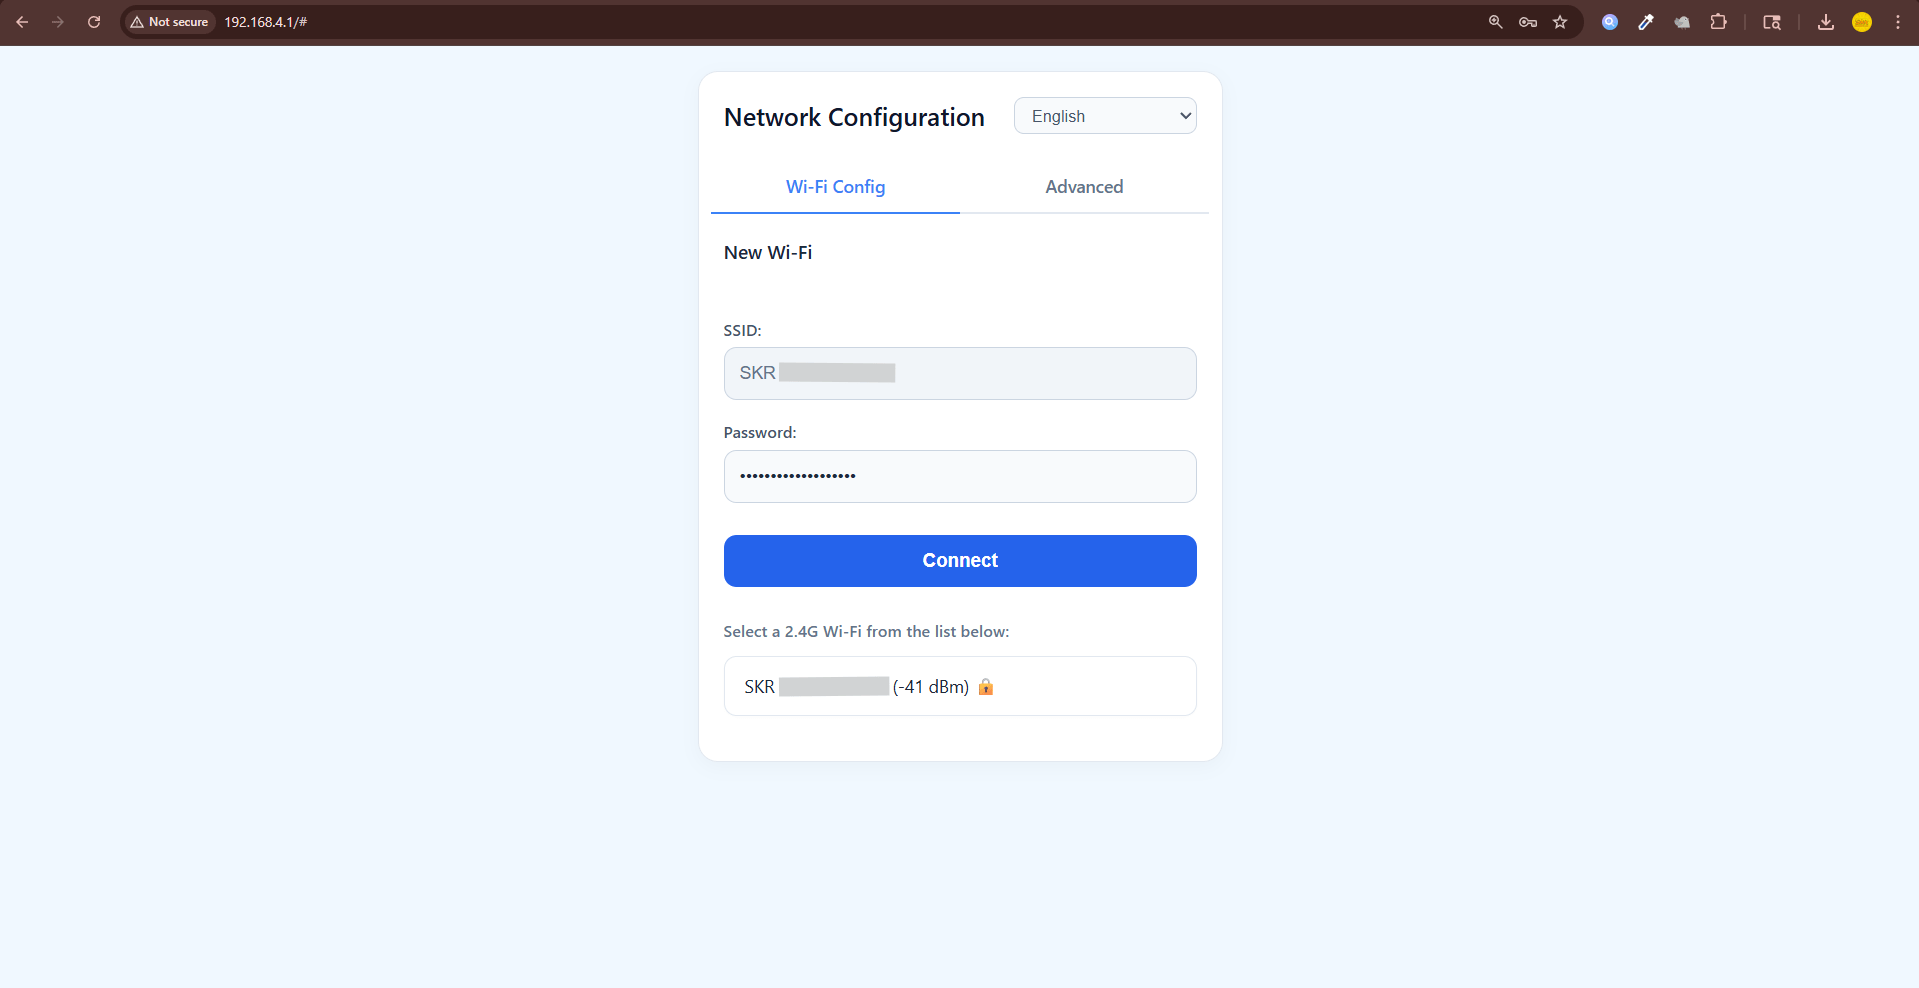
📶 Connect to Your Wi-Fi Network
Via captive portal at 192.168.4.1 · 2.4 GHz onlyAfter flashing, the ESP32 creates a temporary Wi-Fi hotspot named XiaoZhi-XXXX.
No password needed.
You'll see the Network Configuration portal.
SSID auto-fills.
Type carefully.
Device will restart and join your network.
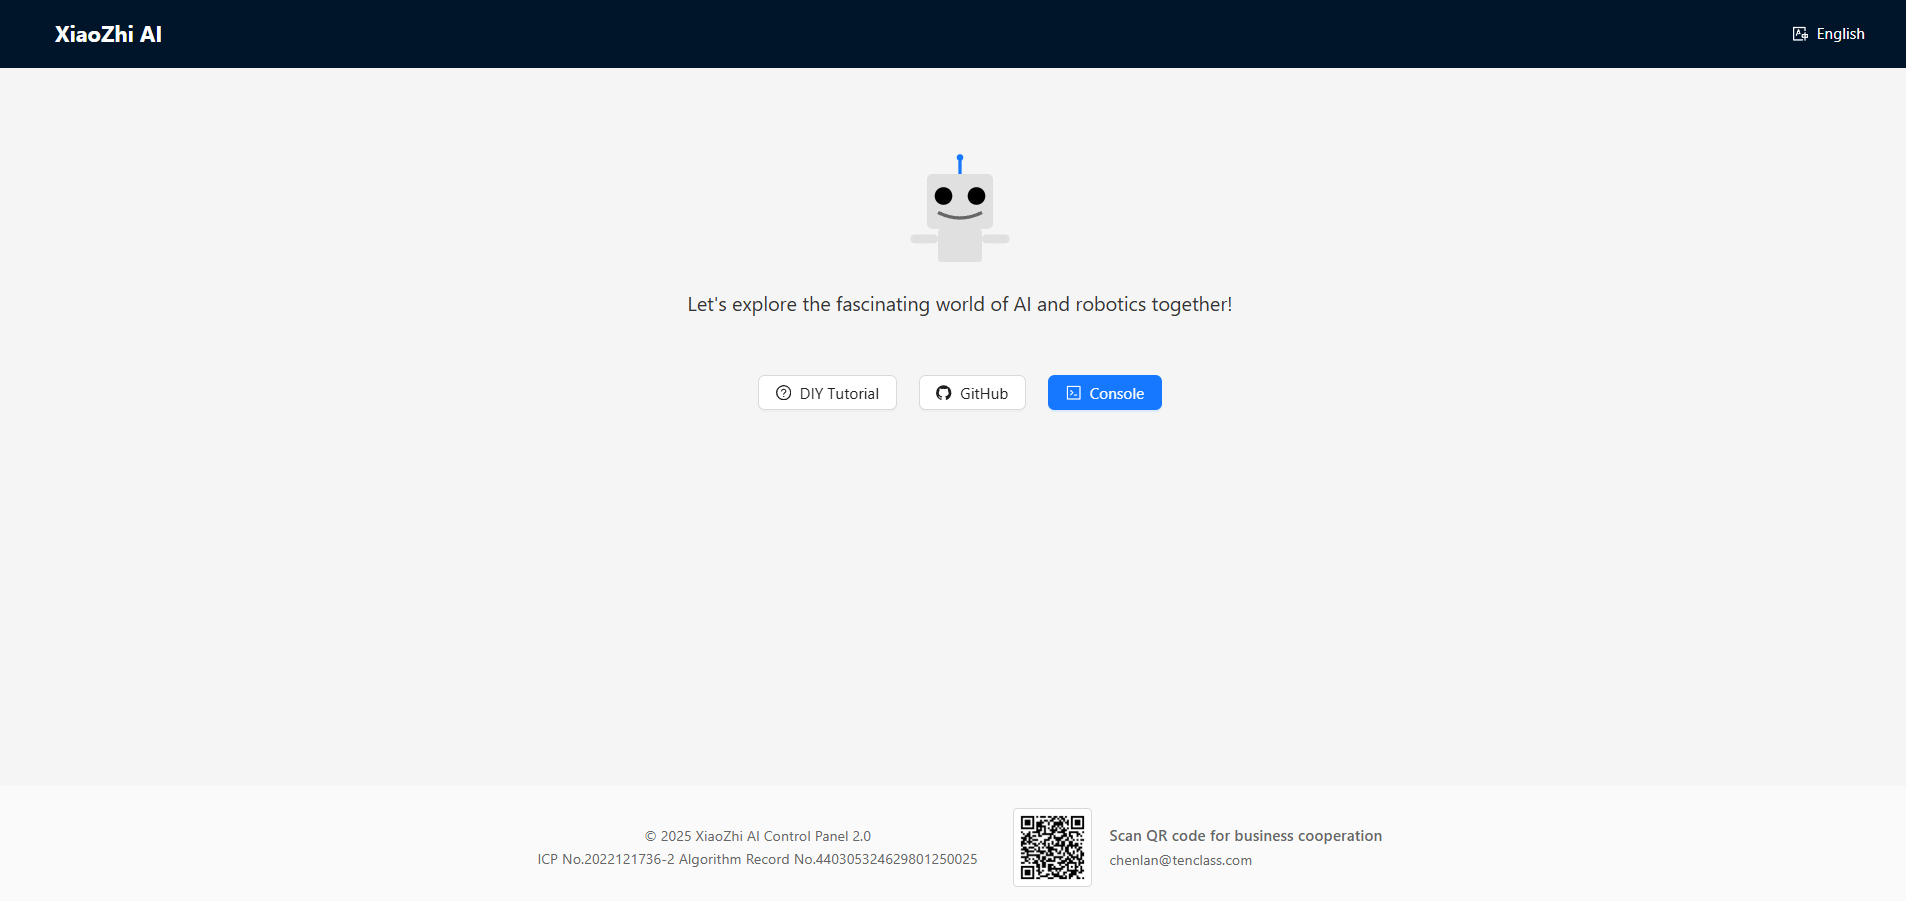
🧑💻 Create Your XiaoZhi AI Account
Free account at xiaozhi.me · Google login recommendedBefore pairing, create a free account at xiaozhi.me.
Switch back from XiaoZhi hotspot.
Click "Console".
Fastest method.
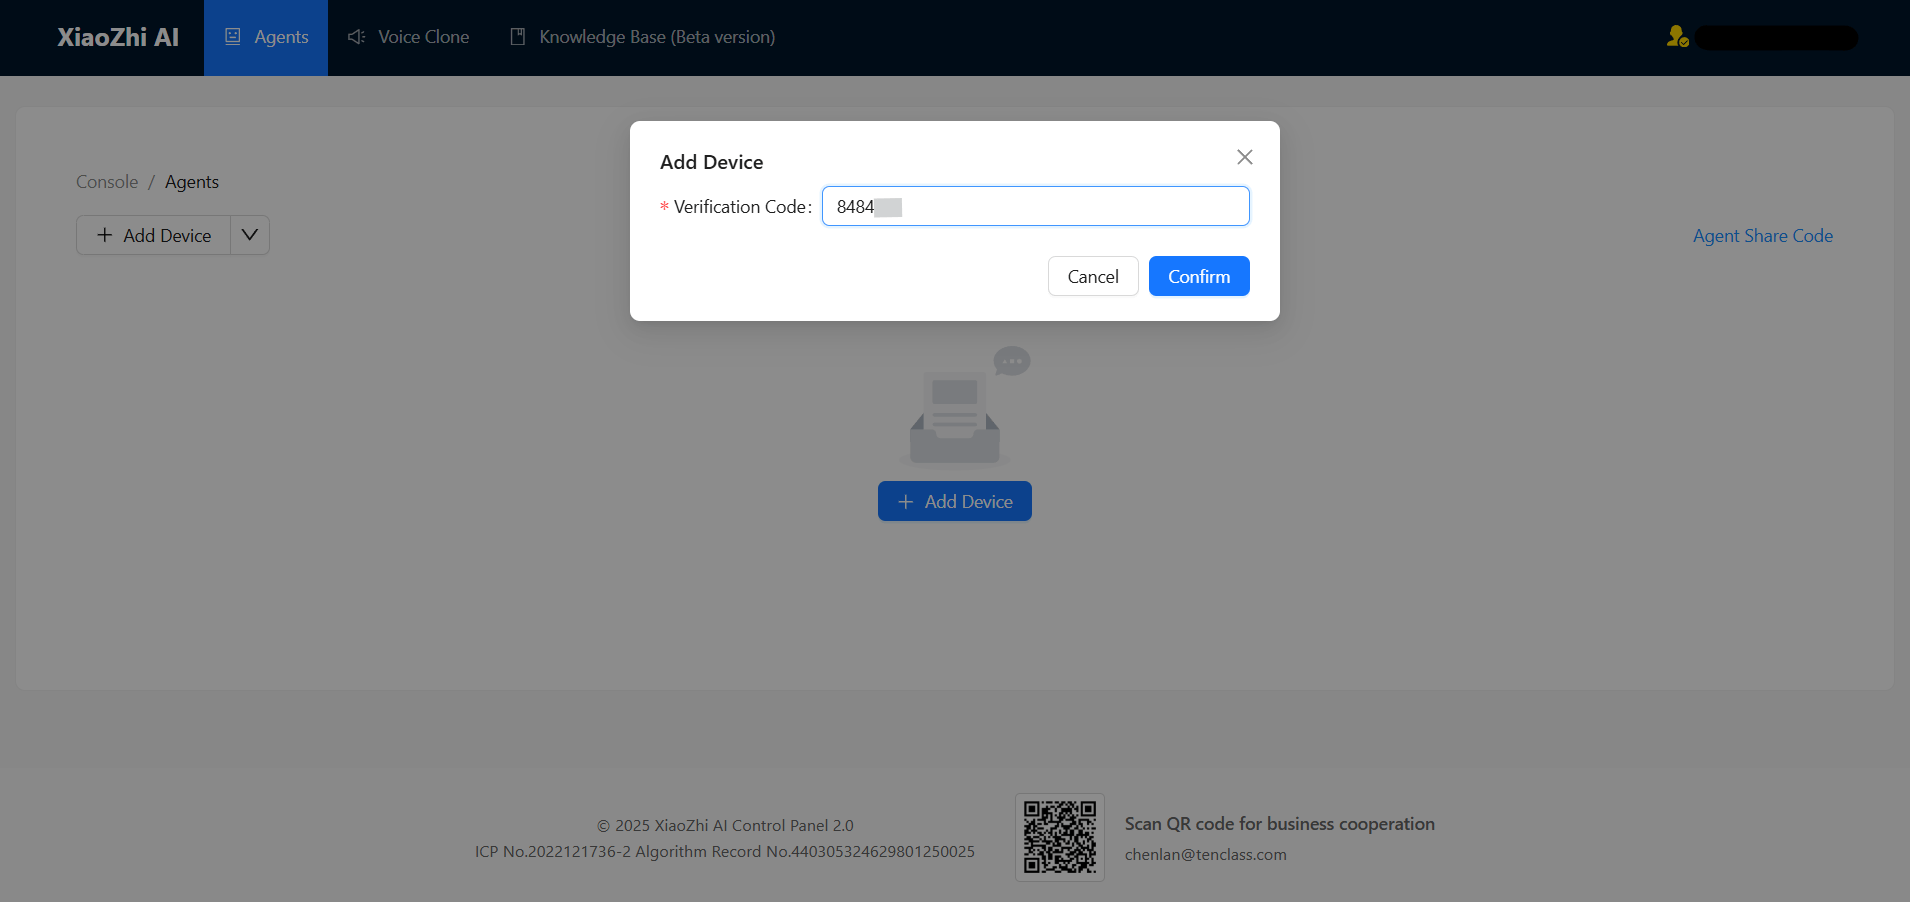
🤝 Pair Your ESP32 Device
Enter the 6-digit code shown on your OLED displayDialog appears.
Act quickly — it refreshes.
Device links to account.
Select Open Source (Free).
🎭 Configure Your AI Agent's Personality
Set name, voice, language, role prompt & advanced settingsThis is the most exciting step — you get to design your AI's identity. Click "Configure Role" on your device card to open the full configuration panel.
Here's what every setting in the Configure Role page does:
| Setting | What It Does | Recommended |
|---|---|---|
| Assistant Name | The name the AI calls itself when greeting you | Anything you like — e.g., "Jarvis" or "Mitra" |
| Dialogue Language | Primary language the AI speaks in voice | Chinese (default), or switch to your preferred language |
| Voice Role | The voice/accent used for TTS (Text-to-Speech) | Try different voices and pick what sounds best |
| Role Introduction | The system prompt — AI's full personality & instructions | Use the generator below to craft a perfect prompt |
| Memory Type | How the AI remembers past conversations | Memory (Short-term) for context awareness |
| Language Model | The AI brain powering responses | Xiaozhi Lite (free tier, fast & capable) |
| Voice Recognition Speed | How fast the speech-to-text processes your voice | Normal (adjust if it mishears you) |
| Character Speech Speed | How fast the AI talks back to you | Normal — slower for easier comprehension |
| Voice Pitch | Low to High slider for the AI's vocal pitch | Center position is natural; adjust to taste |
| Official Services (MCP) | Built-in tools the AI can use: Weather, Jokes, Music, etc. | Keep Weather & Music enabled for richer interactions |
Use the interactive prompt generator below to create a detailed, personalized system prompt that defines your AI's behavior, tone, and knowledge.
🐻❄️ Features & Voice Commands
What your XiaoZhi AI can do out of the boxVoice Volume Control
Say "Volume 50%" or "Increase volume".
Display Brightness
"Increase brightness" / "Dim screen".
Live Weather
"What's the weather in Mumbai?"
Music Playback
"Play Hindi music".
Jokes & Fun
"Tell me a joke".
Conversation Memory
Remembers context.
Auto Sleep Mode
Press BOOT to wake.
OTA Updates
Change personality anytime.
Multilingual
Hindi, English, Hinglish.
🎉 Save, Reset & Launch Your AI!
You're one step away from talking to your very own AI voice assistantYou're one step away from talking to your very own AI voice assistant. Perform these final steps to bring it to life.
Save your configuration changes in the xiaozhi.me console.
Press the physical Reset/EN button on the ESP32 board.
A short press wakes the agent and starts listening mode.
Say "Hello" or your wake word to begin.
Using Your AI Voice Assistant — Daily Tips
Activate: Press the BOOT button
A short press on the BOOT button wakes the agent and starts the listening mode. The OLED will show it's active.
Auto-sleep after silence
After a few seconds of no conversation, the device automatically goes back to sleep to save power. Simply press BOOT again to wake it.
Change personality anytime
You can go back to xiaozhi.me/console at any time to update the Role Introduction, switch voice, or change language. Hit Save and reset the ESP32 for changes to take effect.
MCP Tools (Weather, Music, Jokes)
With Official Services enabled in MCP Settings, your AI can fetch live weather, play music, or tell jokes when you ask. Make sure you enabled them in Step 5.
🎉 Your AI Voice Bot is Ready!
You've successfully built, flashed, and configured your own XiaoZhi AI voice chatbot. Press BOOT and start talking! Share your creation with friends, or use it as a unique project submission.
🐼 Want It Pre-Built & Ready to Go?
Skip the building and get a fully assembled, tested XiaoZhi AI kit delivered. WhatsApp us for pricing!
Order on WhatsApp — +91 8535889926